Noa’ia, greetings. Last week, we rang in to focus on using the telephone as a verbal tool for communicating with other healthcare professionals and customers. We’re hanging up on that now and shifting to a written channel of communication and (post mail’s modern counterpart) the humble email.
Email is a common communication tool that pharmacy technicians use to interact and collaborate with other healthcare professionals.
Take a few minutes now to create a list outlining how, when and why pharmacy technicians might use email when collaborating with other healthcare professionals in their daily work. If you get stuck, reflect on how you observe your colleagues using email at your work placement.
When you’re ready, select the (+) symbol to compare your answers.
Pharmacy technicians may use email for the following:
- Prescription orders: Pharmacy technicians may receive electronic prescriptions via email from healthcare providers, which they then process and prepare for dispensing.
- Medication enquiries: Healthcare professionals may send or receive emails seeking information about medication availability, dosages, interactions, alternatives, costs and funding.
- Medication recalls or alerts: Pharmacy technicians may receive emails notifying them of medication recalls, shortages, or safety alerts from pharmaceutical companies or regulatory agencies.
- Administrative communication: Pharmacy technicians may exchange emails with colleagues, supervisors, or administrative staff regarding scheduling, staffing, inventory management, or policy updates.
- Collaboration requests: Healthcare professionals may email pharmacy technicians to request collaboration on patient care plans, medication therapy management, or adherence monitoring.
Writing effective emails
Have you had to write emails in a workplace or professional setting? Apart from dialling down the slang and emoji use, there are a few guidelines to remember when writing effective emails in the workplace. For general guidance, read this article from Mind Tools and watch the video (that looks like the image below) that is embedded in the article: Writing Effective Emails.

Emails in the pharmacy
Let’s emphasise this point from the MindTools article:
Email has long been a core tool for business communications, but according to research, 50 percent of emails and texts are misunderstood.
Imagine how catastrophic misunderstood emails could be in a pharmacy setting! Using your knowledge of the content of communications for a pharmacy, consider at least two consequences that could happen from miscommunicating an email message. When you're ready, select the (+) symbol below.
A miscommunication over email could lead to the following:
- prescription errors
- patient safety concerns
- confidentiality breaches
- missed inventory or incorrect supply orders
- tension between staff.
As you can see, workplace emails in a pharmacy setting differ in some respects from emails in other workplaces, as they are centred on patient health, safety and privacy. This means that there are some extra considerations to make before hitting ‘Send’ on an email. Specifically, you must consider the following:
- Patient confidentiality: Ensure patient information shared via email is handled securely and complies with privacy regulations.
- Secure communication platforms: Use secure email platforms to transmit sensitive information securely and protect patient confidentiality.
- Accuracy of information: Double-check all medication-related information, dosage instructions, and patient details before sending the email to prevent errors that could compromise patient safety.
- Urgency: Due to the critical nature of medication-related information, pharmacy emails may require a higher degree of urgency than emails in other workplaces to ensure patient safety and well-being.
Journal post
email communication
Enough reading! Let's jump into the pharmacy and put your email skills into action. This journal post activity has three parts. It will allow you to reply to a workplace email, review an example email response, and reflect on your email writing skills.
PART ONE
Complete the following Documentation Tool before reading Part Two and Part Three. As you know, drawing on your knowledge, experience, and skills to apply them in a real-world scenario helps you to learn.
PART TWO
After you sent the email, your colleague Jenny told you that she had actually drafted the reply email to Brian earlier but had been distracted by a customer and hadn't hit send. She thanks you for following up and asks if you can delete her draft email reply in the shared inbox. However, before you delete it, you read through her email reply to learn if she wrote anything differently to you.
Now, select the (+) symbol to review Jenny's draft response to the same email.
- First, read through the email and note how Jenny has worded her reply.
- Then, select each ‘i’ icon to read her reasoning behind her email format.
Tip: You can enlarge Jenny's email by selecting the fullscreen icon at the bottom right of the activity.
Reflection question
- Compare this email to your email reply. If you could rewrite your response, is there anything that you would change to your email? If so, what and why?
PART THREE
- Upload your completed Documentation Tool activity and your answer to the reflection question to a new journal post, 'Email Communication'.
- Publish the post to 'All course users'.
- Save the permalink to your Index of Journal Posts, and make sure to check back at a later date for tutor feedback.
Key points
In summary, the following are important key points for communicating and collaborating with healthcare professionals using email.
- Include a descriptive subject line when sending an email.
- Use an appropriate and professional greeting.
- Address the recipient appropriately.
- Use a polite and professional tone.
- Use clear, concise, and professional language.
- Provide relevant information and answers to all the questions asked by the sender.
- Ensure a logical flow and format.
- Include an appropriate, courteous sign-off that identifies who you are and what your role is.
- Ensure correct spelling and punctuation - proofread before sending.
- If this isn’t your strong suit, ask a colleague to review the email for you or use a spelling and grammar check like Grammarly or Hemmingway Editor.
- Check that you have correctly selected the intended recipient.
- Check that you have not selected ‘Reply all’ unintentionally.
Communication wrap-up
Over the last few weeks, we have covered why effective communication is essential when working with other healthcare professionals and how to use it. Bring your learning to the front of your mind with this end-of-topic pātaitai (quiz). Answer the seven following multi-choice questions.
If you don’t hit 100%, don’t be discouraged. The old adage ‘learn from your mistakes’ is true, as making mistakes allows you to analyse what went wrong and why, leading to a deeper understanding and retention of knowledge. You’ll also see how these mistakes can happen in the real world.
Self-directed learning activity
Communicating with healthcare professionals
Now, you’re officially a communicating aficionado! You can educate, support, and interact professionally with patients, as well as collaborate effectively with other healthcare professionals. For this week’s SDL, you will need to review our previous sessions on communication with other healthcare professionals.
- Create a new journal post, ‘Communicating With Healthcare Professionals.’
- Answer the following questions.
- Publish your post to ‘All course users’.
- Save the permalink to your Index of Journal Posts.
Questions
- What insights have you gained from this topic?
- It might be a reminder or reinforcer of something you already knew, a new concept or idea or something that you will put into practice in the workplace.
- Do you have any further questions about your role as a pharmacy technician communicating with other health professionals?
- How confident do you feel in effectively communicating with other healthcare professionals? If your confidence hasn't increased over the course of this topic, what can you do to improve this?
That wraps up our discussion on communication with other healthcare professionals for this week. Ka pai temahi, good work!

Introduction
Welcome back to Dispensing 2. This week, we will start our initial exploration of aseptic compounding, which will continue for three weeks. Over that time, we will discuss:
- Contamination control
- Clean rooms
- Quality control.
Tip
You will encounter lots of new and unfamiliar terminology related to this topic; therefore, it is well worth creating either a separate glossary for this topic or adding to your existing personal glossary.Me ruku ki te kaupapa, let’s dive into the topic.
Aseptic compounding
Aseptic compounding refers to the process of preparing sterile medications in a controlled environment to prevent contamination. It can be carried out in various settings, including hospitals, compounding pharmacies, and other healthcare facilities. These environments are equipped with sterile compounding areas where pharmacists and pharmacy technicians prepare sterile medications to meet specific patient needs.
Contamination control
Contamination is the presence of an unwanted constituent, contaminant or impurity in a material, such as microbes. It is important to remember that microbes exist everywhere – this includes people, objects, and surfaces. Microbes have the ability to survive for days or even weeks on surfaces, leading to a persistent source of contamination.
Journal post
Aseptic Terminology
Let’s recap some terminology.
- Create a journal post with the title ‘Aseptic Terminology.’
- Write a definition for each of the following terms:
- Microbe
- Microorganism
- Pathogen
- If you haven’t already, make sure that you add these words to your glossary!
- Publish the post to ‘All course users’ so your tutor can ensure you have the correct understanding of these terms.
Types of contaminants
There are a few different types of contaminants that can put compounded products at risk of contamination. Have a guess at how each contaminant risks contamination before selecting the (+) symbol to see the answer.
This refers to the presence of microbes or pathogens such as bacteria, fungi or viruses. Microbial contamination can result from dead skin cells, shed from clothing, or through direct contact with exposed skin. It can lead to serious and often fatal infections.
This includes chemicals released from bacteria as well as chemical participates, which can be caused by accidental spillage of chemicals or cleaning residues.
This may be from solid particle contaminants such as debris or dirt. This contamination can also occur from objects such as glass fragments being present in the final product.
Cleaning, sanitising, and disinfecting
The aseptic technique aims to protect the patient from infection and prevent the spread of pathogens. Often, practices that clean, sanitise or disinfect are insufficient to prevent infection.
Do you remember the meaning and differences between these practices? Test your knowledge before you turn each card to reveal the answer.
Asepsis
The ultimate goal of aseptic compounding is to reach asepsis - the state of being free from all contaminants. When a pharmaceutical product is compounded aseptically, it must be sterile, meaning it is free of all biological contaminants, not just those that can cause disease.
Sterility
In aseptic compounding of medicines, sterility refers to the complete absence of viable microorganisms, including bacteria, viruses, fungi, and spores, in the compounded product or in the environment where the compounding process takes place. Anything that is not sterile is considered contaminated.
Sterility is crucial in aseptic compounding because it ensures that the final compounded medication is free from contaminants that could potentially cause harm to patients, particularly those with compromised immune systems.
Compounding a sterile pharmaceutical compound requires the following:
- The pharmacist or pharmacy technician to use the aseptic technique.
- The attentive use of sterile equipment and supplies.
- Preparation of the compound in a controlled sterile environment.
- Maintaining sterility of the final prepared product.
Sterilisation

Sterilisation is the process of making an object or environment sterile, ensuring that it is free from all forms of viable microorganisms. There are different types of sterilisation techniques, which use one or more of the following:
- Physical sterilisation: Involves using physical agents such as heat, radiation, or filtration to destroy or remove microorganisms.
- Examples include:
- Autoclaving (steam sterilisation — you can see autoclaving in action in the image above.)
- Dry heat sterilisation
- Ultraviolet (UV) radiation
- Filtration through membrane filters.
- Examples include:
- Chemical sterilisation: Involves the use of chemical agents to disinfect or sterilise surfaces or equipment. This may include using liquid chemical sterilants or high-level disinfectants such as hydrogen peroxide, ethylene oxide gas, or glutaraldehyde. These chemicals disrupt the structure and function of microorganisms, ultimately rendering them inactive or unable to reproduce.
Supplies and equipment
The supplies and equipment for compounding and administering sterile preparations include:
- Needles and syringes: Used for drawing up and administering sterile medications.
- Ampules and vials: Containers for storing and dispensing sterile medications
- Personal Protective Equipment (PPE): Worn to maintain sterility during compounding and administration.
Let’s take a closer look at each of these.
Needles and syringes
Needles and syringes are used during the preparation process of compounding to facilitate manipulations (withdrawing precise amounts of liquid from vials, mixing different medications, or transferring substances between containers). Both needles and syringes are manufactured in many different sizes and types, depending on the type of manipulation necessary.
Needles
Needles are made of either aluminium or stainless steel and used to transfer solutions during compounding. They are packaged individually by the manufacturer to guarantee sterility.
The main parts of the needle are the bevel, bevel tip, hub, shaft and lumen.
Use this matching activity to learn about these parts. Drag and drop the name of the part next to the correct description. As this is an introduction to the concept, mistakes are expected and are a good way to learn. So, if you get an answer wrong, don't worry! Instead, make sure to add the correct answer to your glossary or notes.
Needles vary in their lumen diameter and length, and both characteristics should be selected based on their intent of use.
Lumen diameter and gauge size

- The diameter of the lumen (the internal space within the needle) is represented by gauge size. The higher the gauge, the smaller the lumen diameter and the sharper the needle. This is because gauge size is inversely related to needle diameter. So, a 20-gauge needle will have a larger lumen diameter than a 26-gauge needle.
- The selection of the proper gauge depends on the type of solution being transferred. Thicker fluids require needles with larger gauge sizes to accommodate their viscosity (thickness) and ensure smooth flow during transfer.
- For example, thick solutions should be transferred using small gauge needles, such as 20 gauge rather than 25 gauge. This is because the 20 gauge needle will have a larger diameter than the 25 gauge to allow easier flow of the solution through the needle.
Lumen length
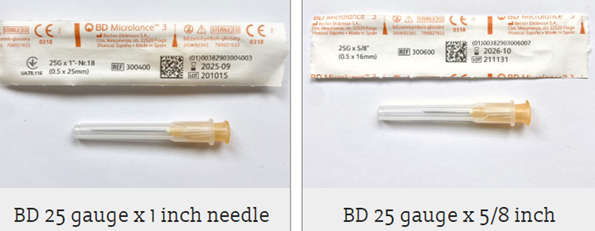
- The length of the needle is the distance from the hub of the needle to the tip of the needle. Needle lengths vary from 3/8 inch to 2 inches.
- A longer needle should be chosen when working with thick closures or lengthy entry ports on containers.
- You can see different examples of needles on the webpage where we found the image above. Check it out yourself here (after confirming you are over 16 years old): New Zealand Needle Exchange Programme.
There are also many different types of needles to use for different types of transfers and manipulations. Expand the labels below to explore three types.
- This needle has two needles joined together with a plastic centre hub.
- These needles are very useful for transferring solutions from one container to another.
- When using a double-ended needle, one side is inserted into one container, and the other side of the needle is inserted into a different container.
- Because these types of needles do not attach to a syringe, the volume of the contents cannot be measured. Therefore, double-ended needles are only to be used when transferring the entire contents of one container to another container.

- Filter needles contain a filter embedded within the hub of the needle, which prevents particulate matter from passing through the needle. The filter is typically 5 microns, which is the maximum pore size necessary to prevent particulate matter from passing through the needle.
- To prevent pieces of glass and other unwanted material from being transferred into the final preparation when withdrawing a solution from an ampoule, a filter needle must be used every time.
- It is essential that filter needles be used only one time and used in only one direction.
- Using a filter needle to both withdraw and expel solutions will cause any material trapped in the filter to be expelled in the final preparation. Therefore, a filter needle should be used to withdraw a solution from the ampule into the syringe, and then the filter needle should be removed and replaced with a regular needle before expelling the contents of the syringe.
- It is also important to note that filter needles cannot be used with certain medications, such as suspensions, as the filter can remove important active ingredients.

- Vented needles are plastic spikes that are thicker in diameter than the typical needle. They allow air to pass in and out of a “vent”, thereby preventing pressure differences.
- Vented needles are useful for re-entering multiple-use vials or preparing chemotherapy.
- Attaching a vented needle allows re-entry multiple times without compromising the integrity of the closure of the container from multiple penetrations.
- When preparing chemotherapy, positive pressure can result in the spraying of vial contents, putting the operator at risk of exposure. Vented needles alleviate the need to account for positive and negative pressure and result in better protection of the operator from spraying of hazardous drugs.
Syringes

Syringes attach to a needle and hold solutions that are to be administered to a patient or that are about to be transferred from one container to another. Traditionally, glass syringes were used, but they have now been almost completely replaced with plastic syringes. Plastic syringes are packaged by the manufacturer in an individually sealed paper or plastic overwrap. This maintains sterility until the package has been opened. Plastic syringes are disposable and are intended for single use only.
The main parts of the syringe are the luer lock tip, barrel, calibrations, plunger flat end and plunger piston.
Use this matching activity to learn about these parts (and a few more!). Again, if you get any answers incorrect, use this as a learning opportunity and add the term to your glossary or notes.
Sizes
Syringe sizes vary from 0.5ml to 60ml, indicating the maximum volume that can be drawn up into the syringe. The larger the syringe is, the lower the accuracy of the measured volume.
It is important to consider the accuracy of measurement when selecting a proper syringe size. For example, a large syringe should not be selected to draw up a small volume. The smallest syringe size that can accommodate the desired volume should be used.
Anatomy of a needle and syringe
Here, you can see the anatomy of a needle and syringe and how they fit together.

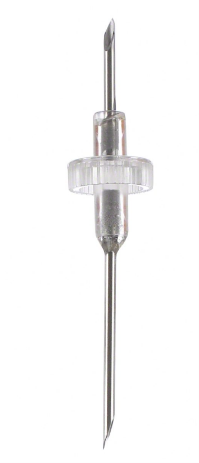
Ampules and vials
Ampules and vials are types of containers used for storing pharmaceutical liquids. They are typically made of glass and have different designs to suit various applications in the medical and pharmaceutical fields.
Ampules are small, single-dose containers that are usually sealed by melting the glass to create a hermetic (airtight) seal.
Vials, on the other hand, are larger containers with a rubber stopper or aluminium cap to seal the contents. Both ampules and vials are used to store and transport liquids such as medications, vaccines, and other sterile solutions.
Ampules
Source: Pharma Lab Global
These are glass containers that hold sterile injectable solutions. They are broken at the neck prior to accessing the solution and have pressure points that mark the desired point to break them. You can be seen as the blue dot in the picture.
Due to the potential for glass to enter the solution being withdrawn, a filter needle must be used when withdrawing contents from an ampule.
Vials

These can be made up of plastic or, more commonly, glass. Glass vials have a rubber closure, also referred to as the rubber stopper, to prevent the passage of air or fluids inside and outside of the vial. A cap covers this rubber stopper and must be removed before the contents of the vial can be accessed.
While these covers protect the rubber closure, they do not guarantee its sterility. Therefore, it is necessary to disinfect the rubber closure prior to puncturing it.
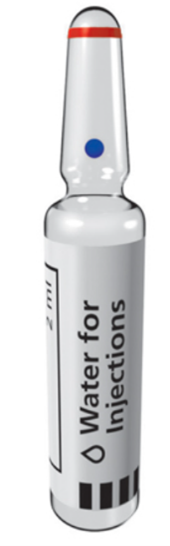
Personal Protective Equipment (PPE)
In aseptic compounding, maintaining contamination control is vital, and one key aspect is the use of PPE. Throughout the compounding process, it's imperative for the aseptic operator to wear PPE consistently. This equipment serves as a barrier against shedding skin and hair cells, as well as the deposition of cough droplets or any other contaminants, thereby safeguarding the integrity of the compounding area.
Wearing PPE
Typical items of PPE include the following (which you can also see in the above image):
- Sterile gloves
- Surgical mask or respirator
- Hair cover or hood
- Gown or coverall
- Shoe covers or boots
The order in which the PPE goes on matters! This is because you don't want to inadvertently contaminate a piece of PPE by mistake (for example, if you put gloves on first and then touch your hair to put the hair cover on). Therefore, when preparing for aseptic compounding, the operator must follow these seven steps, in order:
- Shoe covers
- Hair cover
- Beard cover (if applicable) and mask
- Face/eye protection
- Hand hygiene
- Gown
- Gloves.
Watch: My job in a minute: [...] Sterile Compounding Technician (1:23 minutes)
Mātakitaki mai, watch here as a pharmacy technician in the United States, describes her responsibilities in aseptic compounding. Listen out for the factor that inspired her to pursue this role and what motivates her to remain in it.
Did you notice what items of PPE the operators were wearing?
Self-directed learning activities
Activity 1
The following is a list of compounded pharmaceutical products. Decide if each product is compounded using non-aseptic or aseptic techniques.
Activity 2
- Create a journal titled 'Intravenously Injected Antibiotics'.
- In your own words, explain why intravenously injected antibiotics must be compounded using the aseptic technique.
- Publish to 'All course users'.
- Save the permalink to your Index of Journal Posts.
We have now come to the end of this session. Ko koe a runga, you're awesome, as there was a lot of new learning to take in! In our next session we dive into personal hygiene, the steps for aseptic gowning, and clean room.