Introduction
Kia ora, huānyíng, selamat datang, bula, hello, and welcome to our discussion about ward management.
This topic delves into medication management for patients while they are hospitalised in a ward, the roles of the pharmacy staff, and the medicine management systems commonly used in hospitals.
Clinical team
When a person is admitted to a hospital for in-patient care, there are several different clinical staff members who make up the multidisciplinary clinical team that contribute to their care.
Depending on the patient's needs, the team may include the following healthcare professionals:
- Pharmacy staff
- Ward nurses and assistants
- Specialist nurses - wound care, infection control and pain management
- Doctors - medical, surgical, specialists and psychiatrists
- Therapists - occupational, speech, respiratory and physical
- Dieticians
- Social services - case managers, social workers, counsellors and home care coordinators.
Clinical staff will collaborate and consult with each other regarding various aspects of a patient's care while in the hospital, as well as develop care plans for discharge. Pharmacy staff are integral members of the clinical team, ensuring proper medication management and continuity of care throughout the patient's hospitalisation and upon discharge.
The role of pharmacy staff on the ward
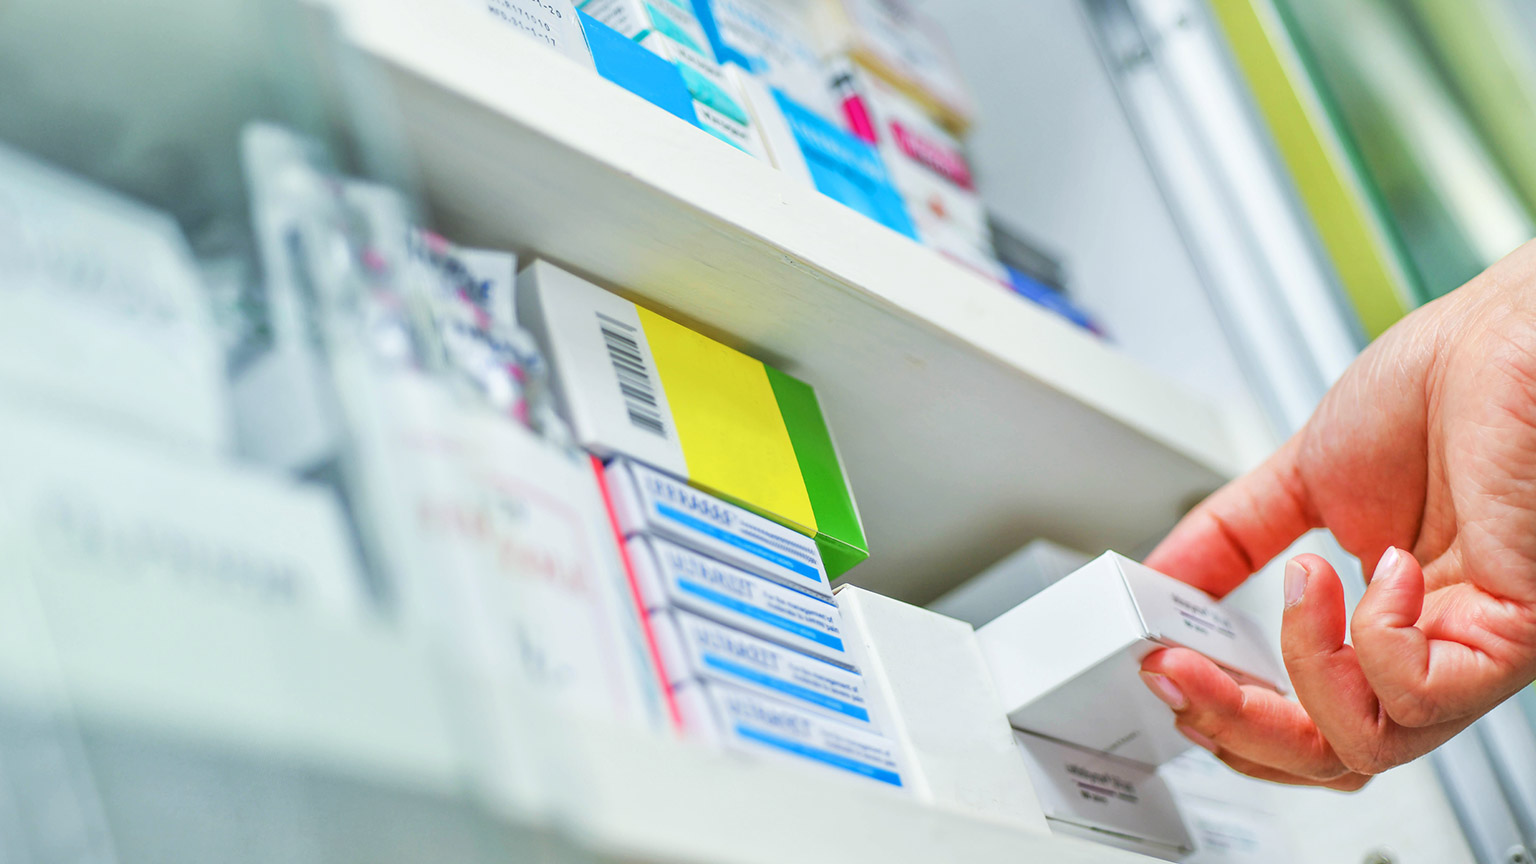
In the past, pharmacy staff spent most of their time in the pharmacy while the ward staff (nurses and doctors) sent requisition orders for medication to the pharmacy or returned empty boxes of medication to be replaced by pharmacy staff in a 1:1 system. However, in an effort to improve medication stock control in the wards and to make use of the skill sets of pharmacy staff, ward pharmacies were developed.
The pharmacy staff play a crucial role on the ward by monitoring charts, ensuring accurate medication supply, ward imprest and monitoring stock use. They are not just an important part of the clinical team but also the guardians of patient safety, assisting in providing an efficient service for the ward staff and ensuring the utmost safety of every patient.
Watch: What hospital pharmacists do (1:38 minutes)
Mātakitaki mai, watch here for a glimpse at the typical roles and functions of hospital pharmacies and pharmacists.
Note: the relevant section of the video ends at 1:38 minutes.
Pharmacist’s role
The role of the pharmacist in a hospital is varied and involves collaborating with clinical teams and supporting patients. Take two minutes to consider what a pharmacist’s role in the ward specifically involves, and then select the (+) icon to compare your answers.
The pharmacist’s role may involve the following:
- Participating in ward rounds and attending clinical meetings as the pharmacy representative.
- The pharmacist is the medication expert on the ward and, together with the medical/surgical team, is involved in clinical decisions regarding medications prescribed to patients.
- Examples include advising the clinical team about doses and interactions.
- Pharmacists are involved with checking the patient’s clinical parameters before dispensing medication.
- Some pharmacists in the hospital have also been involved with clinical trials and writing manuals regarding medications used in the hospital.
- During working hours, the ward pharmacist is available by pager/cell phone to assist the clinical staff with any information on medicines that may be necessary.
- There is also an on-call pharmacist available after hours if there are urgent matters to be attended to on the ward. This may not necessarily be the ward pharmacist.
- Pharmacists in the hospital generally work collaboratively on the wards with a number of other pharmacists in the same area.
- For example, surgical/cardiology/respiratory. They will prioritise (triage) patients according to their needs, with a large part of their work done with cardiac/respiratory patients and older patients.
Pharmacy technician’s role
The role of the pharmacy technician can vary depending on the district or specific hospital the technician works in. Generally, the technician’s role on the ward is to aid the pharmacist in providing accurate medication supplies to the patients.
Again, make some educated guesses about the specific tasks that a pharmacy technician may be involved with. When you’re ready, select the (+) symbol to check your answers.
The pharmacy technician’s role may involve the following:
- Managing ward stock, such as stocktakes and analysis of stock levels for different meds and monitoring high-use meds and medicine expiry dates.
- Annotating patient charts with generic names, cautionary and advisory labels, the brand the patient uses of a crucial medication, or the day a patient takes a weekly medication.
- Taking drug information enquiries such as medication expiries, shelf-life information, storage requirements and legality questions regarding prescriptions.
- In an admitting ward, technicians may also take the medication history to be used in a medicine’s reconciliation.
- Filling out “yellow cards” for patients involving their current medication list and when to take them. A pharmacist checks these before giving them to the patient.
- Some pharmacy technicians, with additional training, are also involved in Warfarin counselling and counselling regarding inhalers and blister packing. They may also refer patients to a medication management service in the community.
- Being involved in audits, for example, how many antinausea medications are prescribed or how many prescriptions are not written properly or according to Te Whatu Ora guidelines.
- Examples of Te Whatu Ora guidelines in prescribing may include using the Latin abbreviations for the frequency of dosing correctly.
- Some wards are involved with clinical trials of medication, which the technician may be involved in.
As in a community pharmacy setting, it is important that hospital pharmacy technicians work within their limits and knowledge and recognise when referral to the pharmacist is necessary. By this stage in your study, you will be very familiar with the following principle from the Medicines Act, Section 42, that emphasises these restrictions.
Pharmacy assistant’s role
Many hospitals employ pharmacy assistants who work with the wards to provide them with ward-stock medications from the pharmacy. They may also be involved with the recycling of medication returned from the wards. Pharmacy assistants are generally trained through an in-house teaching programme.
Lines of communication

As a pharmacy technician, when you are out of the pharmacy, it is important to always wear an identification badge with your name and position so the staff can clearly identify you in the hospital.
As you work on the ward, you will most likely encounter questions from the ward staff and the patients while going about your ward duties. Some of these discussions can be answered or resolved by a technician, but it’s important to know when referral to the pharmacist is necessary. The technician’s role on the ward needs to be carried out under the supervision of a pharmacist, so if you feel uncomfortable answering something, always refer to the pharmacist.
When to refer to a pharmacist
Common requests, questions or discussions with clinical staff that must be referred to a pharmacist include:
- Incorrect charting or dosage queries
- Drug interactions
- Providing clinical information or drug information
- Interpreting a patient’s clinical parameters
- Requests for patient counselling regarding medications or compliance devices where the technician feels unconfident.
Important
As a general rule, clinical staff should be referred to the pharmacist when communicating with patients about treatment or medication.When pharmacy technicians don’t need to refer to a pharmacist
Common requests, questions or discussions with clinical staff that a technician can deal with include:
- Storage requirements of medication
- Shelf-life of medications once opened/used
- Requests for medication items on the ward’s imprest list
- How to write a legal prescription (particularly controlled drugs)
- Patient counselling regarding medications or compliance devices where the technician feels confident in their ability to answer accurately.
Communication between the technician and ward nurses in relation to stock issues and dispensing will generally not require referral to the pharmacist.
Journal post
Staff enquiries
In this tūmahi (activity), you will need to apply your knowledge to respond to questions from the clinical staff.
- Complete the following Documentation tool activity.
- Upload the completed activity to a new journal post, ‘Staff Enquiries’.
- Publish to ‘All course users’.
- Save the permalink to your Index of Journal Posts. Make sure to check back on your mahi (work) for tutor feedback.
Self-directed learning activity
Watch: 'A day in the life: Inpatient Pharmacy Technician' (2:09 minutes)
This video showcases how important the pharmacy technician's role is in maintaining the smooth running of a hospital pharmacy. Join Pharmacy Technician Angelina as she shows you her daily tasks, the work environment, and opportunities for career progression and then answer the questions that follow the video.
Note: Although the video depicts scenes from the US, much of the content is relevant to the context of New Zealand.
Answer the following questions in the forum: SDL: Day In The Life: Inpatient Pharmacy.
Questions
- According to the Staff Pharmacist and the Pharmacy Technician Supervisor in this video, what are a pharmacy technician's essential actions, behaviours, and work practices?
- Would you consider a career as a hospital pharmacy technician? Share your thoughts and reasons.
That brings us to the end of this week's professional practice. Ka pai temahi, good work. Next week, we will continue to investigate pharmacy in the hospital workplace.

Kia Orana, welcome. This week, we continue to explore aseptic compounding, picking up where we left off last week – with contamination control measures and aseptic gowning. We also discuss ‘clean rooms’, the environment where aseptic compounding is carried out.
PPE recap
As you will remember from last week, Personal Protective Equipment (PPE) is worn to maintain sterility during compounding and administration, and there is a very specific order that it must be put on to avoid contamination. These specific steps for putting on PPE must be carried out before entering the room where aseptic compounding is performed. This room is referred to as the ‘clean room’.
Now, imagine you’re getting ready to enter a clean room. Use your prior learning to drag the PPE gowning steps into the correct order to dress yourself properly.
As each step has its own processes to follow, let’s focus on steps 5, 6 and 7, starting with the step that most people will be very familiar with — Hand hygiene.
Step 5: Hand hygiene
By now, you will have a solid understanding of hygiene practices and their importance in pharmacy care. However, aseptic compounding practices are highly specific, requiring precise following of sterile techniques to avoid contamination and maintain the quality of compounded medications.
Within this step alone, there are three parts:
- Personal hygiene
- Aseptic handwashing steps
- Aseptic hand-drying steps.
Personal hygiene
Any aseptic compounding operators must adhere to the following personal hygiene practices.
These should always be implemented before aseptic handwashing and gowning starts:
- No make-up may be worn at any time.
- Bracelets, wristwatches, and rings with stones or ridges should not be worn.
- Long-sleeved clothing should be rolled up above the elbow so as not to interfere with effective hand hygiene practice.
- Nails should be kept short and clean. Nail polish must not be worn, including artificial nails (gel or acrylic).
- Any breached skin (cuts, dermatitis or abrasion) should be covered with a waterproof film dressing.
Aseptic handwashing steps
The steps for aseptic handwashing are more extensive than the usual handwashing process at home, where most people squirt some soap on their hands and rinse it off after a few seconds.
First, gathering everything you need before you start washing your hands is important. You will need the following:
- A nail cleaner
- Antimicrobial hand cleanser
- Lint-free disposable towels.
Steps
- Turn on warm tap water and wet the hands and forearms up to the elbow.
- Use the nail cleaner to clean underneath all the nails on each hand. Nails should then be cleaned under running water.
- Use sufficient antimicrobial hand cleanser to work up a lather, and gently clean all sides of fingers, the back and palm of both hands. Use circular motions to clean around the circumference of the wrist, moving down the entire circumference of the arm until the elbow is reached.
- Repeat step 3 for the opposite arm.
- Holding the arms upward, with the fingertips pointing up and the elbows down, rinse the hands so that the water runs from the fingertips downward toward the elbow.
Here, you can see just how thorough you must be when lathering your hands (step 3).
| 1. Palm to palm | 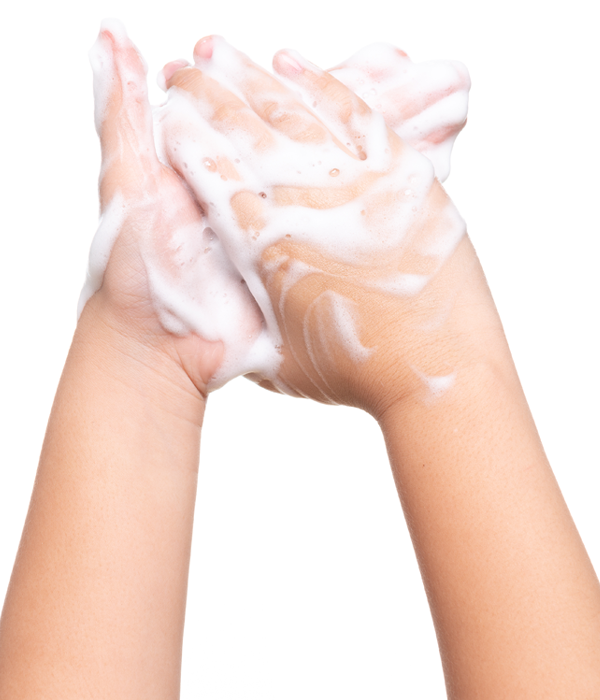 |
|---|---|
| 2. Backs | 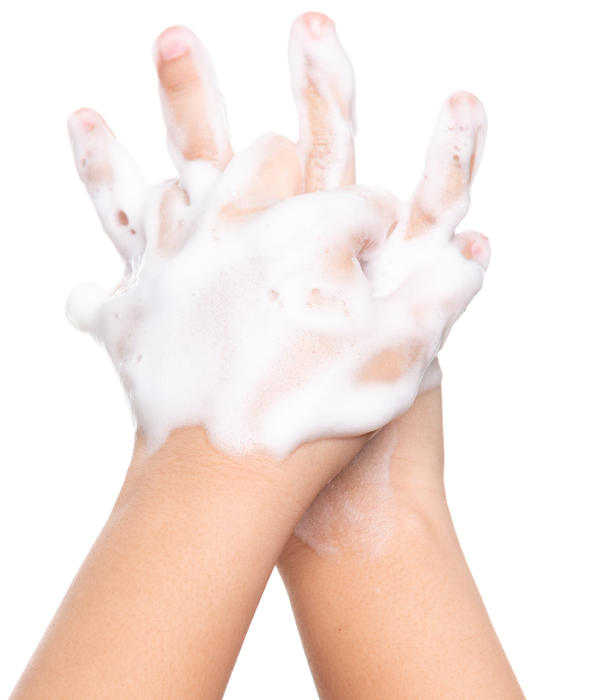 |
| 3. Interlace | 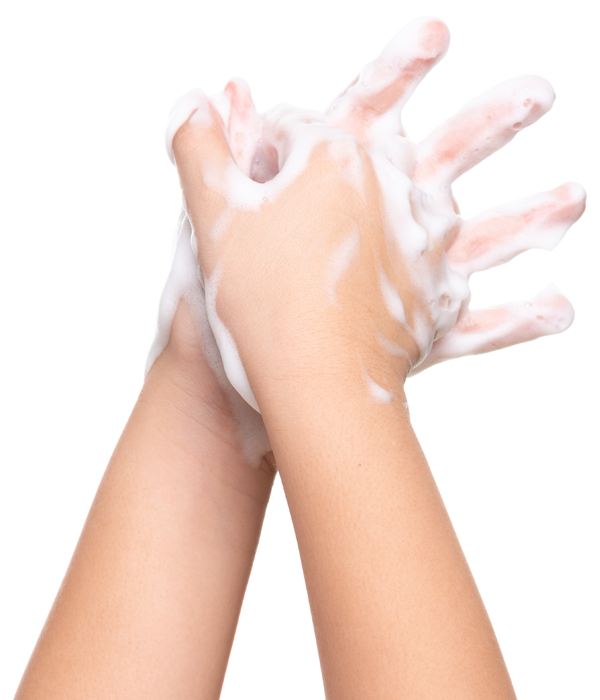 |
| 4. Clasp | 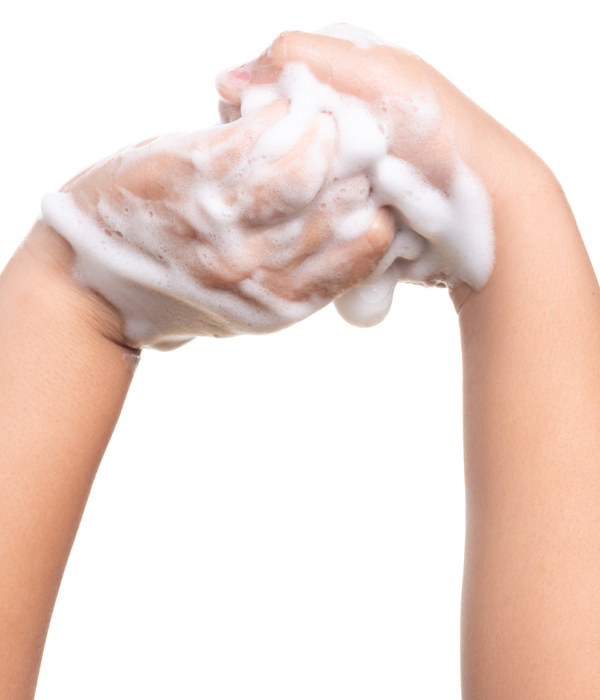 |
| 5. Around thumbs | 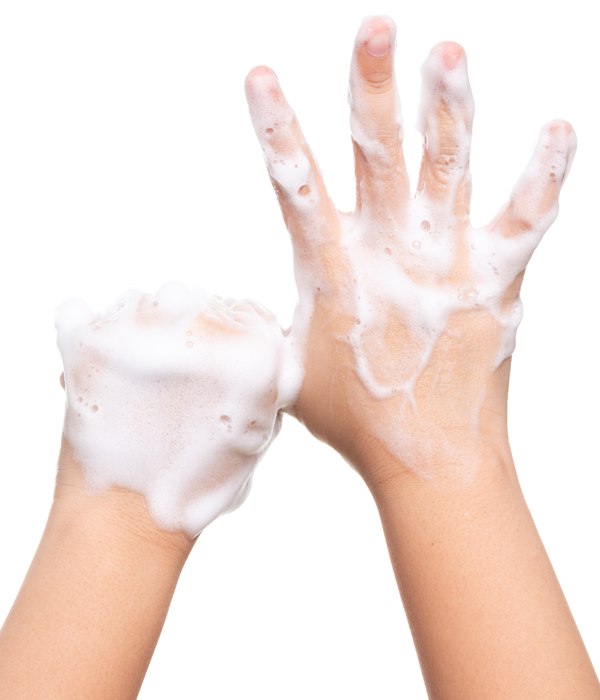 |
| 6. Fingertips | 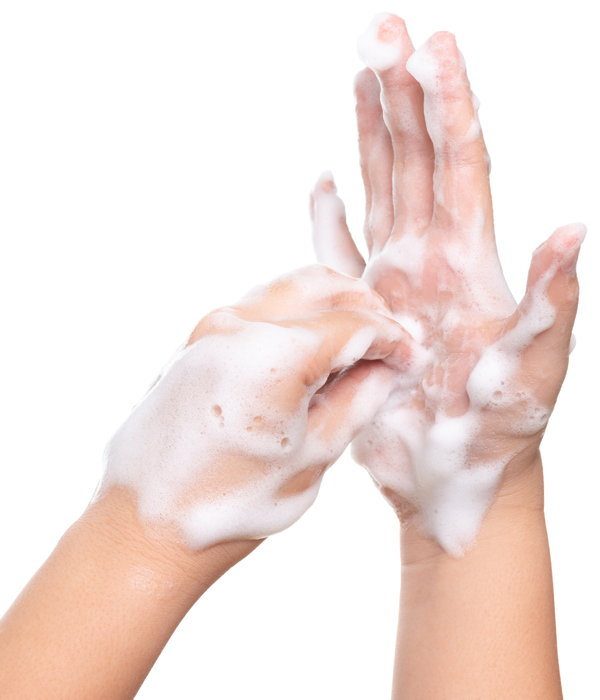 |
| 7. Wrists | 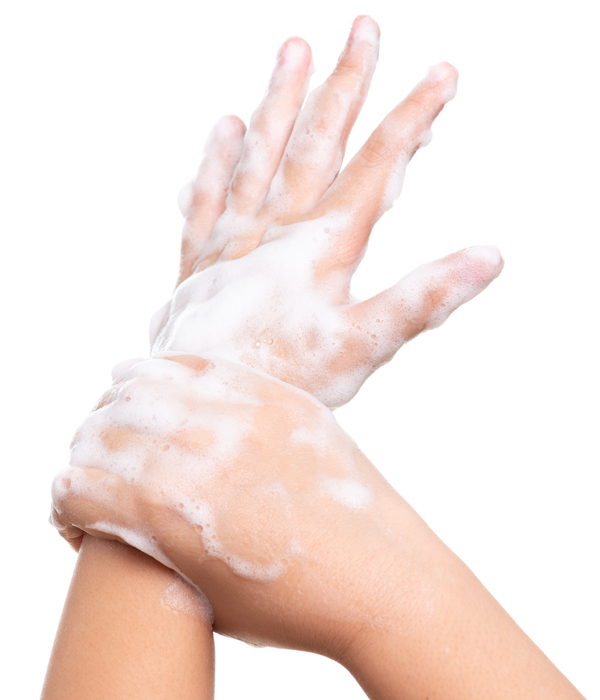 |
Aseptic hand-drying steps

Reflect on what you now know about aseptic handwashing and take a minute to consider what the process for aseptic hand-drying might be (the image above should get you started!). Write down at least three steps you can think of before you select the (+) symbol to check against the best practice steps.
- Take at least two disposable towels. Select one hand to dry and dry the fingertips first, followed by the palm and back of the hand.
- On the same hand, dry the wrist next, going around the wrist's circumference.
- Dry the forearm, also going around the arm's circumference.
- Discard the towels into a waste container. Do not reuse.
- Take two new disposable towels and repeat the same drying process for the opposite arm.
- Take another new disposable towel to turn off the water tap.
Journal post
Aseptic handwashing and drying
Take a moment to think critically about these processes. You may need to conduct some rangahau (research) or chat to your tutor or pharmacy colleagues to find the answers.
- Create a journal post titled ‘Aseptic Handwashing and Drying’.
- Answer the following questions.
- Publish the post to ‘All course users’.
- Save the permalink to your Index of Journal Posts.
Questions
- Explain why the hands and arms should be rinsed as described in step 5 of the aseptic handwashing process.
- Explain what the potential consequence/s could be if this step were not followed.
- How should you turn off the water taps after aseptic hand-drying?
- What should you do if you mistakenly touch the tap handles with your clean hands?
Step 6: Aseptic gowning
After ensuring that personal hygiene has been addressed and hands washed and dried adequately, the next step is to put the gown on. There are many reasons the principles behind the aseptic gown technique contribute to contamination control in aseptic compounding.
The principles of aseptic gowning are to:
- Maintain personal hygiene: As noted above, this includes washing hands thoroughly and using appropriate hand-drying techniques before donning the gown.
- Maintain sterility: Establish and maintain a sterile barrier between the wearer's clothing and the sterile field, minimising the risk of contamination.
- Minimise shedding and ensure the correct fit: Low particle emitting gowns should be selected and should be at least knee length to ensure good coverage and protection. The sleeve cuffs of the gown should fit snugly around the wrists to ensure gloves can be placed over them.
- Avoid contamination: Gowning techniques should minimise the risk of contaminating the sterile gown or the surrounding area. This includes being mindful of movements, avoiding touching non-sterile surfaces, and ensuring that the gown remains intact and properly secured throughout the procedure.
- Ensure effective closure: Gowns should be closed securely to prevent exposure to the sterile area and maintain the integrity of the gown's barrier function. This may involve tying or fastening closures according to manufacturer instructions.
- Inspect for integrity: Before and during gowning, the gown should be checked for any signs of damage or compromise to its integrity. Gowns with tears, punctures, or other defects should not be used as they may compromise sterility.
Steps
One of the most important principles of gowning is ensuring the correct sequence. Gowning procedures should follow a specific sequence to ensure the gown is donned correctly and without contamination.
While each ward will have their own procedures to follow, generally, they will look like this:
- Open the sterile gown pack.
- Touch only the edges of the gown, lift it off the bench and unravel onto the clean side of the bench. Take care not to let the sleeves of the gown touch the floor.
- Undo the zip. Sit on the bench.
- Put feet in first on the clean side of the bench, then arms and slip the gown over the shoulders.
- Place the hood over the hair cover and close the zip.
Step 7: Aseptic gloving
Finally, the gloves go on! As you will have noticed, when it comes to putting these different components of PPE, the sequence in which you put them on is vital to avoiding contamination. Gloves are no exception. When it comes to aseptic gloving, you must follow these steps.
Steps
- Start by choosing the correct type and size of gloves. Aseptic compounding typically requires sterile gloves, which come in various sizes to ensure a proper fit. It's essential to use gloves that are appropriate for the specific task and environment.
- Open the package of sterile gloves carefully to avoid touching the inside of the gloves or contaminating them. It's essential to handle the packaging with clean hands to prevent contamination.
- Hold the first glove by the folded cuff edge and insert your dominant hand into the glove without touching the outside surface. Be careful not to touch any surfaces other than the glove itself.
- With the gloved hand, carefully grasp the second glove from the inside cuff and pull it over the non-dominant hand, avoiding contact with the outside surface of the glove. Ensure that both gloves fit snugly and cover the hands completely without any gaps.
- After donning both gloves, inspect them for any tears, punctures, or other defects that could compromise their integrity. If any damage is detected, discard the gloves and start the gloving process again with a new pair of gloves.
Here, you can see steps 3, 4 and 5 broken down into images.
| 1. Don the first glove. | 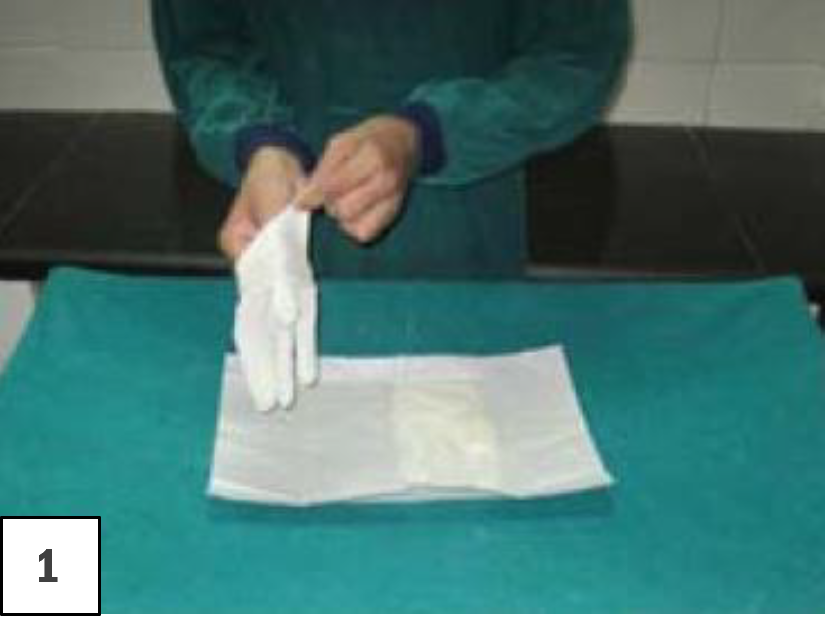 |
|---|---|
| 2. Hold the first glove by the folded cuff edge. | 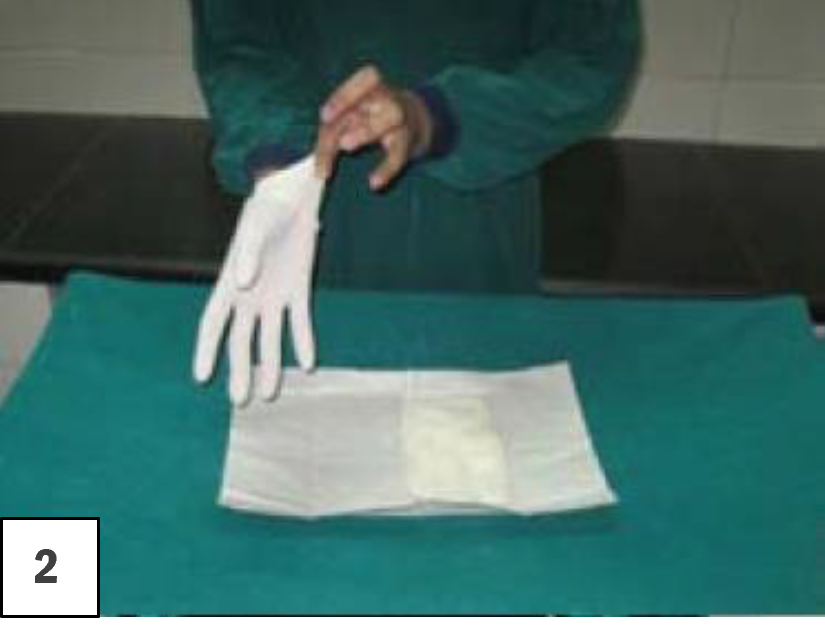 |
| 3. Grasp the second glove from the inside of the cuff. | 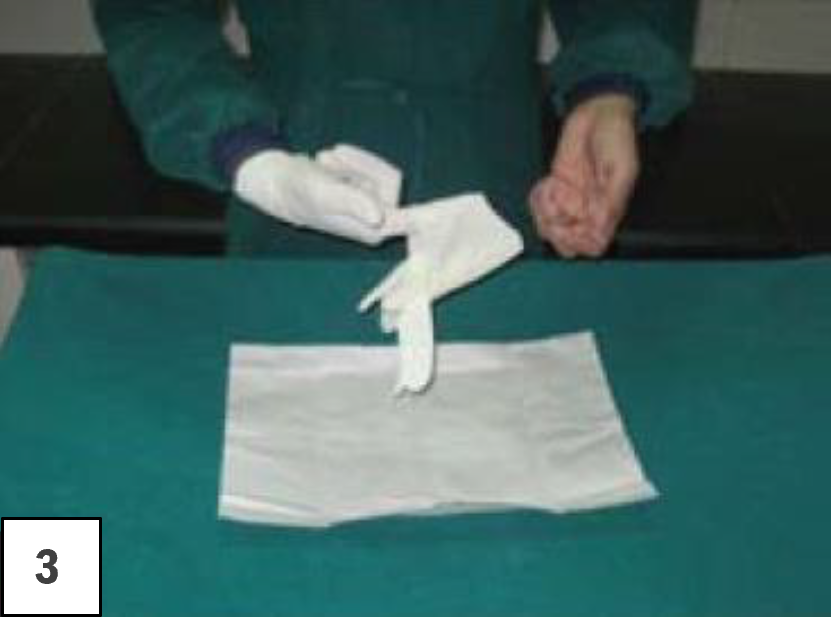 |
| 4. Don the second glove. | 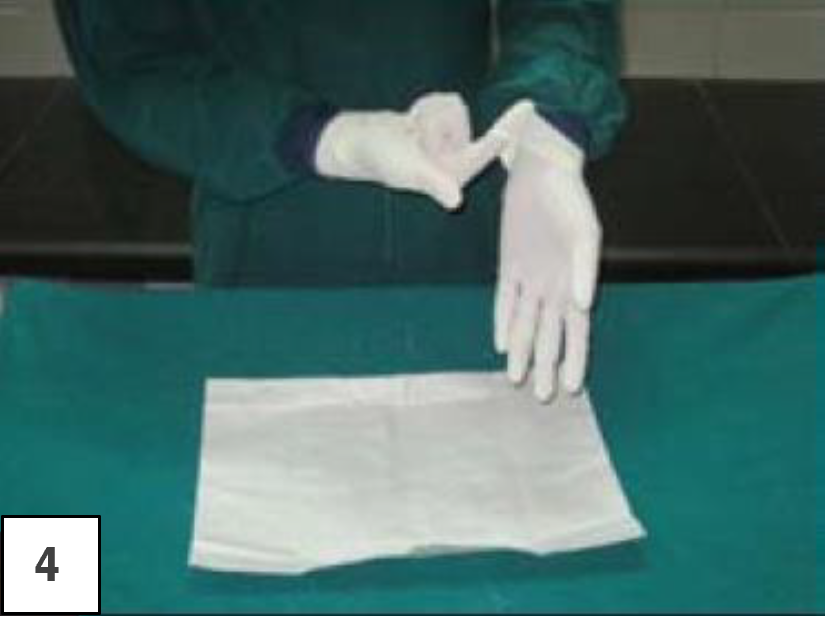 |
| 5. Ensure the gown cuffs are covered with the cuff of the sterile glove. |  |
| 6. Check the gloves fit correctly and that there are no defects. | 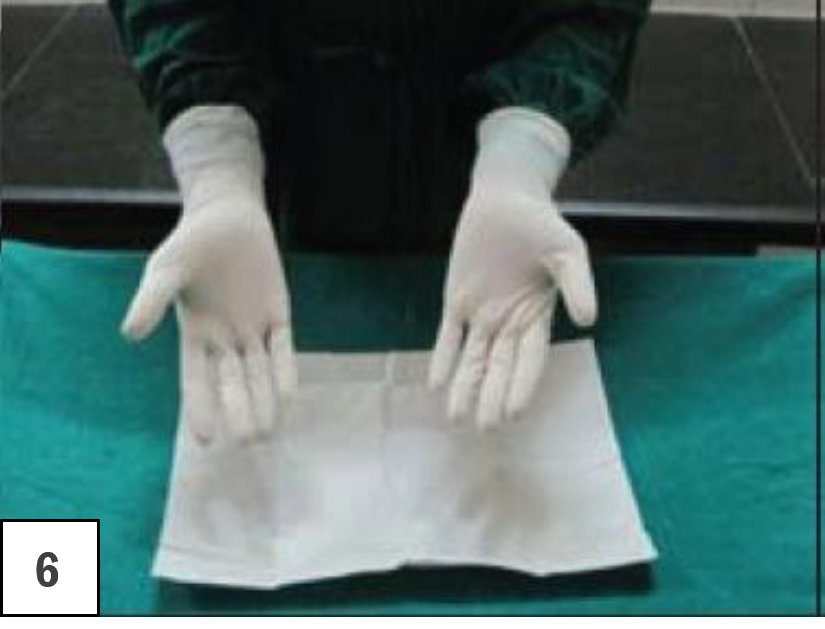 |
Watch: Sterile Gowning (9:27 minutes)
Now, let's pull these three steps together. Āta mātakitaki, watch this video carefully as a student from the Binghamton School of Pharmacy demonstrates hand hygiene, gowning and gloving. It's important to note that while specific procedures may vary, the fundamental principles remain consistent throughout.
As you watch, add any additional information to your notes. There will be a short quiz after the video to aid your retention!
Self-directed learning activities
Activity 1
Review and recap your learning on the topics of non-aseptic and aseptic compounding. Go back through the previous weeks of learning and ensure you have included all the new terms in your glossary.
Optional
Harness the power of AI! Check out an online study tool like Quizlet, where you can take ownership of your learning and create your own study materials. Sign up to create a free account and upload your glossary or notes. Quizlet will generate flashcards for you to test yourself.
Activity 2
As you know, getting hands-on practical experience is a great way to learn. This week, we mean this quite literally.
Use gloves you have at home, and practice aseptic gloving. If you don’t have medical gloves, be creative! You might have dishwashing gloves, gardening gloves, bike gloves…
- Before you start, fold over your gloves to form a cuff to simulate their appearance when you open a pack of proper medical gloves.
- Go through the sequence as many times as it takes for it to feel natural (and you don’t need to refer to the steps).
Optional
Here are some extra ideas to grow your confidence with this process.
- You might like to film yourself so you can assess your own technique.
- You may like to include friends and family in this activity. Here are some suggestions:
- Get them to observe you and provide feedback.
- Teach them! Teaching someone else is a great way to test your own knowledge.
- Race! If you have enough gloves, set up a race to see who can correctly and aseptically glove the fastest. You might need to film this or appoint a judge to avoid arguments over who the winner is!
Whakamihi. Congratulations, you have now completed this week's learning for Dispensing 2. Well done.