Assessment Information
There are five assessments due in this module:
- 07A1 due at the end of Week 18
- 05A1 due at the end of Week 19
- 07A2 due at the end of Week 19
- 05A2 due at the end of Week 20
- 07A3 due at the end of Week 20
These assessments contain a mix of theory and practical tasks. Please read all assessments immediately so that you can talk to your supervisor to plan for your work-based practical tasks.
Nǐhǎo, hello. This week, we’re right back into our exploration of ward management. We will be discussing medicine reconciliation, the management of refrigerated stock, and other ward stock management situations.
Let's crack into it.
Medicine reconciliation

Medicine reconciliation is a topic we have discussed previously in this programme. Let’s take a moment to recap.
What is it?
Medicine reconciliation is the systematic process of obtaining a complete list of a patient’s medicines, including prescription and non-prescription medicines and remedies. This process also captures drug allergies, intolerances, and previous treatments that have been discontinued, as well as the reasons why.
Who is involved with medicine reconciliation?
Pharmacists and pharmacy technicians carry out reconciliations. Pharmacy technicians often play a key role in gathering medication information from patients, caregivers, and various sources, such as electronic health records or community pharmacies.
Specifically, pharmacy technicians:
- clarify and gather information on what medications the patient is currently taking, including OTC medicines, supplements or complementary medicines
- ask patients and other medical staff about allergies and experiences with adverse reactions to medicines and related products
- document the information they get from the patient and record any discrepancies.
Why is it important?
Medication reconciliation is vital for patient safety for the following reasons:
- It helps identify discrepancies, errors or omissions in medication lists, which can lead to adverse drug events, medication errors, or failure of treatments.
- The medical team can discover if patients have been taking their medication as prescribed. The patient may have misinterpreted doctors' or pharmacists' instructions, they may be intentionally non-adherent due to perceived side effects, or they may simply be forgetful or have cognitive impairment that makes it difficult to remember doses.
- The patient may have multiple prescribers who are unaware of some of the medications a patient has been prescribed by someone else.
- OTC and complementary medications can have significant interactions with prescribed medications.
When does it happen?
Reconciliation can happen at different times throughout a patient’s stay at the hospital for different reasons. Why do you think reconciliations might be carried out in different situations?
As we will focus more on it in next week's content, it's also worth noting that when a patient is discharged, the reconciled medicine list is explained to the patient, and a copy is sent to the patient's GP.
Steps for medicine reconciliation
Now that we have discussed the ‘what’, ‘who’, ‘why’ and ‘when’ of medicine reconciliation, let’s look at the ‘how’.
As we’ve learnt, there are different times that medicine reconciliation can happen during a hospital visit. For this example, let’s focus on the typical steps a pharmacy technician will take when a patient is first admitted to the hospital.
| Step 1 |
The technician may speak to the patient (if they can) or their family to check the medication they are taking. This may be backed up by their “yellow card” (medicines list), labelled medication or medico-pack they have brought into the hospital.
|
|---|---|
| Step 2 |
The technician may also access an electronic shared care record view (e.g. TestSafe, HealthOne) to see the dispensing record of a patient's regularly prescribed medication from their regular pharmacy. |
| Step 3 |
They may then look for other written sources of information, such as discharge letters and prescriptions or ring the doctor’s surgery.
|
| Step 4 |
The pharmacy technician will note any discrepancies in the medicine reconciliation on the medication admission form for the pharmacist and/or doctor to review. They may also alert the doctor or pharmacist regarding any medication issues. (e.g. if a patient was taking codeine and dihydrocodeine). |
| Step 5 | The pharmacist then does a clinical check on the medication that the patient is taking. |
| Step 6 |
Once all discrepancies have been addressed and a correct and up-to-date list of the patient's medications, allergies, and adverse drug reactions has been documented, this list is then regarded as the most accurate information available at that time.
|
Sources of information
As you can see, pharmacy technicians need to think like detectives to investigate and ensure they gather all the relevant information properly.
When seeking out information, they must aim to find at least two sources that corroborate the medication regime the patient is taking. The information provided by sources should cover a period of at least six weeks before the present day. However, written sources of information should not be used if older than three months.
These sources of medication information are divided into three types.
Select the (+) symbol to read examples of each.
This information comes from the patients themselves. For example:
- verbal information from the patient and the patient’s family/caregiver
- the patient’s written medication list, i.e. yellow card
- the patient’s own medicines, i.e. the physical packages, bottles, and blister packs (noting medicine labels for date of supply and expiry date).
This information comes from providers who have cared for the patient. These sources include the following:
- General practitioner’s information
- Community pharmacy information
- Community mental health team information
- Non-Government Organisations (NGOs)
- Aged residential care facilities
- Lead maternity carers
- Other appropriate community health teams
This information comes from records about the patient’s care. These include the following:
- Clinical notes - current medication chart
- Transfer letters
- Hospital pharmacy records
- Previous reconciliation documents
Watch: Medication reconciliation form (2:33 minutes)
Watch the first two and a half minutes of this video illustrating how to complete a medicine reconciliation form. Although this is a specific example, the information is relevant to all medicine reconciliation, so āta mātakitaki (watch carefully).
In particular, pay attention to the ‘Patient information’ section of the form. You will notice checkboxes to indicate whether the patient’s medications are self-administered or administered by a caregiver. There are also check boxes to indicate the sources of medicine information that were used.
Knowledge check
It’s time to reconcile your understanding of medicine reconciliation. Complete this five-question pātaitai (quiz). Karawhiua, give it heaps and remember, if you don’t get 100%, that’s OK. Select the 'Show solution' button to pay extra attention to the correct answers, and chat with your tutor or pharmacy colleagues if you have questions.
Cold chain

In ward stock management, the term "cold chain" refers to the protocols put in place to guarantee the consistent and proper storage and transportation of refrigerated medications to the ward. This process starts with storing medications appropriately in refrigerated units within the pharmacy and extends to ensuring their correct storage on the ward.
Common ward stock medicines
Many common ward stock medicines require maintenance of the cold chain. The following is a list of these common medicines that should all be kept at a fridge temperature of 2-8°C.
- Insulin
- Vials in current use can be stored at room temperature for up to 28 days.
- Eye drops
- Bottles in current use can be stored at room temperature.
- Reconstituted antibiotics
- Most vaccines
- Desmopressin nasal spray
- Erythropoietin injection (a hematopoietic agent to treat anaemia)
- Fludrocortisone tablets (a steroid)
- Cytotoxic medicines used in cancer treatment
Cold chain procedure
Typically, the following procedures should be adhered to to maintain the cold chain for a refrigerated item:
| Step 1 |
In the pharmacy, fridge items to be dispensed to the ward are clearly labelled with Cautionary Advice Label No 6, KEEP IN FRIDGE, DO NOT FREEZE, to alert staff of its storage requirements. |
|---|---|
| Step 2 |
All refrigerated stock (individually dispensed or ward stock) to go to the ward should be flagged for urgent checking by the pharmacist. This is to minimise the amount of time the stock is out of the fridge.
|
| Step 3 |
Once checked, the stock is packaged into a “chilly bin” cooler with packing material separating it from the ice pack.
|
| Step 4 |
The chilly bin should be clearly marked with the destination ward's name and identified as a refrigerated item.
|
| Step 5 | Once the chilly bin reaches the ward, the delivery person should hand it over to the appropriate staff member and alert them that it is a fridge item. |
| Step 6 |
The staff member then unpacks the medication and places it in the ward refrigerator immediately. |
Temperature validation
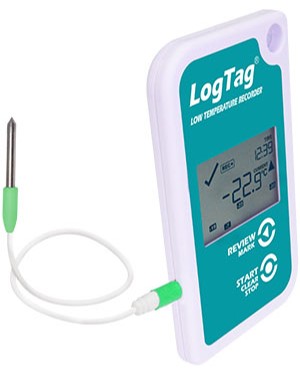
Temperature validation is a critical aspect of stock management. When refrigerated medicines are transported, the temperature must be tracked and validated. To do this, temperature loggers and probes (like those in the image above) and electronic devices accompany the goods throughout the transportation process. They are used to monitor and record temperature continuously, ultimately verifying that the products have been maintained at the appropriate temperature at all times.
Example - cold chain for vaccines
Now, let's put everything together, using an example of cold chain practices used for vaccines.
You will notice that when the order is received, the nurse must check the temperature log to validate the vaccines have been kept within the appropriate temperature range throughout the delivery process.
- The order is received and processed on the day the vaccination is due.
- The fridge temperature where the vaccine is stored is maintained at 2-8°C. It is monitored electronically, and records of the maximum and minimum temperatures each day are kept and downloaded every week.
- Vaccines are left in their original packets, which help insulate them against thermal insult and protect vaccines sensitive to light.
- To ensure there is good airflow around the refrigerator:
- Vaccines are not stacked against the walls of the fridge.
- They are not stacked to the top of each shelf.
- They are not placed against the rear freezer plate or by the icebox of the fridge.
- They are not placed on the floor of the fridge.
- They are not stored in solid trays or boxes (excluding their box package).
- There is good stock rotation in the fridge, so those expiring first are at the front.
- The prescribed vaccine is selected and dispensed. It is then either checked immediately by the pharmacist or returned to the fridge with a note that an item in the fridge is to be checked.
- The pharmacist will be checking to ensure that vaccines are dispensed accurately, comply with regulatory requirements, and maintain their quality and effectiveness.
- They will check that the correct vaccine has been selected, that the vaccine has been stored and handled according to specific regulations and that the vaccine is in good condition.
- Once the vaccine is checked, it is then packed into a labelled chilly bin (ice bin) with ice packs that have been prepared for packing. Insulation material is used to help maintain the desired temperature range inside the chilly bin. A digital monitor and record card are put in the box, which records temperatures every five minutes and produces a visible alarm if the temperatures fall outside the range.
- The delivery person transports the chilly bin and hands it over to a registered nurse, who then unpacks it, checks the temperature log, and stores it in the ward fridge until ready for use.
Watch: Packing Chilly Bin (3:26 minutes)
Mātakitaki (watch) this demonstration from the Immunisation Advisory Council of how to pack a chilly bin to transport vaccines (and keep an eye out for the temperature validation devices they use!).
Pay special attention to how the nurse pre-conditions the ice packs and chilly bin coolers. As this is an important step in the packing process, you will check your understanding of this process in a quick two-question quiz that follows.
Consequences for not maintaining the cold chain
What could happen if the cold chain is not maintained for medicines that require refrigeration? Think about your answer before revealing the list below.
Failing to maintain the cold chain can result in the following:
- The medication may deteriorate and could be potentially harmful to a patient.
- If the medicine needs to be replaced or resent and the patient does not receive it promptly, it could impact patient outcomes if treatment is delayed.
- The medications may degrade or lose their potency, rendering them less effective or ineffective in treating the patients' conditions. This can lead to patients losing confidence in the medication (e.g. vaccines) and being less likely to accept treatment in the future.
- The shelf-life of the medication may be shortened, therefore expiring before use.
- Spoiled or degraded medications must be discarded and replaced, leading to unnecessary costs for the ward and the hospital.
- Patients and healthcare professionals may lose trust in the hospital's ability to provide safe and effective medication management, damaging its reputation.
Ward stock management scenarios
Now that we've covered medicine reconciliation and managing refrigerated medicines, it's time to step back into your pharmacy technician shoes and explore some other ward stock management situations that you may come across as a pharmacy technician in the hospital workplace.
Pānui (read) each scenario in the following Documentation Tool carefully and take the time to formulate your response. The purpose of this activity is to encourage you to draw on your knowledge and apply it to real-world scenarios. Don't worry if you find that your responses differ from ours. The act of connecting to your current knowledge and taking note of the correct answers will help you strengthen your understanding of the topic. It's a win-win!
Ready? Karawhiua, give it heaps!
Self-directed learning activities
As we’ve come to the end of the ward management topic, use your self-directed learning time this week to flex your self-directed learning muscles.
Here are some ideas for how to use this time effectively:
- Seek out more information about aspects of stock ward management from reliable internet sources and discussions with pharmacy colleagues and your tutor. Organise and review your notes on this topic.
- Depending on your learning style, you may like to summarise what you already know, ask questions as you read, note the main points in your own words, or create mind maps.
- Test yourself (or your colleagues) on your glossary of terms. Have fun with this! As we've explored in previous weeks, there are heaps of tools online to help you make study materials like quizzes and flashcards.
- Prepare for your assessments. Ensure that you know what is required of you! Chat with your tutor if you have questions.
There was a lot of new learning in this session; he pai aū mahi I tēnei rā, you have done a great job!
 Afio mai, welcome. Last week, we looked at human nutrition and feeding support. This week, we will continue to focus on Total Parenteral Nutrition (TPN), giving you a taste of the medical conditions that require TPN, how to prepare it, and how it can be administered.
Tip
CVC, BEE, TEE, PICC – brace yourself to encounter new acronyms and uncommon words in this week’s content. Get your glossary ready, and add these terms as you go!TPN recap
Before we get stuck in, let’s review what we learned last week on this topic in this two-question quiz.
When does a patient require TPN?
Common conditions and situations that may require the use of TPN include:
- patients who cannot use their intestines after major abdominal surgery
- patients with conditions affecting the gastrointestinal tract severely (i.e. severe mucositis, acute severe pancreatitis, intractable vomiting, obstruction or fistula)
- patients with severe inflammatory bowel disease (i.e. Crohn’s disease or ulcerative colitis and those who do not tolerate enteral feeding)
- bowel obstruction
- short bowel syndrome
- certain paediatric GI disorders (i.e. congenital GI anomalies or prolonged diarrhoea, regardless of its cause)
- premature low birth weight infants.
Contraindications for prescribing TPN
There are conditions and situations when TPN should not be prescribed, such as when:
- the patient has a functional gastrointestinal tract that can adequately absorb and process nutrients from oral or enteral feeding
- nutritional support is only needed for a short period, e.g. less than seven days
- the patient is terminal and receiving palliative care
- there is an infection of the central line
- the patient does not consent.
Delivering TPN
So, now that you know the situations in which TPN cannot be prescribed, let’s turn our focus to how TPN is administered for those patients who are prescribed it.
TPN can be delivered to the bloodstream via two different venous lines at different locations:
- Central Venous Catheter (CVC)
- Peripherally Inserted Central Catheter (PICC)
Like most medical procedures, each method has its advantages and disadvantages. Read on to explore these.
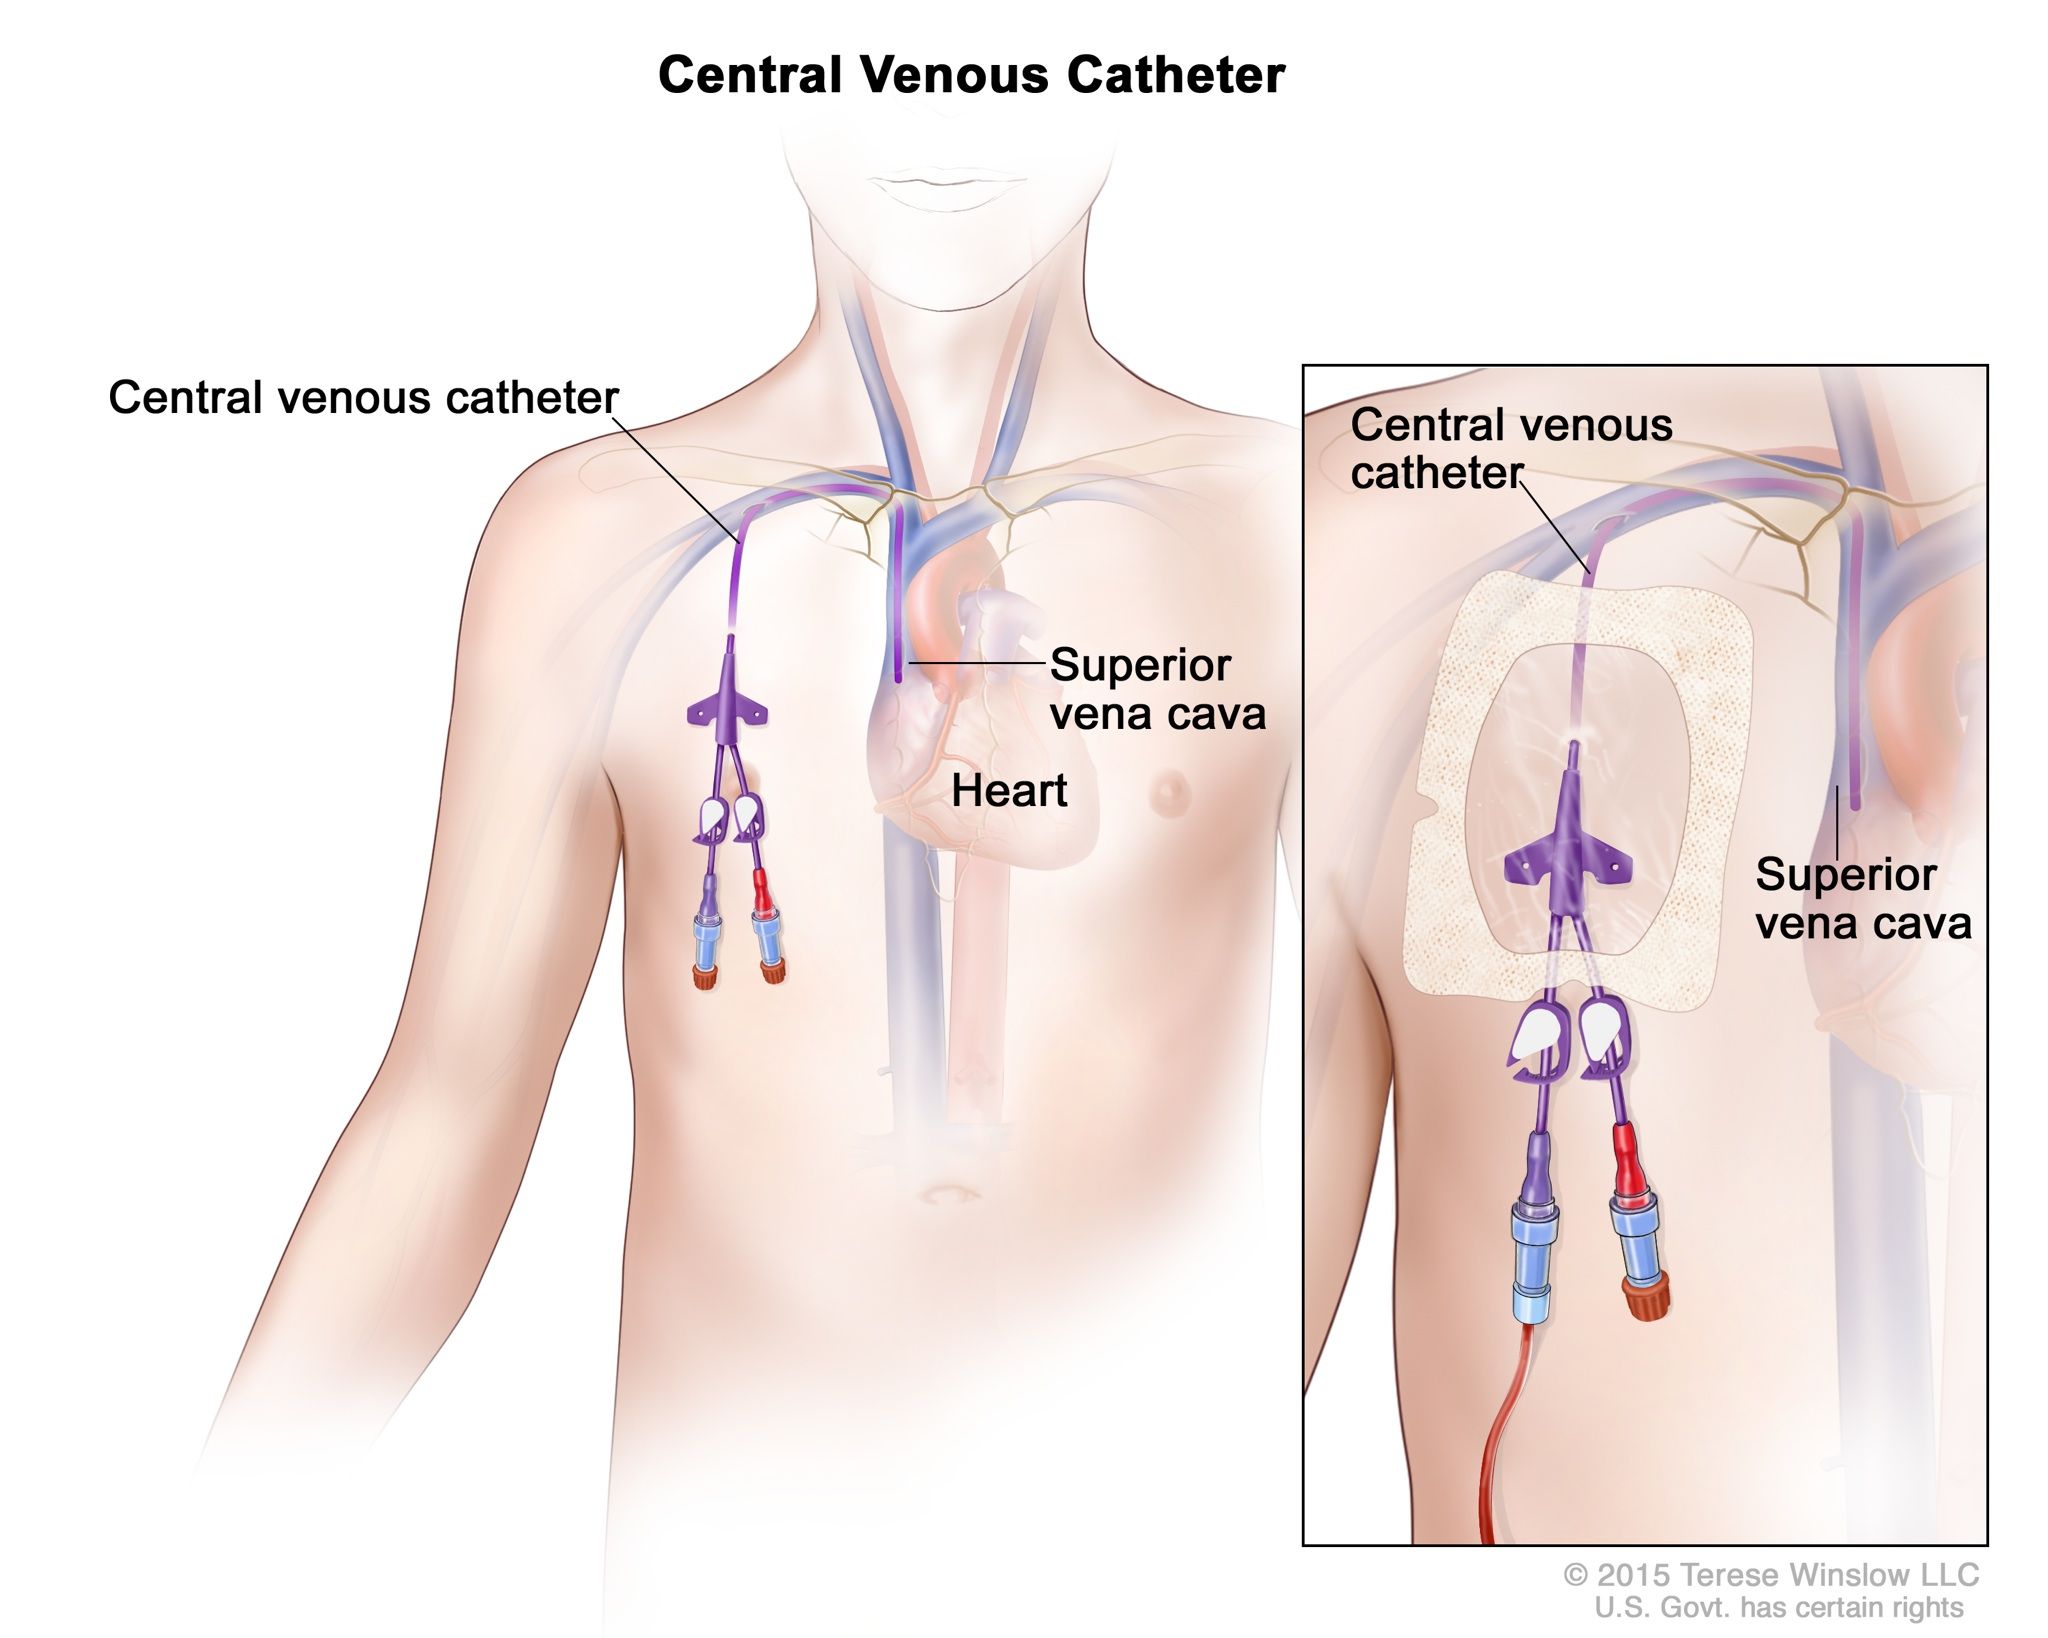
Central Venous Catheter (CVC)

As you can see in this image from the National Cancer Institute, a CVC line is inserted through veins in the neck or chest and threaded into one of the central veins, such as the superior vena cava. An easy way to remember this is that it is inserted in the centre of the body instead of a limb or peripheral.
Advantages
- It provides reliable access to the bloodstream, allowing for the administration of TPN and other medications.
- It can remain in place for an extended period, reducing the need for frequent insertions.
Disadvantages
- Insertion of a CVC line carries a risk of complications such as infection, thrombosis (blood clots), and pneumothorax (collapsed lung).
- CVC lines are more invasive and require specialised skills to insert.
- They require specialised care and monitoring to prevent complications.
Peripherally Inserted Central Catheter (PICC)
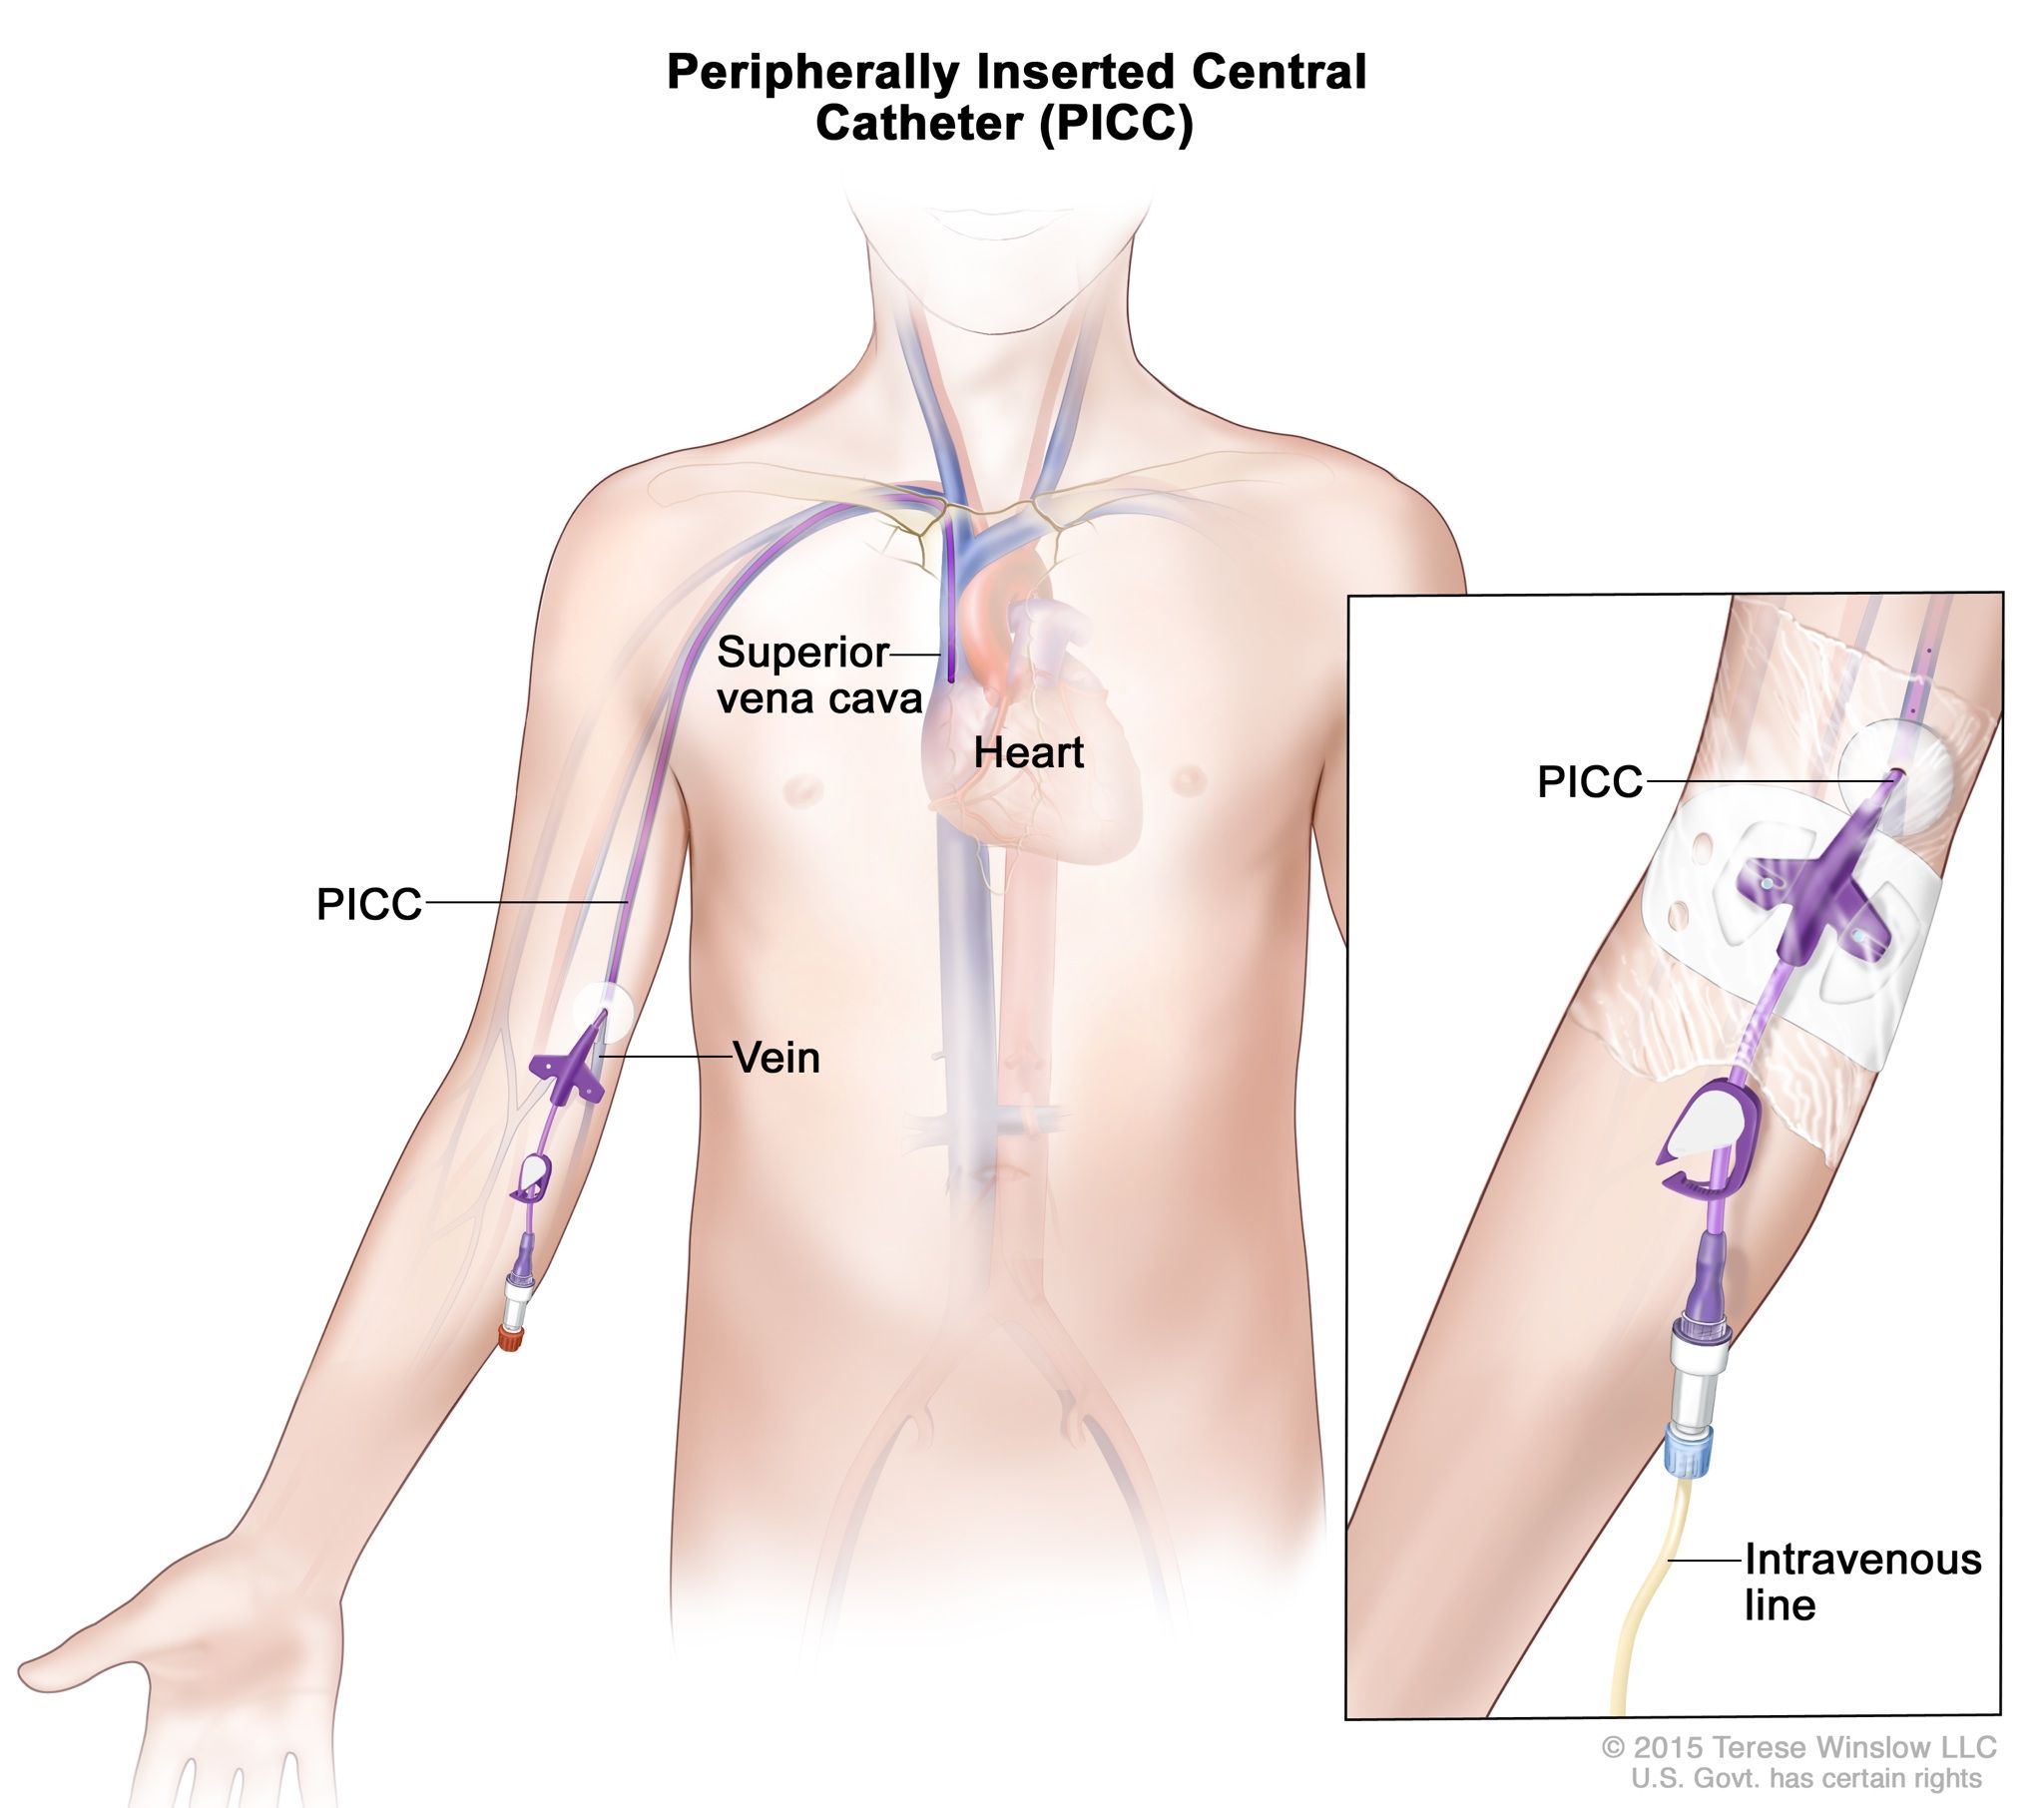
This image from the National Cancer Institute demonstrates a PICC line. A PICC line is inserted into a peripheral vein, typically in the arm, and advanced until the tip reaches a larger central vein near the heart. An easy way to remember this is that if you want to pick (PICC) something up, you do this with your arms.
Advantages
- It can be inserted at the bedside without the need for surgery, making it less invasive than a CVC line.
- It is suitable for long-term use and provides reliable access for TPN administration.
- It can be more comfortable for patients than a CVC line.
Disadvantages
- Despite being less invasive, PICC lines still carry risks of complications such as infection, thrombosis, and catheter migration.
- Careful monitoring and maintenance are necessary to prevent these complications.
- It can kink or occlude due to patient movements.
Now that you have a basic understanding of how TPN can be administered, the next pātai (question) to ask is, what is actually administered?
Composition of TPN solution
To provide adequate nutrition, the TPN bag contains the following seven components. These won’t come as a surprise to you as we covered these last week as the building blocks for providing a nutritional diet.
Select the (+) symbol for specific details about each component.
Glucose is the primary source of energy in TPN solutions. It provides calories to meet the patient's metabolic needs.
Amino acids are the building blocks of proteins. TPN solutions contain a balanced mixture of essential and non-essential amino acids to support protein synthesis and tissue repair.
Lipid emulsions provide essential fatty acids and calories. They serve as a concentrated energy source and help prevent essential fatty acid deficiency.
TPN solutions are fortified with water-soluble and fat-soluble vitamins to prevent vitamin deficiencies and support various metabolic processes.
Trace elements are minerals your body needs in relatively small (or trace) quantities. These include zinc, copper, selenium, and chromium, which are essential for enzyme function, immune function, and antioxidant activity. They are added to TPN solutions to prevent deficiencies.
When essential minerals dissolve in a fluid, they form electrolytes that carry an electric charge. Electrolytes such as sodium, potassium, chloride, calcium, and magnesium support different bodily functions, including nerve and muscle function and maintaining hydration. These electrolytes keep the body functioning as it should!
Water is an essential component of TPN solutions and serves as the solvent for all other components. The amount of water in TPN solutions is adjusted to meet the patient's fluid needs and to prevent dehydration.
TPN bags
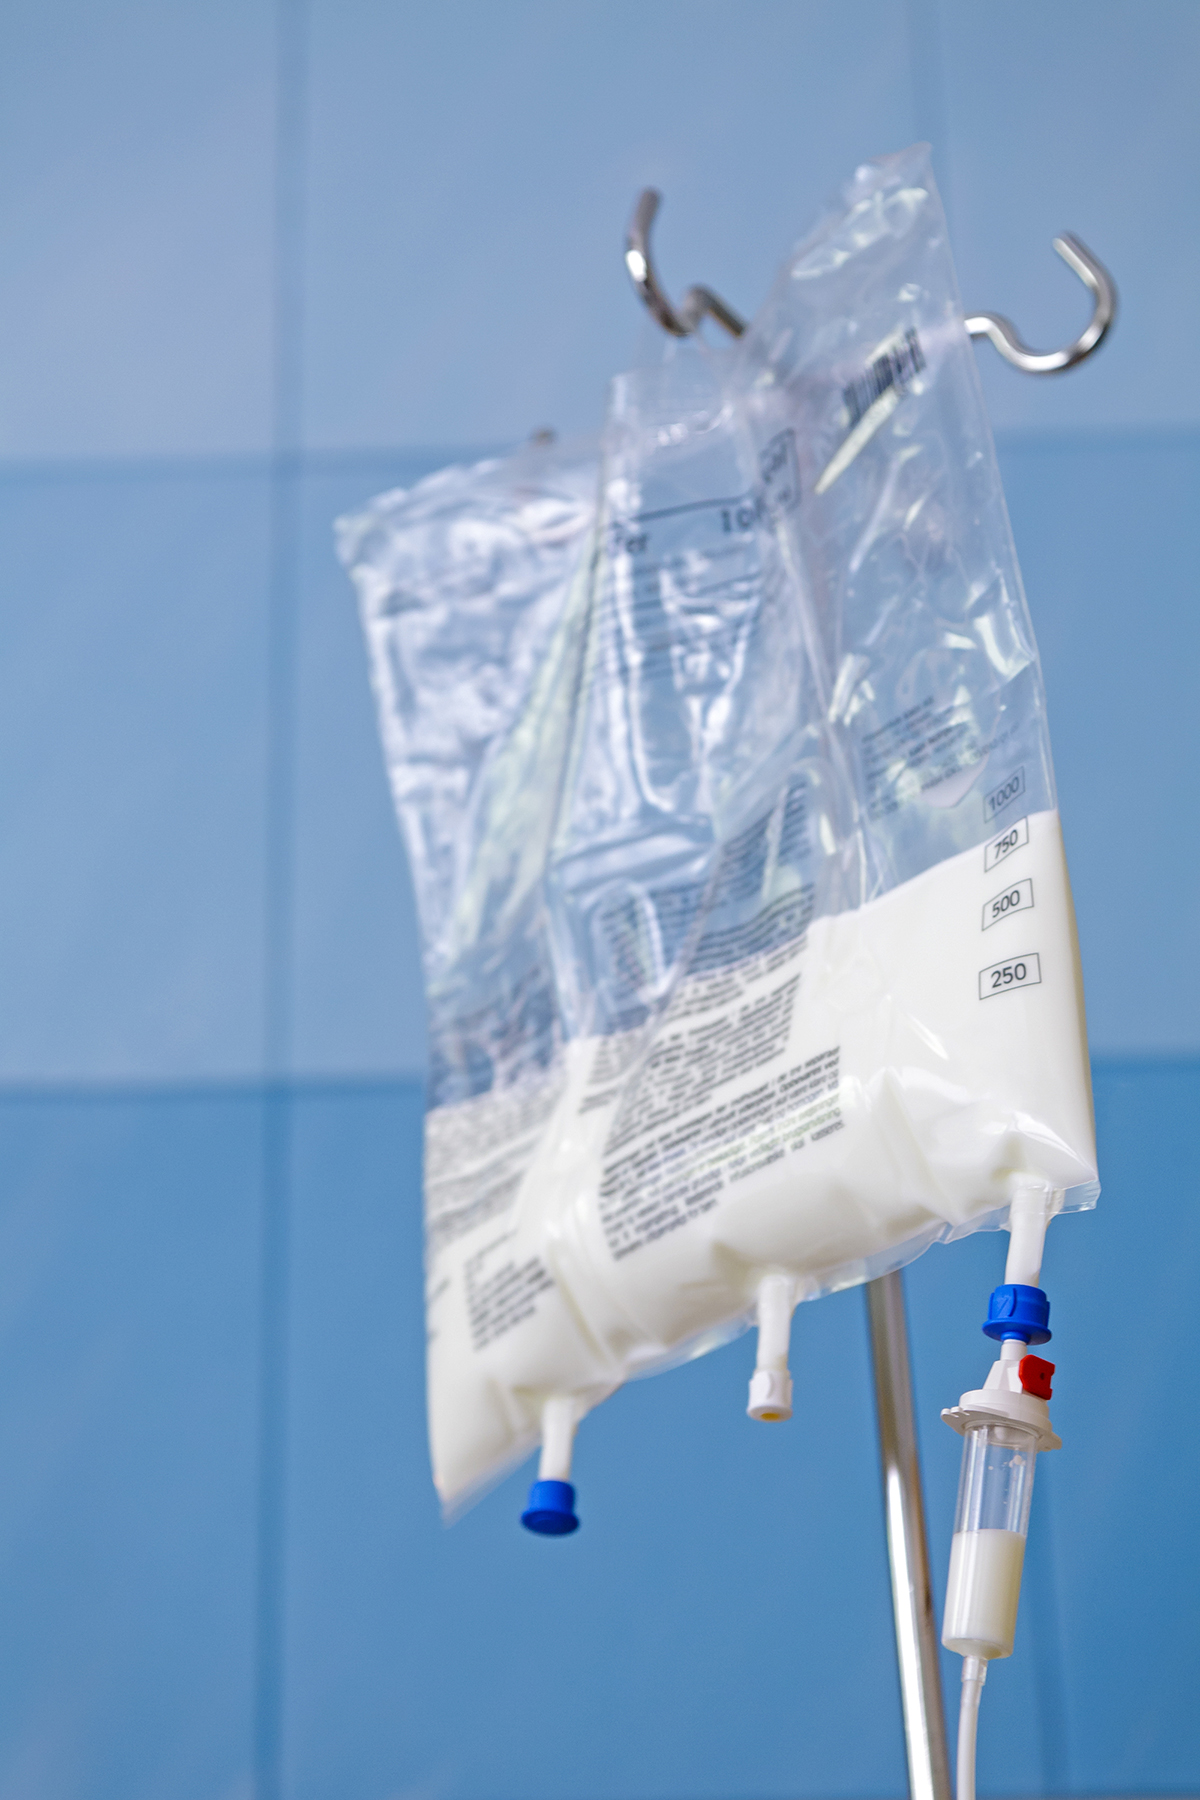
You will likely have seen bags like this before, either in person at the hospital, in images that we have used in previous content, or in your favourite hospital-related TV shows. These bags hold the TPN solution. TPN bags are usually pre-prepared and commercially produced.
They may come in the following forms:
- Standardised bag
- Multi-chamber bag
Standardised bag
This is a pre-mixed solution in a single bag (chamber) containing all the essential nutrients required for a patient's nutritional needs, as shown in the image above.
Advantages
- Standardised formulations simplify the preparation process and ensure consistency in nutrient composition.
Multi-chamber bag
These specialised bags contain separate compartments for different components of the TPN solution, such as amino acids, lipids, and electrolytes. The compartments are typically separated by a barrier that prevents mixing until the bag is ready for use.
Advantages
- Multi-chamber bags have an extended shelf life. Unlike single-chamber bags, whose shelf life is significantly reduced once mixed due to stability and compatibility concerns, multi-chamber bags can maintain their integrity and potency for up to two years when stored properly.
- The risk of infection is minimised due to fewer aseptic procedures required during compounding with all the nutritional requirements present in one bag.
Other components may be added to the pre-prepared TPN bags to customise them for the individual patient. Depending on the patient's condition and requirements, these may include additional nutrients, electrolytes, vitamins, minerals, and medications.
Compatibility and stability
Pharmacists need to ensure that all components of the TPN solution are compatible with each other and remain stable throughout the time of the preparation, storage and administration processes to ensure the safety and effectiveness of the treatment.
The components’ compatibility and stability can be viewed from physical, chemical, and microbiological perspectives. Take a moment now to consider these perspectives before selecting the (+) symbols below.
- Physical compatibility refers to the ability of different components within a solution to coexist without causing visible changes such as precipitation, cloudiness, or separation.
- For example, if two substances are physically incompatible, they may form solid particles or a cloudy appearance when mixed together.
- Physical stability refers to the ability of a solution to maintain its physical characteristics over time without undergoing any visible changes. This includes maintaining clarity, colour, and uniformity of the solution without any signs of degradation.
- Chemical compatibility refers to the ability of different chemical components within a solution to coexist without undergoing any chemical reactions that could produce new substances or alter the composition of the solution. Chemical reactions could lead to the formation of toxic byproducts or the degradation of active ingredients.
- Chemical stability refers to the ability of a solution to maintain the integrity of its chemical composition over time without undergoing any significant chemical degradation or transformation. This ensures that the active ingredients remain effective and safe for administration.
- Microbiological compatibility refers to the ability of a solution to remain free from microbial contamination, such as bacteria, fungi, or other microorganisms, that could compromise its safety. Solutions must be sterile and maintain their sterility throughout their shelf life and administration.
- Microbiological stability refers to the ability of a solution to resist microbial growth and maintain its sterility over time. This involves preventing the introduction of microorganisms during preparation, storage, and administration, as well as ensuring proper aseptic techniques are followed to minimise the risk of contamination.
Complications of TPN therapy
As we have mentioned, there can be some serious complications when using TPN therapy. Because of this, patients are closely monitored for signs of complication while receiving TPN.
Kia haere tonu tatou, let’s continue on to read some of these.
-
Catheter complications: These are problems related to the CVC used for administering TPN. Complications may include infection, thrombosis (blood clot formation), catheter displacement, or mechanical issues.
-
Blood clots: TPN administration via a CVC can increase the risk of blood clot formation, particularly in the veins where the catheter is inserted. Blood clots can lead to complications such as thrombosis or pulmonary embolism.
-
Refeeding syndrome: This occurs when nutrition is reintroduced to a malnourished individual too quickly, leading to metabolic disturbances such as electrolyte imbalances (e.g., hypophosphatemia, hypokalaemia, hypomagnesemia), fluid shifts, and potential organ dysfunction.
-
Hyperglycaemia: TPN solutions often contain high concentrations of glucose, which can lead to elevated blood sugar levels in patients receiving TPN. Hyperglycaemia can increase the risk of complications such as infection, poor wound healing, and diabetic ketoacidosis. Hyperglycaemia is common at the start of therapy but can be treated with insulin added to the TPN solution.
-
Fatty liver or liver failure: Prolonged TPN use can lead to the accumulation of fat in the liver, known as hepatic steatosis or fatty liver. In some cases, this can progress to more severe liver damage or liver failure, particularly in patients with pre-existing liver conditions.
-
Gallbladder issues: TPN administration can affect the gallbladder, leading to complications such as gallstones or biliary sludge. This can result from reduced bile flow or stasis due to decreased enteral feeding.
-
Growth and developmental delay in children: Long-term TPN use in paediatric patients may interfere with normal growth and development, as TPN may not provide all the essential nutrients and growth factors needed for optimal growth. This can lead to delays in physical and cognitive development.
TPN calculations

So far, we have covered the basics of administering TPN and the nutritional compounds required in the TPN solutions based on the patient’s needs. Now, we will learn how to calculate patients’ energy requirements.
How much energy an adult requires through parenteral nutrition is influenced by factors such as age, weight, gender, nutritional status, and the condition for which the patient has been admitted to the hospital (stress factors).
To determine the total amount of energy patients need from their parenteral nutrition solution, we must work out their baseline energy requirement and consider any additional energy expended.
BEE calculation
As a broad estimate, people will have an energy requirement of 20kcal/kg - 30kcal/kg per day. However, to calculate the energy requirements more accurately than using the broad estimate, we first need to find out the patient’s Basal Energy Expenditure (BEE) for 24 hours.
BEE is the amount of energy the body needs to carry out fundamental metabolic functions such as breathing and ion transport, irrespective of physical activity or additional stressors. Think of this as the baseline for estimating energy requirements.
The BEE for adult men and women are different. The formula for the calculations is:
| Men | BEE = 66.67 + (13.75 x [weight in kg]) + (5 x [height in cm]) – (6.76 x [age in years]) = kcal/24 hours |
|---|---|
| Women | BEE = 665.1 + (9.56 x [weight in kg]) + (1.85 x [height in cm]) – (4.68 x [age in years]) = kcal/24 hours |
Case Study

Sally is being considered for TPN therapy. She is a 22-year-old woman who weighs 45 kg and is 160 cm tall.
The BEE calculation for Sally is: BEE = 665.1 + (9.56 x 45) + (1.85 x 160) – (4.68 x 22) = 1,288.34 kcal/24 hours.
This result tells us that for Sally’s body to carry out the basal metabolic functions to keep her alive, she will need an energy intake of 1,288.34 kilocalories every 24 hours.
Journal post
My BEE
Kei a koe te rākau ināianei (it’s your turn now)!
- Create a new journal post with the title ‘My BEE’.
- Using the correct formula, calculate your BEE (or the BEE of an anonymous friend or family member). Make sure to show the formula you have used, your workings, and your final answer for the BEE in kcal/24 hours.
- Publish your post to ‘All course users’ so your tutor can check that your calculations are correct.
- Save the permalink to your Index of Journal Posts, as you may wish to refer to this later.
Total Energy Expenditure (TEE)
Once the BEE has been calculated, it is then multiplied by stress factors to get the Total Energy Expenditure (TEE). This adjustment ensures the patient receives adequate nutrition to support their increased metabolic demands during these stressful periods.
The TEE represents the total amount of energy a patient expends in a day. It includes the energy expended at rest and during physical activity, as well as the energy expended for digestion.
Therefore, we can say that TEE = BEE x Stress factor.
Stress factors are specific factors that are given a corresponding number as follows:
| Patient stress factor | Number |
|---|---|
| Severe starvation | 0.8 |
| Bed rest | 1.2 |
| Fever or trauma | 1.4 |
| Fever and trauma | 1.7 |
| Burns | 2.0 |
Case Study
Let’s return to Sally and calculate her TEE.
The reason Sally has been admitted to the hospital is that she has severe starvation.
From our previous calculation, we know what Sally’s BEE is. We use her BEE and multiply it by the stress factor number in the table above.
BEE x [Severe starvation] = TEE.
1,288.34 x 0.8 = 1,030.67 kcal/24 hours.
This result shows that Sally's total energy expenditure is 1,030.67 kilocalories in 24 hours. Therefore, this is the amount of energy she will need from her parenteral nutrition solution.
Note: You will notice that Sally’s TEE is less than her BEE. In severe starvation, the basal energy expenditure decreases by as much as 20-25%. In this situation, to avoid refeeding syndrome, the guidelines recommend that refeeding is started at no more than 50% of energy requirements.
Journal post
Max’s TEE
In this tūmahi (activity), you must use your calculation skills to provide TPN for a patient called Max.
- Complete the following Documentation tool activity.
- Upload the completed activity to a new journal post, ‘Max’s TEE’.
- Publish to ‘All course users’.
- Save the permalink to your Index of Journal Posts. Make sure to check back on your mahi (work) for tutor feedback.
Ka pai, now that you know how to calculate a patient's energy requirements, let's look at the full TPN picture, from considering TPN therapy for the patient, right through to delivering the solution to the patient.
Preparing and administering TPN therapy
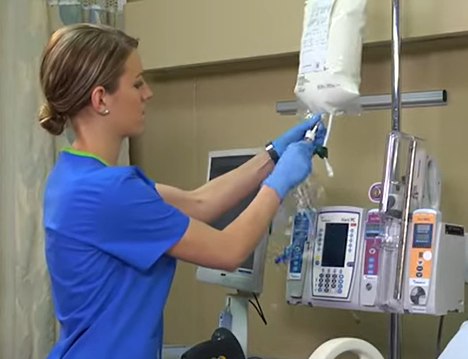
In this image, the nurse is preparing the TPN bag for administration to a patient via an infusion pump. If you'd like to watch this process in action, you can watch the video here: Administering Parenteral Nutrition Through A Central Line.
Before getting to this point, however, the medical team follows these general steps when a patient is considered for TPN therapy.
| Step 1 |
The ward dietician is usually contacted first. |
|---|---|
| Step 2 |
The ward dietician will undertake a formal and individual assessment of the patient and make specific nutritional requirement recommendations for the patient on their medical notes. |
| Step 3 |
The ward dietician will collaborate with the ward pharmacist and the clinical team to discuss whether TPN suits the patient. If it does not, an alternative therapy will be discussed and the process stops here. |
| Step 4 |
The procedure is explained and discussed with the patient. |
| Step 5 | The TPN bag is prescribed by a member of the clinical team and sent to the pharmacy. |
| Step 6 |
The pharmacist checks the patient's clinical records and the prescription to ensure there are no stability and compatibility issues.
|
| Step 7 |
After the TPN bag is prepared according to the prescription, it is transported to the ward in a specially designed light-protective bag, typically silver in colour.
|
| Step 8 |
Once the bag arrives on the ward it is placed in the ward medicine fridge until required.
|
| Step 9 |
To prepare for administration, the bag is removed from the fridge one hour before use to warm to room temperature.
|
| Step 10 | The light protective covering is briefly removed for a visual inspection, checking for signs of discolouration, separation or any other issue that would indicate it is not safe for administration. The covering remains in place during the infusion. |
| Step 11 | When the bag is checked and ready for administration, it is taken to the patient's bedside, where it is connected to the central venous line using an aseptic technique. |
| Step 12 |
The TPN bag is hung on an IV pole, and the line is connected to an infusion rate control pump to ensure a steady delivery rate to the patient.
|
It's important to remember that throughout the infusion process, the medical team constantly monitor the patient for any signs of infection or other general indicators to ensure the safety and effectiveness of the TPN therapy.
Knowledge check
Now that you have a good sense of what TPN is, when it is used and how it works, finish this week off with a flourish! Complete this seven-question pātaitai (quiz) to consolidate your learning and check your understanding.
Self-directed learning activities
Once again, this week, it's up to you how you want to use your SDL time. We encourage you to use the time wisely to review your notes and prepare for your assessment.
You can also complete the following optional activity to understand how pharmacy technicians contribute to the TPN process.
Optional Activity
Watch: Pharmacy Technician – Total Parenteral Nutrition (17:25 minutes)
Tune in to mātakitaki (watch) this pharmacy technician prepare TPN bags using the aseptic technique.
Consider the following reflective questions to help you connect the key points in the video to your current knowledge. You may like to take a moment to think about each question, write your answers in your notes, or discuss these with your pharmacy colleagues.
Questions
- How did she ensure the safety and sterility of the compounding process?
- Why did she use the hood's airflow when swabbing the bag ports and drawing from the vials?
- How did she organise her tray for the pharmacist's final check?
Ka mau te wehi, awesome! You’ve wrapped up another week of learning.