Up to now, you've covered various types of modelling and the UV mapping process; now, learn about texturing, an integral part of design production as it is essentially what helps bring life to your models.
As you will have found in the previous Modelling topic, some of these subtopics are paired with corresponding subtopics outlining the necessary system steps and videos that you will need for your learning tasks and assessment preparation.
The main Texturing subtopics include:
- Maya Materials
- Arnold Materials
- Using the IPR Renderer Process
- Painting Texture Maps.
Learning tasks that will support your skills in digital production have been outlined in the following table.
Practice
Put your skills into practice and extend your knowledge
As you work through the learning, you will encounter a series of learning tasks that you must complete within this Texturing topic and showcase on the discussion forums.
Keep an eye out for the PRACTICE boxes as you progress through the learning process to identify the learning tasks, resources, and instructions for what you must do. They also house the information regarding the specific subtopics, and how long you will need to allocate for these tasks. This has been briefly outlined below.
Remember, there will be learning tasks that you will need to complete that link directly to your assessment, so please read through them carefully.
| Learning task # | Learning Task Name | Duration (Hours) | |
|---|---|---|---|
| 1 | Create a texture material swatch for your space craft model | 2 |
|
| 2 | Create nine procedural shaders using default Maya materials | 6 |
|
| 3 | Create texture maps for the ballpeen hammer model | 3 |
|
| 4 | Create texture maps for spacecraft model | 8 |
|
| 5 | Summary knowledge check | 1 |  |
Feedback and support are woven through the learning tasks as you complete them. Reach out if you have any questions about what to do!
Reference
When texturing objects, using a library of your reference material is a good idea to help guide your texture-building process. References can give you excellent ideas about how things in the natural world change over time, how structures are formed, and how human-made buildings are put together.
In terms of textures, having references for a range of everyday materials like wood, metal, stone, or tree bark can help inform your texture work and give you a far better understanding of how various materials react to light and weather in the real world, changing colouration as they age, and so much more.
Creating your library of reference material is as easy as going for a walk with your camera. There are so many exciting opportunities to gather reference material in your everyday life.
Check out the following sliders of natural elements you may capture for inspiration.
The beach
One location where you are bound to find natural elements is the beach. Beaches house interesting rock formations, not to mention coral swept onto the shore and the textures of sand.
Select the arrows in the slider below to view three imagess captured at a beach.
Exploring towns and cities
Exploring local or foreign towns with older buildings, houses with weathered bricks offer great inspiration for texture.
Select the slider's arrows below to view two examples of weathered bricks.
Plants
Plant life is another natural element you may wish to draw textural inspiration from. Plants offer unique formations, textures and shapes to use in your work.
Select the sliders' arrows below to view three examples of plant life textures and shapes
Having a library of images that you can refer to for inspiration will help you create more grounded works and can be a time saver and a creative advantage in your workflow.
Using your unique reference images can help your work stand out and has the advantage of not requiring copywriting permission to use. If you took the image yourself, you also have the right to use that image; something that most people don’t think about when trawling through a Google image search looking for something to use in their work.
Texture Schemes
When creating the model's textures, materials, and colours it is important to consider how to generate interest and appeal.
The main areas to focus on while working on textures, materials, and colour for any model are outlined below.
1. Contrast
Effective contrast can draw the eye to a particular part of an image, texture or model.
Contrast can also add interest and appeal to your models through contrasting shapes, large and small, straight and curved, smooth and rough, high detail and low detail.
2. Colour
Colour and combinations of colour can also add or remove appeal in an image, texture or model. Think back to the colour theory section from the Foundations module of this course.
You will remember that there are established guidelines for creating appealing colour schemes — for example, contrasting, complementary, monochromatic, or analogous colour schemes.
3. Level of Detail
When working on an image, texture or model, it is critical to ask yourself what level of detail you need to achieve for this piece of work.
An object on a mantle in the background of a shot need not be highly detailed but only painted so that the audience can recognise what it is. Conversely, something is going to be seen in a close-up. In that case, you must create enough detail to convince the audience of its authenticity and prevent pixelation in the final render.
4. Weathering
The last thing to consider is the backstory of an object. Has the object had a hard life? Does it show evidence of hard wear and tear? Do you remember the Space crate challenge in the Foundations module? You needed to consider that the crate would have been moved around a lot in its lifetime and would, therefore, show evidence of that in its texture with damaged and scuffed-up edges and corners.
Part of adding weathering and use to an object or texture is considering where an abject would show its usage. There are some great examples of usage in the real world, like statues with a specific highly polished area where many people have touched them for luck or fertility.
Select the slider's arrows below to view four examples of weathering.
Creating a texture material swatch sheet
A valuable process to follow when you are creating a texture, material and colour scheme for a model is to create a swatch sheet for the object or model.
The swatch sheet is a high-resolution page that includes your model or concept drawing in the centre with a number of visual examples of the type of texture, material and or colour that each part of the model should be referenced and guided by.
In the following example of a spaceman character, the process involved finding high-resolution examples of the desired textures and materials for each part of the spaceman's costume and skin.
It would also be helpful to include notations on your sheet to help support your ideas and thinking for the textures, materials, colour weathering etc.m especially if you are not the texture artist who is tasked with bringing the textures and materials to life.
![[ADD IMAGE'S ALT TEXT]](/sites/default/files/Texture%20Swatch%20Sheet.png)
Watch the following video (2:55m) to help you create your texture swatch sheet.
Practice
Task 1: Create a Texture material swatch for your space craft model
Create a high-resolution swatch sheet to use as a reference for adding texture to your spacecraft model.
What tools or resources do you need?
- Adobe Photoshop
- Reference materials for images
- Your spacecraft.
What steps should you take?
2 Hours

Set aside up to two hours to complete steps 2-7 below. Remember to save your work as you go when using Adobe Photoshop.
- Review the learning for Texturing and watch the video High resolution Texture Swatch Sheet to help you with this task.
- Take some time to research various textures that will be suitable for your spacecraft.
- Open Adobe Photoshop and create a new document with a width of 1300 pixels and a height of 8000 pixels.
- Import your spaceship design and place it at the centre of the canvas.
- source reference for each different part of your ship design. You can use found images from online, or photographed images that you have found from around you (its best if you use only large high resolution images for your reference).
- Import and arrange your sourced reference images around your ship design.
- Include any written notations about the types of materials in your ship design, any special attributes you want to highlight or include etc.
- Once you have finished arranging all the materials and reference in your file, crop it to remove empty areas of unused space.
- Save the image in JPEG format. This will keep the file size around 30 megabytes.
- Keep your swatch handy as a reference for when you are ready to add texture to your spacecraft.
What should you do after?
- Reflect on your experience completing this task. What was your main source of inspiration for finding reference images?
- Share your Texture Swatch to Forum:
- Select your forum thread in Forum: Texturing.
- Select Reply to your first Forum post.
- Enter the words ‘Task 1 Spaceship Texture Swatch’ in your reply.
- Select the Post your response button, then select Edit in your new reply when it shows up.
- Upload your photo(s) or files using the Attachment field.
- Select Save changes to share your coursework to your forum thread.
- Get feedback on this and other learning tasks at the next Live Session – check the Live Session calendar for dates and times. Get feedback on this and other learning tasks at the next Live Session – check the Live Session calendar for dates and times. All live sessions are recorded so you can watch them later if you miss a session.
Ensure you keep this swatch handy as you continue to work through the texturing aspects of your learning. Your next task is creating procedural shaders in Maya.
The Hypershade Window
The Hypershade window is where you create and manipulate all materials and shading networks in Maya. The steps below walk you through using the hypershade window.
To open the Hypershade window, go to: Windows>Rendering Editors>Hypershade.
The Hypershade window can also be opened using the hypershade button on the main menu status line.
![[ADD IMAGE'S ALT TEXT]](/sites/default/files/Hypershade.png)
The Hypershade window is displayed below. Selectthe arrow to navigate between the slides.
Watch Geoff in the following video (7:49m) as he provides you with an overview of the Hypershade features.
In Maya, there are several different materials available for you to use. There are basic Maya materials that will work in most different render engines, and there are materials that are specific to a set render engine. The current specialised render engine that comes with Maya is called Arnold.
Maya Default Materials
The main default materials you will use are:
- Lambert
- Blinn
- Phong
- Phong E
- Anisotropic.
All the default materials in Maya have some common material attributes. The image below illustrates the common material properties and descriptions of each attribute.
![[ADD IMAGE'S ALT TEXT]](/sites/default/files/Common%20Material%20Properties.png)
Colour
The colour attribute allows you to set a flat colour to your material. Selecting the colour swatch will open a colour wheel where you can change the colour values.
Transparency
The transparency slider allows you to set how transparent a material is: with the slider all the way to the left, it will appear opaque, and to the right, it will appear fully transparent.
Ambient Colour
Ambient colour adds brightness to the colour of the material. With the slider to the left (black), the ambient colour will not affect the material’s colour. As ambient colour is lightened, it will mix with a material's colour and brighten the overall colour. Ambient colour is also affected if there are any ambient lights in the scene.
Incandescence
Incandescence is the colour and brightness that a material appears to be emitting. For example, if you have a material to simulate glowing lava, you can use a bright red incandescence. It is important to note that incandescence does not emit light or illuminate any other objects in the scene.
Diffuse
Diffusing allows a material to reflect light in all directions (0 = no light being reflected in all directions). The diffuse value acts like a scaling attribute for the colour of an object; the higher the value, the closer to the actual surface colour the object will appear. The diffuse value, by default, has a range of 0 to 1, but this attribute can be set to a higher value by manually inputting a value in the input field.
The checkbox icon to the right of each attribute is a button that allows you to link nodes to an attribute. You can use the check box to add a 'file' node, for example, to select a pre-painted UV map of a model, which would then be mapped onto your model.
Many different nodes, like noise, patterns, etc., can be applied to the other attributes, which allows for large and sometimes complicated node trees to be created.
Material Specific Attributes
What makes each material type different from each other is how each reacts to and applies light secularity (highlights) to the surface of the model.
Lambert
Lambert does not have any attributes for secularity: it is a flat matte basic material.
![[ADD IMAGE'S ALT TEXT]](/sites/default/files/Lambert%20Attribute.png)
Blinn
Blinn is a material shader that is particularly effective at simulating metallic surfaces which typically have soft specular highlights (for example, brass or aluminium).
![[ADD IMAGE'S ALT TEXT]](/sites/default/files/Specular%20Shading%20Window.png)
Specular Colour
Specular is the attribute that controls the colour of shiny highlights on the model's surface. Black produces no highlights; the default value is 0.5, and the mid-tone is grey.
Eccentricity
Eccentricity controls the size of shiny highlights on the surface.
Specular Roll Off
Specular roll-off allows the surface to reflect its surroundings (the environment, other surfaces) or the Reflected Colour when viewed at oblique angles. The slider range is 0 to 1. The default value is 0.7.
Tip
To help visualise the effect of Specular Roll Off in a Blinn material swatch, assign a texture to the Reflected Colour.
Reflectivity
Reflectivity gives the surface the ability to reflect its surroundings. The range for the slider is 0 to infinity. The default value is 0.5. Note: To generate real reflection, raytracing must be turned on in the render settings.
Reflected Colour
Reflected colour represents the colour of light reflected from the material. When raytracing, Maya tints the reflections using this attribute. If you are not raytracing, you can map an image texture or environment map to this attribute to create fake reflections which is faster and uses less memory than raytracing.
Phong
Phong Is a material shader that represents glassy or glossy surfaces (such as car mouldings, telephones, bathroom fittings) with a hard specular highlight.
![[ADD IMAGE'S ALT TEXT]](/sites/default/files/Specular%20Shading%20window%202.png)
Specular Colour
Specular colour controls the colour of shiny highlight on the surface of the model. Black produces no highlights. The default value is 0.5 or a mid-tone grey.
Cosine Power:
Cosine Power controls the size of shiny highlights on the surface.
Reflectivity
Reflectivity gives the surface the ability to reflect its surroundings. The range for the slider is 0 to infinity. The default value is 0.5. Note: Raytracing must be turned on in the render settings to generate accurate reflection.
Reflected Colour
Reflected colour represents the colour of light reflected from the material. When raytracing, Maya tints the reflections using this attribute. If you are not raytracing, you can map an image texture or environment map to this attribute to create fake reflections, which is faster and uses less memory than raytracing.
Phong E
Phong E is a material shader that is a simpler version of the Phong material. The specular highlights on Phong E surfaces are softer than those on Phong surfaces, and Phong E surfaces render faster.
![[ADD IMAGE'S ALT TEXT]](/sites/default/files/Specular%20Shading%20window%203.png)
Specular Colour:
Specular colour controls the colour of shiny highlights on the model's surface. Black produces no highlights; the default value is 0.5, and the mid-tone is grey.
Whiteness:
Whiteness controls the specular highlight colour. The default is white, but you can choose any colour. You can also map a texture to this value.
Roughness:
Roughness controls the secularity focus.
Highlight Size
Highlight size controls the amount of specular highlight.
Reflectivity
Reflectivity gives the surface the ability to reflect its surroundings. The range for the slider is 0 to infinity. The default value is 0.5. Note: raytracing must be turned on in the render settings to generate real reflection.
Reflected Colour
Reflected colour represents the colour of light reflected from the material. When raytracing, Maya tints the reflections using this attribute. If you are not raytracing, you can map an image texture or environment map to this attribute to create fake reflections, which is faster and uses less memory than raytracing.
Anisotropic
Anisotropic is a material shader representing surfaces with grooves, such as a CD, feathers, or fabrics like velvet or satin. The appearance of specular highlights on an Anisotropic material depends on the properties of these grooves and their orientation. The Specular shading attributes (shiny highlights) determine the grooves' direction and properties.
![[ADD IMAGE'S ALT TEXT]](/sites/default/files/Specular%20shading.png)
Specular Colour:
Specular colour controls the colour of shiny highlights on the model's surface. Black produces no highlights; the default value is 0.5, and the mid-tone is grey.
Angle
The angle determines the orientation of the grooves. The range is 0.0 (default) to 360.0. Use to determine the X and Y direction for non-uniform specular highlight.
Spread X/Spread Y:
Spread X/Spread Y determines how much the grooves spread out in the X and Y directions. The X direction is the U direction rotated counterclockwise by the specified Angle degrees. The Y direction is perpendicular to the X direction in UV space.
For Spread X, the range is 0.1 to 100.0 and the default is 13. For Spread Y, the range is 0.1 to 100.0 and the default is 3.0
Roughness:
Roughness determines the overall roughness of the surface. The range is 0.01 to 1.0. The default is 0.7. Smaller values correspond to smoother surfaces and the specular highlights are more concentrated. Larger values correspond to rougher surfaces and the specular highlights are more spread out - similar to being diffused.
Fresnel Index:
Fresnel Index simulates the Fresnel index of a real-world material for example the Fresnel Index for water is 1.33. Values range from 1.0 to 20.0.
Reflectivity
Reflectivity gives the surface the ability to reflect its surroundings. The range for the slider is 0 to infinity the default value is 0.5. Note: To generate real reflection raytracing must be turned on in the render settings.
Reflected Colour
Reflected colour represents the colour of light reflected from the material. When raytracing, Maya tints the reflections using this attribute. If you are not raytracing, you can map an image texture or environment map to this attribute to create fake reflections, which is faster and uses less memory than raytracing.
Anisotropic Reflectivity
Maya automatically calculates reflectivity as a fraction of roughness if anisotropic reflectivity is on. Reflectivity is on by default.
If reflectivity is off, Maya uses the specified Reflectivity value for the environment map (mapped on the Reflected Colour attribute), similar to how the Phong and Blinn materials work.
![[ADD IMAGE'S ALT TEXT]](/sites/default/files/Common%20Shader%20Attributes%20infographic.png)
The Maya Arnold render engine has several materials, textures, lights and cameras specifically designed and written to work with the Maya Arnold render engine. Because of this, you will often find that an Arnold material will not render correctly or even display if you use a render engine other than Arnold.
If you cannot see the Arnold renderer or any of its materials, etc., you may need to enable the Arnold plugin in your version of Maya.
Arnold plugins
The following steps will guide you through adding the Arnold plugin.
Step 1
- Go to Windows>Settings and Preferences>Plugin Manager.
![[ADD IMAGE'S ALT TEXT]](/sites/default/files/Plugin%20Manager.png)
Step 2
Scroll down to the Arnold section and ensure that the 'mtoa.mll' plugin is loaded and that the auto load option is enabled.
Step 3
You should now be able to see and access the Arnold renderer and features inside of Maya.
All Arnold materials, textures, lights and camera begin with the prefix ai.
Arnold Textures
Let’s take a look at the various textures you can use when using Arnold.
aiStandardsurface
The standard surface material is the main go-to Arnold shader, which incorporates attributes for most of the main areas for material creation. The standard surface material also includes several default presets (car paint, chrome, clay, plastic, rubber, among many more) that give the artist an excellent starting point to create their unique materials inside of Maya.
There are too many attributes to list in this course, so we will only list the base options and urge you to go and have a look at the standard surface material in more detail for yourself.
![[ADD IMAGE'S ALT TEXT]](https://cms-uped.baseux.com/sites/default/files/aiStandardsurface%201.png)
![[ADD IMAGE'S ALT TEXT]](https://cms-uped.baseux.com/sites/default/files/aiStandardsurface%202.png)
Base Options
The following table provide you with examples and descriptions of the base options available.
| Option | Description |
|---|---|
| Weight |
|
| Colour |
|
| Diffuse Roughness |
|
| Metalness |
|
| Specular Weight |
|
| Specular Colour |
|
| Specular Roughness |
|
| IOR (Index of Refraction) |
|
| Anisotropy |
|
| Rotation |
|
For more information on the Arnold Standard Surface material go to the Autodesk Arnold documentation at Standard Surface - Arnold User Guide.
There are many more Arnold materials. For now, focus on using the aiAmbientOcclusion and the aiWireframe materials in the next topic - Lighting and Rendering - where you'll learn how to use these two Arnold materials to showcase your 3D models for your showreel.
Simulating real world surfaces

You can simulate real world surfaces using default Maya Materials.
Now that you know what each of the default materials and attributes are for, start putting these materials and attributes to use to simulate real world surfaces.
Each different surface reacts differently to the way light interacts with its surface. Learning to observe these qualities of a material surface will enable you to simulate accurate world materials more accurately and, in turn, create more realistic-looking renders.
Selectthe arrows to navigate through three examples of Arnold materials.
Procedural Textures
Creating textures entirely within Maya using only the default materials, their attributes and the available 2D and 3D textures Maya offers is called procedural texturing.
'Procedural' refers to the texture using mathematically generated patterns and textures. Procedurally generated textures are usually faster to compute than painted textures because they are generally far smaller. You can create some exceptionally realistic procedural textures using only the nodes within Maya.
In this section, discover the process of making procedural textures and 2D and 3D texture nodes in Maya, starting with creating procedural material by looking at references and deciding on some critical things about the material based on the reference image.
Note: It is important to understand that the material you create is a possible version of the material based on the reference that you have. The same material will look different based on many different variables for example, the lighting at the time the image was taken and the age of the object. Newly machined surfaces are often very different from materials which have been exposed to the weather.
Procedural Concrete
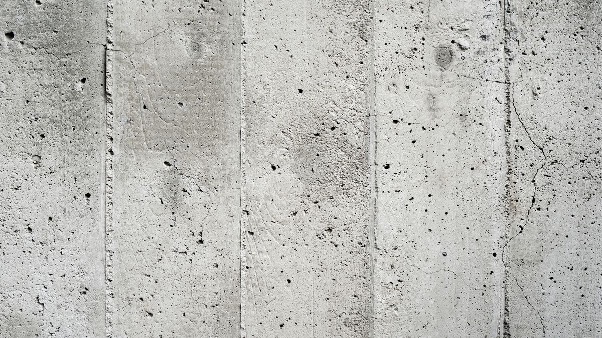
![[ADD IMAGE'S ALT TEXT]](/sites/default/files/Procedural%20concrete.jpg)
Looking at the above reference image for concrete, we can see that there is very little secularity or highlights due to the rough and unpolished surface of the material.
There is only a small variation in the overall colour of the concrete, ranging from light to mid-tone greys.
By far, the most prevalent feature of the material in the above reference image is the surface detail from the bumps and marks in the surface, ranging from small-scale roughness to some larger-scale bubbles and pitting in the surface.
Using this observational knowledge, you will practise simulating a concrete texture using procedural textures and techniques in the next subtopic - Using the IPR Renderer Process - where you'll get to practise creating nine procedural shaders using default Maya materials.
The steps below guide you through the IPR Renderer process. You can return to this subtopic at any time to review the steps using the navigation bar.
Opening the IPR renderer
To open the IPR renderer:
- first open the render settings window.
- you can open the render settings window by selecting the render button with a cog in the corner.
![[ADD IMAGE'S ALT TEXT]](/sites/default/files/Screenshot%20Render%20Button.png)
Choose the software renderer
- Choose the Maya software renderer (IPR Rendering only works with the Maya Software Render Engine).
![[ADD IMAGE'S ALT TEXT]](/sites/default/files/Render%20Settings%20Window.png)
Select the frame size
Then make sure that you have your preferred frame size selected, you can input this manually or choose from the presets (the example uses 1080p or 1920 wide by 1080 pixels high).
![[ADD IMAGE'S ALT TEXT]](/sites/default/files/Image%20size%20window.png)
Close and accept
- Select the close button to accept these settings.
Open and use the IPR renderer
- To open and use the IPR renderer, select the render button with 'IPR' on it.
![[ADD IMAGE'S ALT TEXT]](/sites/default/files/Screenshot%20IPR%20button.png)
The Render window will open and render the current camera and view of your scene. With the render completed, to start interactive rendering you will first need to select a portion of the render window to set an interactive region. Now with a region selected any changes that you make to your textures will update in real time in the IPR render window.
Watch the following video (3.25m) for an overview and setup of a render.
Colour
The base colour is the first area to work on inside the concrete material. If you only need a flat colour for your material, set the colour using the colour swatch and colour wheel. However, you want some variation in our base colour, so connect one of the procedural textures already inside Maya to the colour attribute of the Lambert material.
To add a texture to the colour attribute in the attribute editor follow the steps below.
- Select the checker box to the right of the colour attribute.
- this opens the create render node window
- can choose which texture node to add to the colour attribute.
![[ADD IMAGE'S ALT TEXT]](/sites/default/files/Create%20Render%20Node%20Window.png)
You can apply several nodes, from grid patterns to varying types of noise. Some of the textures are 2D, and some are 3D. You can refine the available textures by selecting one of the categories on the menu on the left. Selecting 2D Textures, for example, will only show you 2D Textures.
Next to each texture is a small thumbnail image of the texture and roughly what it looks like. Each texture type will have its own attributes that you can adjust and change to create the details and look you need in your material.
The best way to select a texture for a particular material is to find one that is nearly what you want and then use its attributes to dial in the texture you are after. For your concrete, you want a two-tone texture that has some variation in the pattern of the colours.
For this example, the Solid Fractal 3D texture is used, but you may wish to experiment with a few of the other textures to create your concrete material.
You can adjust the attribute sliders and values for the Solid Fractal texture to change the way that the pattern is being generated.
To solo a node in the Hypershade window:
- Select the small 's' button in the top right of its node.
- This will only show you the output of the node you are currently working on in the material viewer window.
- Select it again to turn soloing off.
![[ADD IMAGE'S ALT TEXT]](/sites/default/files/S%20Button.png)
Common Procedural Attributes
The following image illustrates the Common Procedural Attributes. Below this image, you will find descriptions of each attribute. Select each of the headings to read the descriptions.
![[ADD IMAGE'S ALT TEXT]](/sites/default/files/Common%20Procedural%20Attributes%20infographic.png)
Select each of the following headings to learn more about each common procedural attribute.
Adjusts the amount of light and dark values in the texture. A higher number will produce more light colour values in the texture, a low number will produce more darks.
Adjusts the contrast in the texture.
Adjusts the amount of noise or detail in the texture.
Increases or decreases the scale of the texture.
Coordinate based ripple, allows ripples to be made more or less obvious in the X, Y, and Z axis.
A min and max value range from 0 to 20. A small range results in less detail a broad range results in higher detail
Adjusting the bias slider allows you to see a clear definition between the edges of the texture pattern (more visible with larger less noisy textures).
On or off creates a puffy or veined look to the texture.
On or off, makes the time sliders adjustable and allows the texture to change over time.
In the Colour balance area of the fractal attributes, you can adjust the colour of the material by using the Default colour, Colour Gain, and Colour Offset swatches which are a method to Tint your overall colour, Darken and Lighten, respectively.
You can also select the place 3Dtexture node in the Hypershade window if you adjust the position size and scale of the 3D placement of the texture to adjust how the texture looks on the object. If you need the texture to fit your model in the 3D space, you can select the Fit to Group BBox button, which will fit the 3D placement node around the model exactly.
Notice in this texture that the scale of the place 3D texture node has been made larger to increase the size of the texture on the model.
![[ADD IMAGE'S ALT TEXT]](https://cms-uped.baseux.com/sites/default/files/Hypershade%201.png)
![[ADD IMAGE'S ALT TEXT]](https://cms-uped.baseux.com/sites/default/files/Hypershade%202.png)
Surface Detail
The next area to work on is the surface bump detail of the material.
Because there is a fair number of different types of bump detail in the concrete, you must think of each of the different types of bumpiness separately from each other. Create the fine bump detail first and the larger details second, then stack them up to create the final shading network.
Bump 1
The first bump detail will be the fine roughness of the surface. The steps below guide you through the process of adding the bump.
- add the first of your bump textures to the bump/normal attribute of the lambert material.
- Using the checker box button to the right of the attribute.
- use a fractal texture which is a 2D texture.
Using the Fractal attributes adjust the texture to be a fine surface bump detail.
- lower the bump depth of the bump 2D node so that the bump is not too extreme. Bump always looks better using a low bump depth and creating a more subtle overall effect.
Tip
Bump depth can go into negative values which will reverse the bump effect. Again, make sure that you are using small values for a more subtle bump detail in the texture.
![[ADD IMAGE'S ALT TEXT]](/sites/default/files/bump2d1%20Window.png)
- play with the sliders for the fractal effect to create the texture that you like in your concrete material
- solo the texture by selecting the 'S' button in the top right of a node
- select it again to turn the soloing off and return to viewing the full material in the material viewing window.
You can also adjust the amount of detail of a texture by adjusting the repeat UV attributes of a texture in the place 2D node. Notice that this texture has had the repeat UV value increased to 30 to create a far finer surface detail than would be possible using the fractal attributes alone.
![[ADD IMAGE'S ALT TEXT]](https://cms-uped.baseux.com/sites/default/files/Fractal%201.png)
![[ADD IMAGE'S ALT TEXT]](https://cms-uped.baseux.com/sites/default/files/Fractal%202.png)
Bump 2
The second bump detail will add more variation to the bump detail. The following image sliders illustrate the variation in the Stucco window.
![[ADD IMAGE'S ALT TEXT]](https://cms-uped.baseux.com/sites/default/files/stucco1%20Window.png)
![[ADD IMAGE'S ALT TEXT]](https://cms-uped.baseux.com/sites/default/files/stucco1%20Window%202.png)
Because the Stucco texture is a 3D texture, you need to use the 3D bump node to connect it to the shading network.
Important
3D textures should only be connected to the 3D bump node, 2D textures should only be connected to the 2D bump node.
![[ADD IMAGE'S ALT TEXT]](/sites/default/files/bump3d1%20Window.png)
You can stack as many different textures as you need to create the details you want in your bump map.
Connecting the bumps to the network
You will then need to connect the bumps to the network.
To connect more than one bump map to the Lambert material, use the Connection Editor to make the connection for the second bump map and create a daisy chain in the Hypershade window. You can make as many different bump maps as you need to create the detail that you want.
Follow the steps below to guide you through connecting the bumps to the network.
To make manual connections between nodes in the work area:
- use the Connection Editor which can be found by going to the menu of the Hypershade and choosing:
- Window>Connection Editor.
The connection editor window will open which has two columns. By Default, the column on the left is the 'From' column, and the column on the right is the 'To' column.
- select a node that you want to connect from (you want to connect from the Stucco bump 3D node)
- select the reload left button at the top of the window
- select the node you want to connect to (you want to connect to the fractal bump 2D node)
- select reload right.
You should now have both columns populated with several different attributes.
At the top of the widow in the Left and Right Display menus make sure that the Show Hidden option is checked. Do this for both menus.
![[ADD IMAGE'S ALT TEXT]](/sites/default/files/Show%20Hidden.png)
To make the connection between the two nodes:
- first select an attribute in the left column (from)
- then select an attribute in the right column (to)
- connect the 'outNormal' to the normalCamera attributes.
![[ADD IMAGE'S ALT TEXT]](/sites/default/files/Connection%20Editor.png)
Shading Network
Congratulations, you have now created your first shading network!
You can see the shading network in the work area of the Hypershade. If you want to work on a different texture in the future, you can graph a network and bring it into the work area by following the steps below:
- right mouse selecting the material in your materials area at the top of the Hypershade window
- right mouse click and hold
- choose the 'graph network' option from the marking menu.
![[ADD IMAGE'S ALT TEXT]](/sites/default/files/Network%20Shading%20Connections.png)
Once you have finished, your final rendered procedural concrete should look like the image of the completed procedureal concrete cube below.
![[ADD IMAGE'S ALT TEXT]](/sites/default/files/Concrete%20Cube.png)
Metals
Metals like the next example need specular attributes, which means that you must use one of the Maya materials with a specular highlight, these materials are:
- Blinn
- Phong
- PhongE
- Anisotropic.
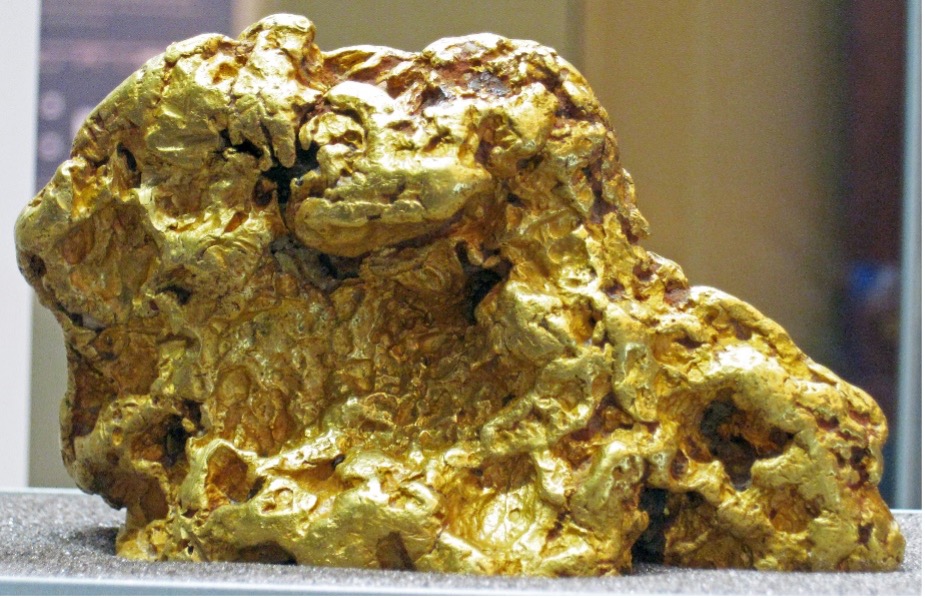
![[ADD IMAGE'S ALT TEXT]](/sites/default/files/Gold%20Nugget.png)
Looking at this reference image of gold (above), you can see that it is not smooth and shiny. As a result, the specular highlight is not all that sharp and can spread a little over the surface. Use the eccentricity value in our material to simulate how far the specular highlight spreads over the surface of a model. The specular colour for metal should be a colour that matches the main colour of the material, which will help to make the material look more metallic.
The specular roll-off attribute controls the brightness or intensity of the specular highlight. You can set this value above 1 by attributing a higher value as required.
The colour is set using the main diffuse colour of the material, which can then be made brighter or darker as required by looking at the IPR render and using the ambient colour attribute.
![[ADD IMAGE'S ALT TEXT]](/sites/default/files/IPR%20Render%20Window.png)
You may also decide that you want to introduce more variation into the main colour of the shader you can do this by adding a texture to the colour attribute as you did previously. In this case, keep the colour in the yellow/green area and have a slight variation in the colours.
There are a few of the 3D textures like Crater Marble, and Stucco (see next umage) that have the option of displaying a few colours so try one of them to add in some variation on the colour of your material shader.
![[ADD IMAGE'S ALT TEXT]](/sites/default/files/Stucco%20Window.png)
The surface detail of the material can be achieved by daisy chaining several textures together to control the bump of the shading network. This network used two noise texture nodes and a simplex noise texture to create an interesting and varied bump texture.
![[ADD IMAGE'S ALT TEXT]](/sites/default/files/Shading%20Network.png)
Your final rendered procedural Gold should look like the example below.
![[ADD IMAGE'S ALT TEXT]](/sites/default/files/Gold%20Render.png)
Fresnel Materials
For highly reflective and smooth surfaces like glass and polished surfaces, you must consider how light and reflections react to curved surfaces as they curve towards and away from the camera's point of view.
To simulate this in Maya, use a sampler info node. This node has a facing ratio attribute that can calculate the angles at which surfaces face the camera.
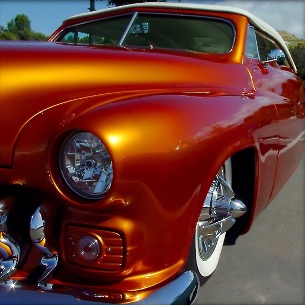
In the example of a highly reflective car below, you can see the Fresnel Effect in the way that the colour of the paint changes as surfaces curve away from and towards the camera Surfaces that are facing the camera are brighter and more orange than the surfaces that are facing away from the camera. This effect is also apparent in the reflections on the surfaces, with the surfaces facing away from the camera appearing more reflective than those facing the camera.
![[ADD IMAGE'S ALT TEXT]](/sites/default/files/Highly%20Reflective%20Car.png)
You first need a material with specular attributes to create a shader that simulates this effect. The Blinn material is an excellent starting point for a shiny and reflective surface.
The Fresnel Effect is achieved using the 'Sampler info' node and a 'Ramp' node. The sampler info node can be found in the utility area of the Hypershade; the Ramp is a 2D texture.
![[ADD IMAGE'S ALT TEXT]](/sites/default/files/Blinn%20Network%20Window.png)
To connect the nodes, connect the ramp into the colour attribute of the Blinn material. To connect the sampler info node to the ramp, use the Connection Editor.
Looking at the Ramp attribute, you need to note what type of ramp you are currently using; in this case the type is a 'V Ramp'. This is important to note for the connection of the sampler info node next.
![[ADD IMAGE'S ALT TEXT]](/sites/default/files/V%20Ramp.png)
- Load the sampler info node into the 'from' column and the ramp into the 'to' column.
![[ADD IMAGE'S ALT TEXT]](https://cms-uped.baseux.com/sites/default/files/Connection%20Editor%201.png)
![[ADD IMAGE'S ALT TEXT]](https://cms-uped.baseux.com/sites/default/files/Connection%20Editor%202.png)
To connect the two nodes, follow the steps below:
- select the facing ratio attribute of the sampler info on the lef
- then the vCoord attribute of the ramp.
Important
Ensure that the ramp type and the uvCoord attributes match.
If the ramp is a V ramp you must use vCoord attribute. If the ramp is a U ramp, then you must use the uCoord attribute.
Adding and changing colour
You can add or change the colour of the ramp.
Adding and changing colours on the ramp will create the Fresnel effect on the model's surface. You can add as many different colours as you like and move the colour locations on the gradient bar by sliding the colours around. This will affect where the colours are located on the model according to its angle to the render camera.
![[ADD IMAGE'S ALT TEXT]](/sites/default/files/Colour%20Ramp.png)
With the colours in this position the yellow/orange value is rendered on surfaces that are facing the camera and the red/orange on the surfaces that are at an angle to the render view.
![[ADD IMAGE'S ALT TEXT]](/sites/default/files/Applied%20Colour.png)
The sampler info node is especially useful in creating many different types of shaders in Maya, from glass and metal to other fabrics.
To create the effect of metallic flecks in the paint, you can use the sampler info node to add some texture to the material's Ambient colour. In the example below, the granite texture node, which has a cell-like or spotty look, has been used to apply to a new ramp.
![[ADD IMAGE'S ALT TEXT]](/sites/default/files/Granite%20Texture.png)
The colours of the granite texture are all greyscale tones which will brighten the ambient colouration of the paint on those areas. You can play with the other attribute to get the size and density that you like.
![[ADD IMAGE'S ALT TEXT]](/sites/default/files/Granite%20Attributes.png)
The Granite texture is plugged into one of the colours of the ramp node and then you can play with its position on the ramp and the colour of the second ramp colour to achieve the fall off that you think looks good in your car paint.
![[ADD IMAGE'S ALT TEXT]](/sites/default/files/Granite%20Texture%20Ramp.png)
The following is an example of the final rendered procedural paint with a slight metallic fleck effect in the material.
![[ADD IMAGE'S ALT TEXT]](/sites/default/files/Final%20Rendered%20Procedural.png)
![[ADD IMAGE'S ALT TEXT]](/sites/default/files/Facing%20Ratio%20Graphic.png)
Complicated and detailed textures
You may choose to add more complicated and detailed textures to your work.
To achieve more detailed materials Maya has two different layer-based nodes that you can use. The layered shader, and the layered texture. Both work in a similar way in that you can layer and blend materials or textures together before displaying them on a surface.
Layered Shader
You can plug different shading networks into the layers (Lambert, Blinn, Phone, etc). This is handy if you have a model with areas requiring different material attributes, such as a glass bottle with a paper label attached.
Using a Layered shader, you can have a shading network for the glass with a specular highlight and a Fresnel effect with a label material without specular attributes.
The series of images below illustrate the difference in specular values (the highlights between the glass of the bottle and the label).
![[ADD IMAGE'S ALT TEXT]](https://cms-uped.baseux.com/sites/default/files/Bottle%201.png)
![[ADD IMAGE'S ALT TEXT]](https://cms-uped.baseux.com/sites/default/files/Bottle%202.png)
Layered Texture
You can plug textures into its layers (fractal, ramp, marble, etc). Layered textures are suitable for materials that require multiple inputs for an attribute. For example, with more detailed materials, you should have a base colouration with areas of discolouration or oxidation. Because you can only have one input into the colour attribute of a material, you would not be able to do this procedurally. You would have to paint a texture map for the material's colour.
For more complicated and detailed textures like the aged bronze in the image below, you must create a more complex shading network to simulate the detail and nuance in this reference image.
To simulate this material, break up its different visual elements. For example, the object's base metal would be the shader's main visual element. Then, you might have another visual component for the areas of oxidation.
![[ADD IMAGE'S ALT TEXT]](/sites/default/files/Bronze%20Ram%E2%80%99s%20Head.png)
It is obvious the condition of the metal is very old; there is weathering evident in the areas of oxidation of the surface, which has created localised areas of green, turquoise, and pale greenish/white.
The surface finish is slightly pitted and is not consistently smooth all over. There are scratches and evidence of use on the surface of the material.
The colouration of the bronze itself is not uniform; some areas are a rich reddish/orange, and others are more subdued brownish/red.
The specular highlights do not look incredibly sharp, are slightly diffused around the edges, and show clear breaks where there are pits and scratches on the material's surface—the specular needs to show up on the areas of the material where oxidation is present.
Base Metal Layer: Bronze
For the base metal layer, you can create a basic bronze shader using a Blinn material.
![[ADD IMAGE'S ALT TEXT]](/sites/default/files/Blinn%20Material%20Window.png)
The colouration of the basic bronze is made using a solid fractal texture with some variations of brown in the colour section.
![[ADD IMAGE'S ALT TEXT]](/sites/default/files/Solid%20Fractal%20Attribute.png)
Oxidation Layer: Turquoise and green oxidation
The oxidation for the material is made using a stucco texture with a light turquoise and a darker green colouration.
![[ADD IMAGE'S ALT TEXT]](/sites/default/files/Oxidation%20Window.png)
To combine the two elements, use a layered texture node which is found in the 'other textures' area of the Hypershade window.
To add the two textures to the layered texture node follow the steps below.
- Drag and drop each using the middle mouse button in the layers area (the area with a rectangular box) of the layered texture node.
- When a layer is empty it is displayed green, when a layer contains something, it is displayed purple.
The layers are displayed on the material from left to right. The left most layer is on the top and the right most layer is the bottom.
Once you have your layers set up
- connect the layered texture out colour to the colour of the Blinn texture.
![[ADD IMAGE'S ALT TEXT]](/sites/default/files/Layered%20Texture%20Attributes%20Window.png)
If you have the layers in the correct order, you won't see the colour of the oxidation texture. You need to create a mask that cuts through the base metal layer and reveals the oxidation on the layer underneath to display both the oxidation and the base metal layers.
To create the mask layer, use any one of the black and white textures in Maya. For this mask, a solid fractal texture is used.
![[ADD IMAGE'S ALT TEXT]](/sites/default/files/Mask%20Window.png)
To connect the solid fractal as a mask:
- Connect the out alpha of the fractal texture to the alpha attribute of the base metal layer in the layered texture node.
The mask will create transparent and semi-transparent areas (anywhere the texture is black or shades of grey) of the base metal layer and reveal the oxidation colours beneath.
You can also connect the mask to the specular colour attribute of the material and use this mask to drive where the specular highlights are applied to the model's surface. Anywhere there is oxidation on the surface, there will not be any specular highlights because the mask is black or a shade of grey in those areas (the specular highlight is displayed the brightest in the light areas of the mask).
![[ADD IMAGE'S ALT TEXT]](/sites/default/files/Mask%20Window%202.png)
The surface detail of the material is made using a chain of bump textures; in the example, a solid fractal, a marble, and a mask texture are used to slightly raise the surface of the model in the areas where the oxidation texture is located.
The image below illustrates the final rendered procedural Aged Bronze.
![[ADD IMAGE'S ALT TEXT]](/sites/default/files/Final%20Rendered%20Procedural%203.png)
Using what you have learned about the Hypershade window, Maya material types, Material Attributes, and Procedural textures, create procedural shaders for each of the material cubes in the procedural texturing activity.
Watch the following video tutorials to help guide you through the task of creating procedural shaders.
Practice
Task 2: Create nine procedural shaders using default Maya materials
Create nine different procedural shaders for the cubes in the project file using the default Maya materials: Lambert, Blinn, Phong. The materials you will need to create are:
- Concrete
- Obsidian
- Marble
- Chalk
- Bronze
- Copper
- Gold
- Brushed Metal
- Wax
What tools or resources do you need?
- Autodesk Maya.
- Material reference images.
- ProceduralTexturing.mb.
What steps should you take?
5 Hours
Set aside up to five hours to complete steps 2-10 below. Remember to save your work as you go when using Autodesk Maya.
Concrete
- Review the texturing subtopic in the learning to help you through this task.
- Open the file Procedural_Texturing_StudentStart.mb in Autodesk Maya.
- Open the Hypershade window by selecting Windows > Rendering Editors > Hypershade from the main menu.
- Open the reference image for concrete.
- Create a new Lambert material
- Give the Lambert a name, e.g. Concrete_SHDR
- Apply material to the geometry.
- Set your render settings using the render settings button (clapperboard with cog image).
- Choose the Maya software renderer.
- Choose the frame size- Select 1080p or 1920 wide by 1080 pixels high.
- Use the IPR renderer to help create your concrete shading network using the procedural texture nodes available in maya.
- Select a portion of the render window to set an interactive region. (This will automatically update as you make changes.
- Add colour to your cube, using the colour attribute of the lambert material.
- Create variation in the base colour by connecting one of the procedural textures available in Maya.
- Add Surface bump detail using the bump attribute of the lambert material. TIP: When working with various surface details, you can consider each of the different types of bumpiness separately from each other.
- Create the fine bump detail. (Bump 1)
- Create larger bumps. (Bump 2)
- Stack them up to create the final shading network.
- View the shading network in the work area of the Hypershade.
For future texture additions or changes to this texture, use the graph network marking menu to bring the shading network into the work area.
Metals
Set aside 1.5 hours to complete 9 steps below. Remember to save your work as you go when using Autodesk Maya.
- Open the Hypershade window by selecting Windows > Rendering Editors > Hypershade from the main menu.
- Create a new material by selecting the Create tab in the Hypershade window and selecting one of the Maya materials with a specular highlight: Blinn, Phong, PhongE, or Anisotropic.
- Apply the gold material to the cube labeled gold in the outliner.
- Using the IPR render window adjust the material attributes to simulate the properties of gold:
- Ensure the main diffuse colour of the material matches the desired colour for gold. Use the ambient color attribute to adjust brightness as needed, observing changes in the IPR render window.
- Introduce variation into the main colour of the shader by adding a texture to the colour attribute:
- Create surface detail by daisy chaining multiple textures together to control the bump of the shading network:
- Review the procedural gold material in the Hypershade window to ensure all attributes and textures are correctly applied.
Render the scene to see the final result of the procedural gold material. Adjust material attributes and textures as needed to achieve desired appearance.
Frensel
Set aside 1.5 hours to complete the 9 steps below. Remember to save your work as you go when using Autodesk Maya.
- Select a material with specular attributes, such as the Blinn material, as a starting point for creating a shiny and reflective surface.
- Locate the Sampler Info node in the utilities area of the Hypershade, to calculate the angles at which surfaces are facing the camera.
- Add a Ramp node, a 2D texture, to create the Fresnel Effect.
- Connect the Ramp node into the color attribute of the Blinn material.
- Use the Connection Editor to connect the Sampler Info node to the Ramp node.
- Connect the facing ratio attribute of the Sampler Info node to the appropriate coordinate attribute (vCoord or uCoord) of the Ramp node, depending on the type of ramp used (V ramp or U ramp).
- Adjust the colors on the Ramp node to create the Fresnel effect on the surface of the model.
- Experiment with adding different colors and moving color locations on the gradient bar to adjust according to the model's angle to the render camera.
- Use the Sampler Info node to add texture to the ambient color of the material to simulate metallic flecks in the paint.
- Choose a texture node like Granite and connect it to a new Ramp node.
- Adjust the attributes of the Granite texture node to control the size and density of the metallic flecks.
- Play with the position on the Ramp node and adjust the color of the second ramp color to achieve the desired effect in the car paint.
- Render the final procedural paint with the slight metallic fleck effect to observe the results and make further adjustments as necessary.
Bronze
Set aside 1.5 hours to complete the 11 steps below. Remember to save your work as you go when using Autodesk Maya.
- Open Maya and load the scene containing the object or model you want to apply the bronze material to.
- Access the Hypershade window by selecting Windows > Rendering Editors > Hypershade from the main menu.
- Create a base metal layer using a Blinn material. Use a solid fractal texture with variations of brown in the colour section to create the basic bronze shader.
- Create an oxidation layer using a stucco texture with light turquoise and darker green coloration to represent areas of oxidation.
- Combine the base metal and oxidation textures using a layered texture node.
- Arrange the layers within the layered texture node from left to right, with the leftmost layer on top and the rightmost layer at the bottom.
- Connect the out colour of the layered texture node to the colour attribute of the Blinn material to apply the layered textures to the model.
- Create a mask layer to reveal the oxidation texture beneath the base metal layer. Use a black and white texture, such as a solid fractal texture, for the mask.
- Connect the out alpha of the mask texture to the Alpha attribute of the Base Metal Layer in the layered texture node. This will create transparent and semi-transparent areas in the base metal layer to reveal the oxidation colours beneath.
- Optional: Connect the mask texture to the specular colour attribute of the material to control where specular highlights are applied. Anywhere there is oxidation on the surface, there will be no specular highlights.
- Apply surface detail using a chain of bump textures. Use textures like solid fractal, marble, and the mask texture to slightly raise the surface of the model in areas where the oxidation texture is located.
- Render the final bronze material to observe the results and make further adjustments if necessary.
What should you do after?
- Reflect on your experience in designing each of the procedural textures.
- Of the textures you created, which was your favourite one to complete and why?
- How well did you capture the details of each texture?
- Share each of your procedural textures to Forum: Texturing.
- Select your forum thread by finding your name in the ‘Texturing’ Forum.
- Select ‘Reply’ to your most recent Forum post.
- Enter the words ‘Task 2 Procedural Shaders’ in your new post.
- Select the Post your response button, then select Edit in your new reply when it shows up.
- Upload your photo(s) or files using the Attachment field.
- Select Save changes to share your coursework to your forum thread.
- Get feedback on this and other learning tasks at the next Live Session – check the Live Session calendar for dates and times. Get feedback on this and other learning tasks at the next Live Session – check the Live Session calendar for dates and times. All live sessions are recorded so you can watch them later if you miss a session.
Practice your texturing skills further in the next task; creating texture maps for the Ballpeen Hammer Model

Now that you have discovered and experimented with procedural textures, it’s time to move on to creating painted texture maps using a UV layout from the UV process you learned about previously.
Colour maps
Painting your own colour maps using a paint program like Adobe Photoshop, allows you far more control over the colour, texture, details and weathering of a 3D object. Adding designs, text and a myriad of other details are now possible where they were not before if you were to only use procedural texturing techniques.
In the example below of a relatively simple model of a Viking Shield, a large amount of the overall interest and narrative of the object is conveyed by the colours and textures. The texture tells a story, which in turn makes for a far more interesting model.
Select the arrows within the slides to navigate through the examples.
Other texture maps
The look of a shader is controlled by many attributes, some of the main ones being bump, specularity, reflectivity, and so on. You can also create painted texture maps to control these attributes.
Most attributes are controlled by values from 0 to 1 or black to white. So, most painted texture maps that control these attributes will be monochromatic or greyscale.
Specular Map
The light areas of a specular map will have the brightest specularity, or highlights, darker areas will have less or none depending on the colour values used in the map.
In the example below for the Viking shield, most of the map is painted in mid grey tones, the lighter areas of the map like the scratches around the edges of the shield, the dragon design, and the blood spatter will appear with the brightest amount of specularity, in the final render as they are the lightest values in the map.
![[ADD IMAGE'S ALT TEXT]](/sites/default/files/Viking%20Shield.jpg)
Bump maps
The bump map of an object will also be a greyscale image. The dark values in the image will be the areas where the bump will appear to sink into the surface. Light values in the image will have the opposite effect, making the light areas of the map seem to rise from the surface.
From the example of the Viking shield's main bump map, you will note that several texture details need to be added to the image. The designs from the front of the shield are not present, and the blood splatter is not. Also, the scratches and nicks on the shield's edge are not included.
![[ADD IMAGE'S ALT TEXT]](/sites/default/files/Viking%20Shield%202.jpg)
The missing details mentioned have been separated into their texture maps so that they can be controlled independently. You will also note in these maps that the scratches are now rendered in dark values, which, when applied to the bump attribute, will make them appear to sink into the model's surface.
![[ADD IMAGE'S ALT TEXT]](https://cms-uped.baseux.com/sites/default/files/Grey%20Design%201.jpg)
![[ADD IMAGE'S ALT TEXT]](https://cms-uped.baseux.com/sites/default/files/Grey%20Design%202.jpg)
Select each of the following headings for other maps you may wish to create for a material shader.
Other maps you may wish to create for a material shader might include:
A reflection map will control where a model is reflective. Dark values are less reflective and light values will be more reflective.
A translucency map controls the areas of a model that allow light to penetrate the surface. Translucency is usually found in materials like wax, plant stems and leaves, and skin. Translucency maps are greyscale with light areas of the map being more translucent than darker areas.
An opacity map controls the areas of a model which are transparent or degrees of transparency. The dark area of an opacity map will appear transparent on the model. White areas will be fully opaque.
Adding maps to your material shaders
Adding the painted map is a very simple process: in the list of nodes you can choose to add to an attribute is a node called a 'File' node, displayed in the image below.
![[ADD IMAGE'S ALT TEXT]](/sites/default/files/Screenshot%20Of%20File%20Option.png)
You can add this node to any attribute in your material. With the node connected to an attribute you can then select a file to display by selecting the browser icon which looks like a folder to the right of the 'Image Name' attribute and then navigating to the location your file is saved in.
![[ADD IMAGE'S ALT TEXT]](/sites/default/files/Details.png)
Important
Texture maps should be saved in the 'Source Images' folder of the Maya project filing system.
The filter attribute allows you to blur an image.
The colour balance area of the node allows you to tint, brighten and darken an image being displayed.
Putting the theory into practice
The best way to learn and get better at painting textures for objects is to learn by doing the skills and processes. So, put that philosophy into practice and focus on creating the colour, bump and specular maps for a simple 3D model.
Reference
The hammer in the following image is very similar to the ballpeen model and would make great reference material to work from. You do not have to use this exact reference material and can decide to find your own. Or you may decide that you'd like to try making a texture that shows more weathering on the Model, as if the hammer has been left out in the elements for years accumulating rust and dirt from general neglect.
![[ADD IMAGE'S ALT TEXT]](https://cms-uped.baseux.com/sites/default/files/Bullpeen%20Hammer%201.png)
![[ADD IMAGE'S ALT TEXT]](https://cms-uped.baseux.com/sites/default/files/Bullpeen%20Hammer%202.png)
Texturing approach
Looking at the reference in the image above, notice that two distinct materials make up the hammer's texture. There is a metal (steel) and handle material that appears to be leather wrapping.
There's also an excellent vintage-looking label on the shaft that will add another small area of interest - you may have only thought of adding that by looking at reference material.
Combining procedural and painted maps
To begin, create a material for the hammer in the hypershade window; the material will need specular attributes, so Blinn, Phong, and PhongE will be our main choices of Maya material.
The Anisotropic material would not be a leading choice because of its unique attributes to control the shape and spread of the specular highlight which doesn't match the steel material you want to simulate.
The metallic texture of the shaft and head of the hammer can be created either using texture maps or by building a procedural shading network.
The leather handle wrappings would be challenging to create using procedural techniques alone, so it would be easier to paint in Photoshop.
The label is impossible to create as a procedural texture and must be part of a custom map.
The Base Metal Shader
Use a Blinn to create the base metal shader for the shaft and head of the hammer, and a textured shader to combine the colour elements of the hammer together.
Use the layered texture method to create an interesting slightly rusted up looking metal material and stack some different bump materials together to create some varied texture on the surface of the metal.
Remember to use the mask that reveals the rust colours on the metal also as a bump node so that the rusted areas appear to stand out from the surface of the model.
![[ADD IMAGE'S ALT TEXT]](/sites/default/files/Rusted%20Areas.png)
The image below highlights the base metal procedural shading network needed for the hammer.
![[ADD IMAGE'S ALT TEXT]](/sites/default/files/Base%20Metal.png)
With the procedural part of the texture complete, move to Photoshop to paint the colour map for the leather portions of the handle.
![[ADD IMAGE'S ALT TEXT]](/sites/default/files/Texture%20Map.png)
Select the arrows to navigate through the texture maps.
As you add more details to your shading network, keeping track of it all can start to be slightly confusing. It is a good idea to group the nodes that are doing a certain job, like driving the colour attribute of a material for example. This will help to keep your networks manageable as they get more complex.
Now, time to practise!
Watch the videos before commencing this task to help guide you through it.
Practice
Task 3: Create texture maps for the Ballpeen hammer model
In this task, you'll further delve into the intricacy of texturing models by creating texture maps for the ballpeen hammer model.
What tools or resources do you need?
- Autodesk Maya
- Adobe Photoshop
- BallpeenHammer TextureStart.mb.
What steps should you take?
3 Hours
Set aside three hours to complete steps 1-11 below. Remember to save your work as you go when using Autodesk Maya.
- Review the learning for Texturing to help you if you need to.
- Open the provided ballpeen hammer model into Maya.
- identify distinct materials from the reference images: metal (steel), leather handle, and vintage label.
- Open the Hypershade window and create a new material for the hammer, ensuring it has specular attributes (Blinn, Phong, or PhongE).
- Choose between using procedural shading or painted maps for texturing different components based on complexity and realism.
- Decide whether to use texture maps or procedural networks for the metallic texture of the hammer's shaft and head.
- Use a Blinn material to create the base metal shader for the shaft and head of the hammer.
- Build a procedural shading network with colour variations and slight rust effects to the metal material and combine different bump textures for added interest.
- Switch to Photoshop to paint the colour map for the leather handle, considering shades of reddish-brown and gaps between layers.
- Paint bump maps to add texture detail to the handle area.
- Adjust Shade and Bump Depth for Label Integration.
- Generate Mask Layer
- Organise Nodes in Shading Network.
- Preview the textured hammer model in Maya's viewport to assess its appearance.
- Check for any inconsistencies, artifacts, or areas needing further adjustment.
- Render the final textured hammer model using Maya's rendering capabilities.
- Ensure the rendering accurately represents the reference images, with textures applied seamlessly and realism achieved.
- Save and export the hammer as a .jpeg.
What should you do after?
- Reflect on the overall learning experience of applying texture maps to the Ballpeen hammer model in Maya and answer the following questions.
- What new skills or techniques did you acquire during this task?
- Describe any insights gained about the importance of attention to detail in the texturing process.
- Share your final textured map of the Ballpeen Hammer to the Forum:
- Select your forum thread in Forum: Texturing.
- Select Reply to your first Forum post.
- Enter the words ‘Task 3 Textured Ballpeen Hammer’ in your reply.
- Select the Post your response button, then select Edit in your new reply when it shows up.
- Upload your photo(s) or files using the Attachment field.
- Select Save changes to share your coursework to your forum thread.
- Get feedback on this and other learning tasks at the next Live Session – check the Live Session calendar for dates and times. All live sessions are recorded so you can watch them later if you miss a session.
Work through the learning to discover your next learning task, homing in on some of the skills you have developed for texture mapping thus far.
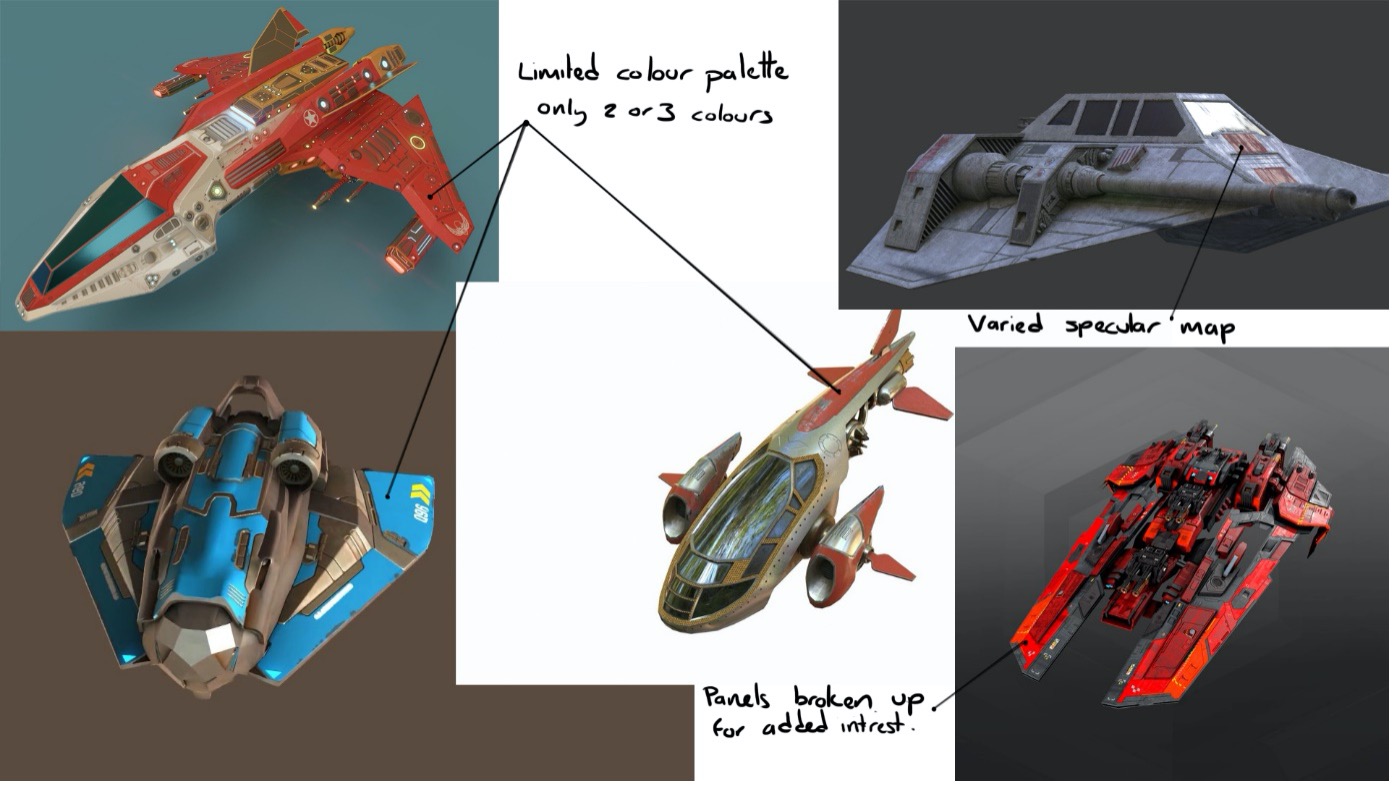
Further practice with texturing
Now that you have created a basic set of texture maps for a simple model, you can take what you have learned and develop your skills by tackling a model that has little or no procedural textures. For this last texturing activity, you need to create a set of texture maps for our spacecraft models.
Texture your model that you completed earlier in the course.
Try to create a story for the spacecraft, think about ways to add interest and history to the 3D model through the following:
- design
- texture
- detail
- weathering.
Design
Begin your texturing by first thinking about the overall design of the model. What materials are present that will need to be simulated? What colours do you want to see in the final textured model?
Do some research and note what objects like your model look like. In this case, with a spacecraft model, hundreds of well-known and not-so-well-known examples exist online. Get tips and pointers from a handful of these examples and consider the following:
- How many colours have been used?
- Is there a main colour and a detail colour?
- Can you identify any bump details?
- Is there variation evident in the specularity of the model?
Answer these questions for yourself and list style guide pointers that will help you create an exciting texture design.
Texture
You will need to identify areas on your model where there are different textures and materials needed. Consider if there is there any way that you can add interest to the textures through one surface finish contrasting with another either with colour, detail or surface finish (glossy/matte) etc.
![[ADD IMAGE'S ALT TEXT]](/sites/default/files/Gloss.png)
While creating your texture maps, think about the level of detail required for each map area. If there are any large unbroken surfaces in the model, you can break them up with painted detail on the map so that they have some interest present that will help slow down the eye when the audience views the model.
![[ADD IMAGE'S ALT TEXT]](/sites/default/files/Painted%20Details.png)
Weathering
The last stage of painting a map is to think about the age and weathering that may have happened to a model in its lifetime. Ask yourself the following questions:
- Are there surfaces that are exposed to the air more than others?
- Are there areas on the model that are located under moving parts that require lubrication?
In these areas, there may be leak or dripping stains where the lubricant has dripped down onto the surfaces below. Corners and edges of an object may be scraped and damaged, the paint or surface of a model may be faded and peeling due to age.
![[ADD IMAGE'S ALT TEXT]](/sites/default/files/Weathering.png)
Watch the following videos to help you with the following learning task, Create texture maps for Spacecraft model. This task is linked to Assessment 1 so observe the demonstrations closely.
Practice
Task 4: Create texture maps for Spacecraft model.
Take the skills you have learnt and apply them to creating procedural textures for the spacecraft model you previously created.
Important! This will be part of your Assessment 1.
What tools or resources do you need?
- Autodesk Maya.
- Reference Image of your choosing.
- Your previously created spacecraft.
- Spacecraft_StudentStart.mb.
What steps should you take?
8 Hours
Set aside up to eight hours to complete steps 2-10 below. Remember to save your work as you go when using Maya.
- Review the learning in Texturing if you need to help you with this task.
- Use the spacecraft model you have already created. Remember, this will be part of your Assessment 1.
- Observe the overall design of your spacecraft model. Consider the materials present and the desired colour scheme.
- Research similar spacecraft designs online for inspiration. Take note of colour choices, surface details, and specular variation.
- Develop a style guide based on your findings to help guide your texture design process. Consider colour palettes, main and detail colours, bump details, and specular variation.
- Identify different areas on your model that require distinct textures and materials.
- Explore ways to add visual interest through contrasting surface finishes, colours, and details (e.g., glossy vs. matte).
- Determine the level of detail needed for each section of the model.
- Break up large, uninterrupted surfaces by adding painted details to maintain viewer interest and engagement.
- Consider the age and weathering effects that would naturally occur on the spacecraft.
- Identify areas exposed to the elements, such as air or friction, which may show signs of wear, corrosion, or staining.
- Start texturing your spacecraft model based on the design, texture, detail, and weathering considerations outlined.
- Use appropriate software tools and techniques to apply textures and refine details.
- Review your progress against your style guide and design objectives.
- Adjust as needed to ensure consistency and coherence in your texture maps.
- Complete the texturing process, ensuring all design elements, textures, and weathering effects are accurately represented.
- Perform a final review to check for any inconsistencies or areas needing further refinement.
- Showcase your textured spacecraft model, highlighting the design choices, texture details, and weathering effects implemented.
- Provide a brief explanation of the storytelling elements incorporated into your model through texture and design.
What should you do after?
- Reflect on your experience with the texturing process and answer the following questions.
- What techniques or tools did you find most effective in achieving your desired results?
- Did you encounter any difficulties in achieving the desired visual effects or textures? How did you overcome them?
- Share your Textured Space craft to Forum:
- Select your forum thread in Forum: Texturing
- Select Reply to your first Forum post.
- Enter the words ‘Task 4 Textured Spacecraft’ in your reply.
- Select the Post your response button, then select Edit in your new reply when it shows up.
- Upload your photo(s) or files using the Attachment field.
- Select Save changes to share your coursework to your forum thread.
- Get feedback on this and other learning tasks at the next Live Session – check the Live Session calendar for dates and times. All live sessions are recorded so you can watch them later if you miss a session.
Well done, you have completed the texturing tasks. Your next task will involve lighting and rendering.
Congratulations on completing Texturing. As you wrap up this topic, take a few moments to think about what you've achieved, including the various learning tasks to increase your animation skills.
You uncovered aspects around using:
- Maya materials
- Arnold materials
- The IPR Renderer process
- Procedural textures
- UV layouts to paint texture maps.
While you may have found this topic challenging due to its technical complexity, the information should equip you with the skills, knowledge, and perseverance to apply varying techniques to diverse digital animation projects.
Check what you know about both Modelling and Texturing.
Use the quiz below to test your knowledge of model and texture to help ensure you're on the right track and identify areas where you may need to revisit the subtopic.
Practice
Task 5: Check your knowledge- Model and Texture
Get ready to put your model and texture knowledge to the test! This quiz is designed to help reinforce your understanding and is not part of the formal assessment process. So, treat it as a valuable tool to gauge your progress and identify areas for improvement.
You'll encounter a series of multiple-choice, true or false, matching and fill in the blank questions. So approach each question with a critical eye and draw on your learning to choose the best answers.
What steps should you take to complete this knowledge check?
1 Hour
This quiz has 20 questions. Read each question carefully. Make sure you understand what is being asked before attempting an answer.
- Provide the most accurate and complete answers you can. If a question stumps you, make an educated guess based on your knowledge.
- Don't let difficult questions discourage you. Stay confident and do your best. Remember, it's a learning opportunity and not a formal assessment!
- Once you've reviewed your answer and are satisfied, select the 'Check button' to see if you chose the correct answer. You can also retry questions and show solutions.
- 4. Good luck and enjoy the challenge!
What should you do after completing this knowledge check?
A solid understanding of model and texture techniques are crucial for enhancing your animation skills. Take the time to practice the concepts covered in this knowledge check.
Remember, continuous learning and practice are key!
When you're ready, move to the next topic: Lighting and Rendering.