So far, you've worked through the various types of modelling, UV mapping , and texturing processes. Now, add lighting and rendering to your digital repertoire. Work through this topic to learn how to:
- work with lighting to make your scenes appear more realistic
- create believable environments by simulating natural light sources, shadows, and reflections.
As with the previous Modelling and Texturing topics, some of the subtopics in this Lighting and Rendering topic are paired with corresponding subtopics outlining integral system steps and videos that you will need for your learning tasks and assessment preparation.
The main subtopics you will explore in Lighting and Rendering include:
- Introduction to Lighting and Rendering
- Exploring Lighting and Rendering
- Create and Set Up an Image-Based Light
- Light Types
- Recreate a Studio Lighting Setup
- Direct Lighting Workflow
- Light Linking Process
Learning tasks that will support your skills in digital production have been outlined in the following table.
Practice
Put your skills into practice and extend your knowledge
As you work through the learning, you will encounter a series of learning tasks that you must complete within this Lighting and Rendering topic and showcase on the discussion forums.
Keep an eye out for the PRACTICE boxes as you progress through the learning process to identify the learning tasks, resources, and instructions for what you must do. They also house the information regarding the specific subtopics, and how long you will need to allocate for these tasks. This has been briefly outlined below.
Remember, there will be learning tasks that you will need to complete that link directly to your assessment, so please read through them carefully.
| Learning task # | Learning Task Name | Duration (Hours) | |
|---|---|---|---|
| 1 | Light and render a presentation video of your best piece of work | 3 |
|
| 2 | Recreate portrait lighting setups | 5 |
|
| 3 | Light a simple scene | 3 |
|
| 4 | Light a day scene | 6 |
|
| 5 | Light a night scene | 6 |
|

Feedback and support are woven through the learning tasks as you complete them. Reach out if you have any questions about what to do!

Before you render a model or shot in Maya, you must go through lighting that shot or model. The lighting process involves creating and setting up lights of various types around your shot or model to enhance the mood or feeling of a shot or model. If done well, your lighting will improve the look of your final scene.
Comparison with physical lighting
You can compare lighting a scene or model in 3D to how a photographer lights a model or how a gaffer lights a film set. Many fundamental concepts are the same from the physical to the digital world, with the added benefit of far more flexibility for the digital lighting artist.
What are the advantages of digital lighting?
The digital lighting artist can create an infinite number of lights. 3D lights can be placed in almost any position in a scene without regard to safety or physical limitations. 3D lights can be linked to particular objects in your scene to only illuminate that object. You can choose whether lights create shadows or not; you can also decide what type of light a light can make, whether specular light only, ambient light only or both. Lights can be any colour in the spectrum or even suck the light out of an area.
Exploring lighting further
Lighting in 3D is a rabbit hole that only gets deeper the more you learn. In this course, you can only scratch the surface of what lighting can accomplish; it will be up to you to dive deeper and further your understanding of the initial concepts discussed.
Indirect Lighting Workflow - Image-based Lighting
Where is image-based lighting used?
Image-based lighting (IBL) is used mainly in Indirect and Physically Based Rendering (PBR) workflows. PBR rendering is used in the games industry to render games in real-time as a player interacts with a game. As rendering lights, textures and materials are so intensive on computer or console hardware there was a need to develop a system to light an environment with as few lights as possible. This is because for each light that is added to a scene or environment, it also adds to the calculation load the renderer must process resulting in longer render times.
What are its application in visual effects?
Another main use for Image-based lighting is the area of visual effects for film and TV, were any computer-generated elements need to match the lighting conditions of a set exactly for them to be seamlessly composited into a shot.
Capturing lighting conditions
To capture the lighting conditions on set at the time of filming, the VFX team will use a chrome and matte grey sphere to capture reference of lighting and reflection conditions and then use a special 360-degree camera to capture a high dynamic range image (HDRI) of the light information on set. Then the reference and HDRI can be used by the production and post-production artists to match lighting conditions on set exactly.
![[ADD IMAGE'S ALT TEXT]](/sites/default/files/Chrome%20Ball%20Rig.jpg)
Where can you find IBL resources?
There are manyonline IBL resources. You can download HDRI files from https://polyhaven.com/hdris. All images and assets on polyhaven are free to download and use in your work.
HDRI images are downloaded as an .HDR or .EXR file depending on the program you want to use them in, Maya can recognise either.
There are also several HDR Images that are prepackaged with Maya.
In the following example of an HDRI image the 360-degree image is the HDRI file that will be used as an image-based light source. The rendered spheres below are examples of the lighting, shadows, and reflections this HDRI will produce.
![[ADD IMAGE'S ALT TEXT]](/sites/default/files/Set%20Of%20Chrome%20Balls.png)
Another benefit of using an image-based light to light a model or shot, is that they are relatively quick and easy to create and set up compared to the standard direct lighting workflow of lighting a shot.
Explore the process of creating and setting up an image-based light in this subtopic. If at any point you need to refer to the steps, select this subtopic in your navigation bar.
How to create and set up an image-based light
Follow the steps below to create and set up an image-based light.
- Go to the Rendering Menu set by choosing 'Rendering' from the pull-down menu at the top of the screen.
![[ADD IMAGE'S ALT TEXT]](/sites/default/files/Rendering%20Window.png)
This will give you access to the rendering specific menus for Maya.
- Create an Arnold Skydome light by going to: Arnold>Lights>Skydome Light.
![[ADD IMAGE'S ALT TEXT]](/sites/default/files/Arnold%20Lighting%20Window_0.png)
A sphere will appear around your scene in the viewport. Currently the Skydome is emitting white light because the colour of the light is set to pure white by default.
To connect an HDRI to the Skydome follow the steps below.
- Go to the attribute editor (Ensure you have the Skydome selected to access its attributes).
![[ADD IMAGE'S ALT TEXT]](/sites/default/files/Sphere%20In%20Viewport.png)
Connect a file node to the colour attribute
- Select the checker box button on the right and from the picker.
- Select 'File'.
Using the attribute editor
- Use the folder icon next to the image attribute and navigate to an HDRI file.
- Downloaded HDRI files should be saved in the source images folder of your Maya project filing system.
To render the scene
- Open the render settings window.
- Select the Arnold renderer from the dropdown list.
![[ADD IMAGE'S ALT TEXT]](/sites/default/files/Renderer%20Settings%20Window.png)
- Select the render button.
As you are rendering using Arnold, you may find that you need to tweak your Maya materials so that they render as you initially intended. Materials will behave and render differently when rendering with different render engines. Native Maya materials will look far shinier and more reflective than you initially intended when rendering using the Arnold render engine.
After some material tweaks, the following is an example of the spacecraft being lit by only an HDR Image in Arnold.
![[ADD IMAGE'S ALT TEXT]](/sites/default/files/Spacecraft%20Lit.jpg)
There are some attributes in the Skydome light that you can use to adjust the look of the render. The main ones that you will want to adjust are:
- Intensity: Controls the brightness of light emitted.
- Exposure: Works like the exposure settings on a camera and multiplies the exposure settings. Positive and negative values can be used to brighten further or darken the render.
The exposure attribute is helpful if you are used to working with cameras and camera equipment. It is also helpful if you are asked by someone who is used to working with cameras “to increase the exposure by 1 stop”. You can then go to the exposure setting and increase the exposure to 1.
If you are not used to exposure, then you can just use the intensity value to control the brightness of a light.
![[ADD IMAGE'S ALT TEXT]](/sites/default/files/SkyDomeLight.png)
You may also want to adjust the attributes in the Visibility area of the attribute editor. Each of the sliders control a specific type of light that is being emitted by the Skydome Light giving you individual control over each.
Select each of the following headings for more information.
The Camera attribute allows you to show or hide the Skydome in the final render. With the value set to 1 the Skydome will be visible in the final render. If you set the value to 0 the Skydome will not be displayed in the background in the final render.
Controls the amount of specular light the Skydome is emitting. You can tweak this attribute as required to create the final render look that you need.
Subsurface Scattering, some materials like skin, leaves and petals, candle wax etc are slightly translucent and allow light to penetrate their surface and then scatter around just under the surface making the material appear to very subtly glow. If there are no materials that need SSS to be enabled, then you can turn it off by inputting a 0 value in this attribute.
The Skydome itself can be rotated and scaled to adjust the direction of the light source.
Watch the following video (7:30m) on how to set up an image-based light.
Common render settings
With a model textured and the scene lit, it is time to start thinking about rendering your project. You will need to use the the following render settings to adjust and setup before making a final render of your shot.
Common tab
All the render engines in Maya have a Common tab. The common tab contains all the render attributes which are shared from render engine to render engine.
![[ADD IMAGE'S ALT TEXT]](/sites/default/files/Common%20Tab.png)
The first area inside common render settings to set is the File Output section.
![[ADD IMAGE'S ALT TEXT]](/sites/default/files/File%20Output.png)
Here, you can set your file name and file format, determine whether you want to render a single frame or a sequence (any pull-down options with a # will render a frame sequence) and choose the number of digits (frame padding). Maya is to add to the frame numbers if you render a sequence of images.
The following section Frame range can only be set when you have chosen to render a sequence of frames by setting a Frame/Animation ext to one option that includes a # in the name.
In the below example, name#.ext has been selected, which means that rendering a sequence of frames is required, and each frame will be output with the name you set in the section before, e.g., SpaceshipColour, then the frame number, e.g. 001, and lastly the file extension, e.g. .jpg.
![[ADD IMAGE'S ALT TEXT]](/sites/default/files/Frame%20Animation.png)
With the output set to a sequence and the name set you can now set a start and end frame in the Frame Range section.
![[ADD IMAGE'S ALT TEXT]](/sites/default/files/Frame%20Range.png)
The By frame option allows you to skip frames in the sequence. With it set to 1, Maya will render every frame in the sequence from the start frame to the end frame.
If you change the 'By frame' option and set it to 2, for example, Maya will skip every other frame in the sequence and render out frames 1, 3, 5, 7, 9, etc. Set to 3, it will render every third frame, for example, 1, 4, 7, 10, 13, etc.
Most of the time, you will leave this option set to 1 and render every frame of your sequence.
In the Renderable Cameras section you can select which camera you wish to render from.
![[ADD IMAGE'S ALT TEXT]](/sites/default/files/Renderable%20Cameras.png)
The above option will render the perspective camera view. If you have created any other cameras in your scene, they will be listed and selectable in the drop-down menu.
The last of the common settings is the Image Size section.
![[ADD IMAGE'S ALT TEXT]](/sites/default/files/Image%20Size.png)
Here, you can set the frame size of the images rendered from Maya. There is a list of preset sizes at the top of the section, which you can select from the pull-down menu, or you can set your size manually by setting a width and height.
Maya Software tab
The first tab in Maya software is literally a quality tab. You can choose the quality settings you want to use for your render from the pull-down menu. The general rule of thumb for quality settings here is that while you are working on a scene, you want to leave the settings on a low-quality setting like the default one you see here. Once you are ready to render a deliverable version of your scene, you would set the quality settings to a higher setting like 'Production Quality', for example.
![[ADD IMAGE'S ALT TEXT]](/sites/default/files/Maya%20Software.png)
Note: The higher quality settings will take longer to render than the lower quality settings according to how heavy your current scene is.
Then, you can enable raytracing in the Raytracing Quality area. Raytracing allows Maya to calculate how lights bounce off glossy surfaces, calculate refraction in transparent materials, calculate and render reflections, and calculate raytraced shadows.
With this setting turned off, reflections, refractions, and raytraced shadows will not be displayed in your completed renders.
![[ADD IMAGE'S ALT TEXT]](/sites/default/files/Raytracing%20Quality.png)
Turning Raytracing on using the check box will give you access to the quality sliders below. These sliders control the number of steps that maya will calculate each of these attributes. The higher the number pushes the quality levels up and closer to real world conditions and will also result in increased render times.
Select each of the following headings to learn more.
The Motion Blur area is like the raytracing tab. You can enable motion blur by checking the Motion blur box which then gives you access to the settings.
This type of motion blur is added to the frame after the render calculation, it is like an effect added in post-production. 2D motion blur is the fastest to calculate.
3D motion blur is calculated as part of the render process you have more control over the look of the motion blur in the render but at the cost of render time.
![[ADD IMAGE'S ALT TEXT]](/sites/default/files/Motion%20Blur.png)
Maya hardware 2.0
The Maya hardware renderer uses your GPU to render the scene. The hardware renderer generally uses this to render any work as it currently has limitations on what the render engine can accomplish, which do not align with the rendering demands of most productions.
At the time of writing the hardware renderer-supported features are:
- File Output settings in the Common tab in the Render Settings window are supported.
- Rendering from different camera types (including stereo cameras) is supported.
Limitations of the Hardware 2.0 renderer
- In the Render View window, the Render region is not supported.
- IPR is not supported.
- Render layers are not supported.
Only colour output is supported. Depth channel is currently not supported.
![[ADD IMAGE'S ALT TEXT]](/sites/default/files/Screenshot%20Maya%20hardware%202.0.png)
Arnold Renderer tab
The Arnold Renderer is a high-quality raytracing renderer that can produce high quality and realistic renders.
You can adjust the quality of the render in the main Arnold Renderer tab. To increase or decrease the quality of the render you use the samples sliders which are divided into 6 different categories.
Note: Increase in the number of samples = less noise in the final render.
Each category controls a specific area of the render quality which means that you can tailor your render to each scene that you need to render. If a scene is heavy on one of the areas: for example, if there are characters with realistic skin which has subsurface scattering in its material properties, you can boost the number of samples for SSS (Subsurface Scattering) resulting in less noise and higher quality in the SSS attribute of the skin material calculation.
Select each of the following headings to learn more of each category.
The camera is a global sampling slider that acts as a multiplier for the other attribute sliders. This attribute is an overall quality slider for the render. The higher value for the number of camera samples allows for more calculation of the rays as they bounce and scatter around the scene. Unfortunately, that also means that the render time is multiplied for higher values.
The Diffuse slider controls the amount of noise in the diffuse colours of the render.
The Specular slider controls the amount of noise in the specular highlights and reflective surfaces of the render.
The Transmission slider controls noise on surfaces that allow light to pass through their surface, surfaces like glass. If you are rendering glass, increasing this slider does not influence the amount of noise. You will also need to increase the specular samples to reduce noise, as transmissive surfaces usually have a specular component to their attributes.
Subsurface scattering is used on wax, skin, milk, and leaves/petals. Increasing samples for SSS reduced the noise in light that is allowed to penetrate the surface of these materials.
Th Volue Indirect slider is responsible for quality on surfaces covered by indirect lighting. To apply this slider, you must also have lights in the scene with volumetric effect enabled, like cast volumetric shadow.
![[ADD IMAGE'S ALT TEXT]](/sites/default/files/Arnold%20Renderer%20Window.png)
There are a considerable number of settings that you can adjust in the Arnold Renderer tab, but for the most part, you will only need to change the sample sliders and leave the rest of the settings at their default values.
System tab
In the System Tab, you can choose whether to render using the CPU or GPU in the render device pull-down menu.
All the settings below the rendering device drop-down menu control how your system handles how it will render a scene. Generally, leaving these attributes and settings at the default values is recommended.
All the settings below the render device drop-down menu control how your system handles how it will render a scene. Generally, leaving these attributes and settings at the default values is recommended.
![[ADD IMAGE'S ALT TEXT]](/sites/default/files/System%20Tab%20Window.png)
AOVs tab
The AOVs (Arbitrary Output Variables) are settings that control how you deliver your render output for post-production. Specifically, how your render is arranged and if it is broken up into passes that go together in compositing to make up the final image.
If you do not need to adjust the render when compositing, you can leave the AOVs and not select any. The render will process usually, and the output will combine all the different passes in a final combined image.
However, do you want or need to adjust a render when compositing? In that case, you can select from the Available AOVs list and add them to the Active AOVs list. This will tell Arnold that the active AOVs should be made available for compositing and not combined during the render process.
![[ADD IMAGE'S ALT TEXT]](/sites/default/files/Arnold%20Renderer%20Window%203.png)
AOVs that are common in compositing have been illustrated in the following table.
| AOV | Description |
|---|---|
| A | Alpha |
| ID | Random number assigned ID pass to identify and isolate materials or objects in the frame. |
| RGBA | Red, Green, Blue, Alpa pass Containing the full rendered image. |
| Z | Depth of the shading points as seen from the camera. Used in compositing to add depth blur or environment fog to a shot. |
| Diffuse_albedio | Diffuse colour without any lighting or shadowing |
| Diffuse_direct | Direct lighting |
| Diffuse_indirect | Indirect lighting |
| Specular_albedio | Specular colour without lighting or shadow |
| Specular direct | Specular direct lighting |
| Specular indirect | Specular indirect lighting |
Many AOVs can also be selected depending on the requirements of the compositing team.
When rendering Active AOVs, they are stored in layers inside a single.EXR file. You will need a compositing program that supports EXR files to access the layers. Adobe After Effects does support the EXR format and Arnold AOVs.
Diagnostics tab
The Diagnostics tab allows you to tell Arnold how to handle errors and where to save error logs. Error logs can be useful when trouble shooting rendering problems for a scene.
You can choose whether to display errors only in the console or to save them to a file, set the maximum number of warnings to display and what type.
![[ADD IMAGE'S ALT TEXT]](/sites/default/files/Diagnostics%20Tab%20Window.png)
Watch the following playlist made up to two videos dfocussing on render settings.
Render layers
Using render layers gives you more flexibility, allowing you to render out passes as separate files. You can choose the file extension that you want and not be locked into using an .EXR file.
Arnolds AOVs also don't do all the things that you may want to render out of Maya. For example, separating characters into different renders or separating the background into its own render or creating a render with the wireframe of the geometry visible for presentation purposes.
Sometimes you want to render out these things as separate files, in these situations you will need to create what are called render layers. You will need to create a render layer for each of the separate render passes that you want to render.
How to set up render layers
The following steps will guide you through setting up your render layers.
To set up a render layer you need to access the Render Setup Editor:
- To open the Render Setup Editor, use the button at the top of the screen clustered with all the render buttons.
- The button for the Render Setup Editor looks like a clapperboard with two layers in front.
![[ADD IMAGE'S ALT TEXT]](/sites/default/files/Render%20Setup%20Editor.png)
The Render Setup Editor will open and look like the following window. Render layers are added in the area in the bottom left of the window, with attributes and options for the layers appearing on the right side of the window.
![[ADD IMAGE'S ALT TEXT]](/sites/default/files/Render%20Setup%20Window%202.png)
- Create a render layer by selecting the Create a Render Layer button.
![[ADD IMAGE'S ALT TEXT]](/sites/default/files/Render%20Layout%20Button.png)
- This will create a new Render layer in the area on the bottom left.
![[ADD IMAGE'S ALT TEXT]](/sites/default/files/Render%20Layer.png)
- Give the Layer a meaningful name, for example Spacecraft_Colour.
The Name should indicate what is going to be included in the layer (in this example, the Spacecraft model) and should also indicate something about the render type, in this case it is the 'Colour' information.
Currently the render layer is empty, so you need to add all the objects that you want to render into your render layer.
To add objects
- Add a collection to the render layer.
- Right mouse click and select Create Collection from the options.
![[ADD IMAGE'S ALT TEXT]](/sites/default/files/Create%20Collection%20Window.png)
- Give the collection a name.
![[ADD IMAGE'S ALT TEXT]](/sites/default/files/Collection%20Naming%20Window.png)
With the collection selected you will see some options on the right side of the window. This area tells you what is currently included in the collection. Currently the collection is empty.
To add geometry and lights to the collection, follow the steps below.
- Select all the things you would like to add to the collection using the outliner.
- Add them to the collection using the Add button on the right.
![[ADD IMAGE'S ALT TEXT]](/sites/default/files/Empty%20Collections%20Window.png)
The spacecraft and the Skydome light have been added to the collection and will now be rendered as a separate layer. When you render a scene, Maya will create a folder inside the Images folder of the Maya project file system called 'Spacecraft_Colour', the render layer name. All the images for this layer will then be rendered into this folder to keep them separate and organised from any other render layers you may have set up.
![[ADD IMAGE'S ALT TEXT]](/sites/default/files/Collection%20Window.png)
If you want to create a special render layer for Ambient occlusion or a wireframe render, you will need to create what is called an override for the collection.
To create an override follow the steps below.
- Right mouse click on the collection
- Select which override you want.
For Ambient occlusion you will use a 'Shader override'.
- Add the aiAmbientOcclusion shader using the right-hand window checker box.
- Search for occlusion in the picker and the shader will appear.
![[ADD IMAGE'S ALT TEXT]](/sites/default/files/Shader%20Override.png)
For Wireframe you will use a 'Material override'.
- Add the aiWireframe material using the right-hand window checker box.
- Search for wireframe in the picker and the material will appear.
![[ADD IMAGE'S ALT TEXT]](/sites/default/files/Properly%20Editor.png)
Watch the following video (10:28m) for the process of setting up render layers.
Cameras
Maya has three main camera types (excluding the two stereo cameras). The first is a standard camera on its own, and the other two both have extra control handles to help align and frame the camera on a subject.
To create a camera in your scene you can find cameras in the create menu.
- Create>Cameras
![[ADD IMAGE'S ALT TEXT]](/sites/default/files/Cameras%20Window.png)
The standard Maya camera
The standard Maya camera has all the same controls and settings as a physical camera with the added benefits of being able to go beyond the bounds of what a physical camera and camera lenses can achieve.
![[ADD IMAGE'S ALT TEXT]](/sites/default/files/Maya%20Camera.png)
As animators and artists, the only attributes that you need to concern yourself with when first starting to work with cameras in Maya are:
- Where is the camera pointed?
- How should the camera move around your scene?
- What is in the frame?
Moving the camera
The steps below will guide you through moving the camera.
To move a camera around your scene:
- Select it:
- Move and rotate it using the standard move (W) and rotate (E) tools.
- You can also select the camera in the outliner:
- Middle mouse click and drag it into the viewport to switch views.
- Look though the selected camera.
This then allows you to use the navigation tools:
- Hold the Alt key and use left middle and right mouse buttons to move, tumble and pan the view to move and aim the camera in your scene.
To change what is in frame you can adjust the focal length attribute, essentially changing the amount of zoom on the camera lens.
The focal length attribute simulates the effect of real-world lenses inside Maya. Using a low focal length will give you a wide-angle view out of the camera but will also start to distort the image like a fisheye lens at extreme low ranges (below 10).
A high focal length simulates a telephoto lens (above 70), a high focal length will flatten the field of view which gives the appearance of less depth between objects in the shot.
![[ADD IMAGE'S ALT TEXT]](/sites/default/files/cameraShape1.png)
You can also use the controls drop down menu at the top of the camera attributes section to change the camera into any one of the other three main camera types at any time without the need to delete and create a new camera if you find the camera type is not working for what you need in your shot.
Camera and aim
The camera and aim have all the controls and settings of the standard Maya camera, with the addition of an aim point constrained to the camera's point of view. This is helpful if you have a particular area of a model that you want the camera to be focused on throughout a camera movement.
The aim also allows you to have a static camera position and then move the aim point to simulate the camera panning as a fast-moving object like a car or bike going past the camera position.
![[ADD IMAGE'S ALT TEXT]](/sites/default/files/Camera%20Aim.png)
Camera, aim and up
The camera, aim and up again, has all the controls and settings of the standard camera with the addition of the aim control of the camera and aim. It also has a new controller that is constrained to the Y axis of the camera, allowing the up-direction of the camera to be animated along with the aim control and the camera's position.
![[ADD IMAGE'S ALT TEXT]](/sites/default/files/Y%20Axis.png)
Presentation techniques
When creating work, at some point, you will want to show it either online or in a portfolio or to someone for feedback. You will need to set up and render a single frame to show parts of your work to do any of those things. Or, render a moving sequence for a more dynamic and, in the case of how light interacts with your models and textures, a more accurate representation of your work.
One of the first ways you can create a presentation is to create a shot showing an area of your model or texture work that you want to showcase and then make a slight camera movement over 100 frames or more to either pan, rotate or move in/out on the area being showcased.
Creating slow camera movement to display parts of your model
To create a camera movement, you first need to know how to set keys on the timeline, fortunately that is a very easy thing to do in Maya.
To create a movement, you need to create two keys - these are the starting position and the ending position.
Before you start creating keys it is a good idea to have a clear idea of what you want the movement to look like. The demonstration below will create a slow push on the model.
- First move the camera into a position where you would like the movement to start from.
Remember if you have your resolution gate active you can see where the outer edges of the frame are in the viewport.
Position 1
![[ADD IMAGE'S ALT TEXT]](/sites/default/files/Spacecraft%20Position.png)
- With position 1 set you need to tell Maya to save this position as a keyframe.
To save this position as a keyframe:
- Make sure that you are on frame 1 in the timeline.
- The play head in Maya looks like a slightly grey bar which can be harder to see on the timeline.
![[ADD IMAGE'S ALT TEXT]](/sites/default/files/Play%20Head%20In%20Maya.png)
With the current frame set to 1 in the channel box
- Select all the camera attributes in the translate area,
- Using the left mouse button and the shift key.
![[ADD IMAGE'S ALT TEXT]](/sites/default/files/camera1%20Window.png)
With the attributes selected you can either:
- Right mouse click any of the attributes
- Then, select Key Selected.
![[ADD IMAGE'S ALT TEXT]](/sites/default/files/Key%20Selected%20Window_0.png)
- Or you can use the keyboard shortcut 'S'.
- Then, select Key Selected.
When you have successfully set a key on the timeline a key will appear as a red line and in red in the channel box. Keys can be set for individual attributes independently from each other, so it is a good idea to keep all attributes keyed on the same frame so that your keyframes do not get overly disjointed and confusing on the timeline.
![[ADD IMAGE'S ALT TEXT]](https://cms-uped.baseux.com/sites/default/files/Camera%201%20Keyframe.png)
![[ADD IMAGE'S ALT TEXT]](https://cms-uped.baseux.com/sites/default/files/Play%20Head.png)
- Next move to the last frame of your camera movement, frame 150 or approximately 6 seconds at 24 frames per second.
![[ADD IMAGE'S ALT TEXT]](/sites/default/files/Playhead%20Set.png)
- Then move the camera into the second position.
Position 2
![[ADD IMAGE'S ALT TEXT]](/sites/default/files/Spacecraft%20Position%202.png)
In position 2, you will need to set a new keyframe by:
- Selecting the attributes in the channel box
- Either right mouse click and select Key Selected, or
- Use the set key shortcut 's' on the keyboard.
![[ADD IMAGE'S ALT TEXT]](https://cms-uped.baseux.com/sites/default/files/Camera1%20Keyframe%201.png)
![[ADD IMAGE'S ALT TEXT]](https://cms-uped.baseux.com/sites/default/files/Playhead%20150.png)
For these sort of presentation shots, you will need to keep the camera movement subtle and slow moving so that the audience has a chance to view the model or texture that you would like to showcase. Fast or sudden movement will jar the audience and worst of all make it very difficult to see any of the details of your model or texture work.
Playback your animation to see how it moves.
Tip
If you find that your playback is extremely fast and not playing at the required 24 frames per second. You can check your playback settings by going to: Windows>Settings and Preferences>Preferences.
In the categories area:
- Select 'timeslider' and on the right side of the window in the Playback area.
- Ensure that your playback speed is set to 24 fps x 1.
![[ADD IMAGE'S ALT TEXT]](/sites/default/files/Playback%20Speed.png)
If you don't like the camera movement, you can delete keys on the timeline by selecting the frame that the keys are on. Right mouse click and choose the delete option.
Turntables
The turntable is another very good way of showcasing your work from all angles. As the name suggests a turntable is a camera movement that spins around your model. In Maya crating a turntable animation is very straightforward.
The following steps guide you through creating a turntable animation.
- First set your beginning position where you would like the turntable to start. You can do this just using the perspective view.
- Next select the object that you would like the turntable to spin around (Maya uses this selected object as the pivot point of the turntable).
- Enable the Animation menu set using the drop-down menu at the top of the screen.
![[ADD IMAGE'S ALT TEXT]](/sites/default/files/Animation.png)
- Visualize>Create Turntable> (optionbox)
![[ADD IMAGE'S ALT TEXT]](/sites/default/files/Visualize%20Window.png)
The Turntable option will appear. Here you can set the number of frames and the direction of the turntable.
- Select 'Turntable' when you are happy with your settings.
![[ADD IMAGE'S ALT TEXT]](/sites/default/files/Animation%20Turntable.png)
- Maya will create a new turntable camera and group with the set number of frames and movement direction.
![[ADD IMAGE'S ALT TEXT]](/sites/default/files/Group1%20Option.png)
Once you have added the turn table, if you play the animation, you will notice an ease-in and ease-out automatically applied to the movement at the beginning and end. This Ease may look good if you only want to play the animation once, but if you'd like to create a loop where the turntable turns multiple times, you must adjust the animation to remove the easing.
To edit the timing of the motion you need to use the Graph Editor. To open the Graph Editor:
- Windows>Animation Editors>Graph Editor.
![[ADD IMAGE'S ALT TEXT]](/sites/default/files/Fole%20Path.png)
The Graph Editor will open and with the turntable camera group selected you will be able to see the animation curves for the turntable movement.
![[ADD IMAGE'S ALT TEXT]](/sites/default/files/Graph%20Editor_0.png)
When the animation curves for the turntable have been created, the S curve line that goes from the first Key at frame 1, to the second key at frame 300. The curve in-between the two keys represent the movement over time. From the S shape of the curve, you can see that the movement is pushed closer to the beginning and end of the animation which is what gives you the easing of the animation.
To change how the animation goes from frame 1 to frame 300, you need to reshape the curve so that it is a straight line which is what constant speed looks like in the Graph Editor.
To reshape the curve, you will change the weights of the tangent handles for the keys on frame 1 and frame 300.
First select frame 1
![[ADD IMAGE'S ALT TEXT]](/sites/default/files/Frame%201.png)
Frame 1
When you have selected Frame 1, you will see that there are two very hard to see handles that stick out of each side of the key frame. These are the tangent handles and how you adjust the weighing of the Bezier curve in-between the keys.
Either manipulate the handle manually of you can use the tangent weighting buttons at the top of the window.
![[ADD IMAGE'S ALT TEXT]](/sites/default/files/Weighting%20Button.png)
You want the one that looks like a straight diagonal line.
![[ADD IMAGE'S ALT TEXT]](/sites/default/files/Diagonal%20Line.png)
This one is for linear tangents.
- Apply linear tangent to both frame 1 and frame 300, your graph editor should now look like this.
![[ADD IMAGE'S ALT TEXT]](/sites/default/files/Graphic%20Editor.png)
Batch Rendering
You will need to send the file to batch render to render an image sequence or animation. The batch render will take the settings from the render settings window and then render each frame of your animation, saving them into the images folder of the Maya project file system.
Before you send your scene to be rendered, it is good practice to have a final check over the render settings for your scene in the render settings window, you would not want to be half way through and realise the render is not correct and need to start over.
Before your render, remember to check:
- frame name
- image format
- frame padding
- start frame
- end frame
- renderable camera
- image size.
Important
It is very important to check your render quality settings and ensure that they are now set to a high-quality render.
![[ADD IMAGE'S ALT TEXT]](https://cms-uped.baseux.com/sites/default/files/Render%20Settings%201.png)
![[ADD IMAGE'S ALT TEXT]](https://cms-uped.baseux.com/sites/default/files/Render%20Settings%202.png)
Once you are happy with the render settings follow the steps below:
- Select Close to accept the settings.
- Send your scene to Batch Render.
- Enable the rendering menu.
- Set and go to:
- Render>Batch Render.
![[ADD IMAGE'S ALT TEXT]](/sites/default/files/Render%20Menu.png)
Your batch render should now start, and you will start to see feedback about the progress of your render in the command line at the bottom right of the screen.
![[ADD IMAGE'S ALT TEXT]](/sites/default/files/Progress.png)
To see your render happening in real time, open the Script Editor using the Script Editor button in the bottom right of the screen.
![[ADD IMAGE'S ALT TEXT]](/sites/default/files/Script%20Editor.png)
The Script Editor view.
The image below illustrates how the Script Editor appears when opened.
![[ADD IMAGE'S ALT TEXT]](/sites/default/files/Script%20Editor%202.png)
Once the render finishes, all the text will stop updating and there will be a rendering completed message at the bottom of the Script Editor screen.
![[ADD IMAGE'S ALT TEXT]](/sites/default/files/Updated%20Rendering.png)
Suppose there are any problems with the render. In that case, a log is generated in the main Maya folder inside 'Documents' on your computer, which may give you more information about the error and help you troubleshoot why the render was unable to start or finish.
Watch the following videos as Geoff demonstrates how to create animated cameras and presentation techniques.
Practice
Task 1: Light and render a presentation video of your best piece of work
Choose your best piece of work and prepare a presentation showcasing applied lighting and rendering.
What tools or resources do you need?
- Maya
- One piece of work you have already completed.
What steps should you take?
3 Hours

Set aside up to three hours to complete steps 2-11 below. Remember to save your work as you go when using Maya.
- Review the learning for Lighting and rendering to help you with this task.
- Select Your Best Piece of Work
- Choose the animation or scene that best represents your skills and creativity. Ensure that the scene is complete and ready for rendering.
- Set Up Scene in Maya
- Open your chosen piece of work. Make sure all assets are correctly linked and organised within the scene.
- Prepare Lighting Setup:
- Assess the mood and atmosphere you want to convey in your presentation video.
- Set up appropriate lighting sources, considering factors such as colour, intensity, and direction to enhance the visual appeal of your scene.
- Adjust Materials and Textures:
- Fine-tune the materials and textures applied to objects in your scene to ensure they react realistically to lighting conditions.
- Pay attention to reflectivity, roughness, and transparency to achieve the desired visual effects.
- Test Render:
- Test renders will be performed before the final render to evaluate the lighting and material settings.
- Adjust as needed to achieve your scene's desired look and feel.
- Camera Setup:
- Position and animate the camera to capture your scene from the most visually engaging angles.
- Experiment with different camera movements and compositions to enhance the storytelling aspect of your presentation video.
- Render Settings:
- Configure the render settings in Maya according to your project requirements.
- Adjust parameters such as resolution, frame rate, and output format to ensure the final video meets your desired specifications.
- Render Sequence:
- Initiate the rendering process to generate individual frames of your scene.
- Monitor the progress and ensure that each frame is rendered without errors or artifacts.
- Post-Processing:
- Once the rendering is complete, import the rendered frames into a video editing software such as Adobe Premiere, Adobe After Effects or DaVinci Resolve.
- Apply any necessary post-processing effects, such as colour correction and compositing, to enhance the overall presentation of your video.
- Finalise and Save the Presentation Video:
- Review the edited video and make any final adjustments as needed.
- Export the high-resolution presentation video (1920x1080) as an mp4 for sharing or submission.
- Ensure the video accurately showcases your skills and creativity in animation and rendering using Maya.
What should you do after?
- Reflect on the effectiveness of your camera angles and movements in conveying the narrative or emotion of your animated scene.
- Identify specific aspects of your materials and textures that you found particularly successful or challenging.
- Share your rendered work to forum:
- Select your forum thread by finding your name in the Forum: Lighting Forum.
- Select ‘Reply’ to your most recent Forum post.
- Enter the words ‘Task 1 Light and Rendered presentation’ in your new post.
- Select the Post your response button, then select Edit in your new reply when it shows up.
- Upload your photo(s) or files using the Attachment field.
- Select Save changes to share your coursework to your forum thread.
- Get feedback on this and other learning tasks at the next Live Session – check the Live Session calendar for dates and times.
Great work, you have now completed your first lighting and rendering piece. Next up, you will recreate portrait lighting set ups.
Lighting workflows
Indirect Lighting workflows rely on simulating light coming from a large dome-shaped image-based light or a physical sun and sky simulation and then using calculation to process how light bounces and scatters around a scene and interacts with all the materials and objects. The downside to this approach to lighting is that the artist does not have much control over the overall look or feel of a scene or shot; once you have set up your image-based light, the only absolute control you have is its orientation and intensity. Then the render engine does its magic, and you get what you get.
Direct Lighting workflow is the complete opposite; it uses many individually placed lights to precisely control the lighting and narrative feel of a shot or scene. The lighting artist has infinite control over the look of the shot; the downside to this approach is that crafting the lighting for a shot can take a long time, and the artist places and tweaks individual lights, slowly honing the look of a shot.
Like many other areas of this course, you can only scratch the surface of what is possible in each area. If you find an area enjoyable and wish to delve further into what is possible, you should take the initiative and dig deeper in your own time.
For more information on lighting and lighting workflows, check out the following book:
![[ADD IMAGE'S ALT TEXT]](/sites/default/files/Digital%20Lighting.png)
There are several distinct types of lights in Maya that each create a different lighting effect or simulate a specific type of lighting condition.
All lights share a two common attributes:
- Colour.
- Intensity.
Colour attribute
Sets the colour of light that the light emits. The colour attribute can also be connected to a texture or file node to create a textured light with variation. This is handy when you want to create the effect of dappled light as if coming through the canopy of a forest or lights from a TV screen, for example.
Intensity attribute
The intensity of a light is basically how bright a light is. Intensity values vary from light to light, so you must experiment with this value as you create and set up your lights to get the effect you need in your shot. The intensity value can also be set to a negative value, which will result in a light that removes light from the scene; this can be useful to create darker corners of a composition or remove unwanted light from under a bed.
In Maya, there are now two different groups of lights:
- Maya standard lights
- Lights that will only work when rendering using the Arnold render engine.
Maya standard lights
Select each of the following headings to learn the six Maya standard lights.
An ambient light shines in two ways—some of the light shines evenly in all directions from the location of the light (like a point light), and some of the light shines evenly in all directions from all directions (as if emitted from the inner surface of an infinitely large sphere). Use ambient light to simulate a combination of direct light (for example, a lamp) and indirect light (light reflected off a room's walls).
Directional lights simulate a very distant point light source (for example, the sun as viewed from the surface of the Earth). A directional light shine evenly in only one direction. Its light rays are parallel to each other.
A point light shines evenly in all directions from an infinitely small point in space. Use a point light to simulate an incandescent light bulb, candle flame or a star.
A spotlight shines a beam of light evenly within a narrow range of directions defined by a cone. The cone's width determines how narrow or broad the light beam is. You can adjust the softness of the light to create or eliminate the harsh circle of projected light. You can also project image maps from spotlights. Use a spotlight to produce a beam of light that gradually becomes wider (for example, a flashlight or car headlight).
Area lights are a two-dimensional rectangular light source. Area lights can simulate windows' reflections on surfaces; you can use the transformation tools to make an area light a size and shape of your choosing. Compared to other light sources, area lights can take longer to render, but they can produce higher-quality light and shadows. Area lights are perfect for high-quality still images.
A volume of light illuminates an area within its shape. Volume lights can be used as a negative light to remove light from a selected area of a scene.
Arnold lights
Select each of the following headings to read descriptions of the five Arnold lights.
The Arnold area light functions similarly to the Maya area light, with the added benefit of changing its shape from the default rectangle (called a quad in Arnold) to a disk or cylinder.
Simulates light from a sphere or dome above the scene. Skydome’s can also be used in conjunction with HDRI images for image-based lighting.
Converts geometry into a light. This is helpful when creating neon lights, or animated car light trails which would be difficult to create in any other way.
Light portals are used in conjunction with Skydome lights. They help to reduce noise for interior scenes, where the light comes in through relatively small openings. Instead of emitting light, they can guide Skydome light sampling. Light portals must cover all windows, doors, and other openings through which Skydome light enters the scene. If you are using light portals, set the portal mode parameter attribute inside the Skydome light so the light portals work as expected.
Each of Maya’s lights are created to perform different lighting tasks and have individual attributes, which are explored further in the following playlist.
The Light Editor
Maya’s Light Editor has some great organisation and productivity features for the lighting artist. The editor can be opened using the 'Lighting Editor' button found at the top of the screen.
![[ADD IMAGE'S ALT TEXT]](/sites/default/files/Lighting%20Editor%20Button.png)
![[ADD IMAGE'S ALT TEXT]](/sites/default/files/Opened%20Light%20Editor.png)
Creating lights
Both standard lights and Arnold lights can be created directly from the lighting editor window using the create lights buttons ate the top left of the editor window.
![[ADD IMAGE'S ALT TEXT]](/sites/default/files/Create%20Lights.png)
Grouping lights
Lights can be grouped together by job, or you can group lights by lighting setup.
![[ADD IMAGE'S ALT TEXT]](/sites/default/files/Group%20Lights.png)
Using groups and the handy enable/disable and isolate buttons allows for fast and easy switching between lights and different lighting setups. Viewing lights in isolation mode conveniently turns all other lights off at a single click, so you can quickly work on one light at a time.
![[ADD IMAGE'S ALT TEXT]](/sites/default/files/Enable%20Button.png)
The look through window
The Look Through window is particularly handy when placing and orienting lights. It opens a separate window that shows the viewpoint of a selected light, this viewpoint can be manipulated in the same way as the Maya viewport for fast and intuitive placement of lights.
![[ADD IMAGE'S ALT TEXT]](/sites/default/files/Look%20Through%20Window.png)
![[ADD IMAGE'S ALT TEXT]](/sites/default/files/Alexander%20Dumas.png)
Property editor
The Property Editor gives your fast access to a selection of the most used attributes for a selected light source allowing the lighting artist to quickly place and setup lights all from one editor window.
![[ADD IMAGE'S ALT TEXT]](/sites/default/files/Property%20Editor.png)
Watch Geoff provide an overview of the Lighting Editor in the following video (5:43m).
Now that you have a basic understanding of the different types of lights and their attributes, it is time to explore and put that knowledge into practice and recreate some studio lighting setups using digital techniques.
As your subject, use these amazing Creative Commons licenced 3D scans of the Alexandre Dumas bust by Jean Baptiste Carpeaux. You can download this and many other 3D scans from www.myminfactory/scantheworld.
![[ADD IMAGE'S ALT TEXT]](/sites/default/files/Alexandre%20Dumas%20Bust.png)
Watch the video below (20:57m) where Geoff takes you through simulating studio lighting.
Recreate the 3-point lighting setup demonstrated in the video using the supplied Maya file. Try creating the same effect using the Maya software render engine and the Arnold Render engine.
- Can you create soft shadows using the Maya Software renderer and depth map shadows?
- How do you stop depth map shadows from looking pixelated?
Try recreating different studio lighting setups, such as 2-point or Rembrandt lighting.
- How does changing the light types and colour affect your lighting setups and overall look?
The Digital Camera website has a good cheat sheet for studio lighting setups.
Once you have recreated a few different studio lighting setups, can you create an exciting lighting setup of your own? Try looking at some lighting reference material from any movies by Alfred Hitchcock or the fantastic cinematography of Roger Deakins.
Practice
Task 2: Recreate portrait lighting setups
This learning task guides you through recreating various portrait lighting setups in Maya, exploring different rendering engines, shadow techniques, and experimenting with light types and colours to understand their impact on the scene's aesthetics.
What tools or resources do you need?
What steps should you take?
5 Hours
Set aside up to five hours to complete steps 2-12 below. Remember to save your work as you go when using Maya.
- Review the learning for lighting and rendering to help you with this task.
- Review the video on how to recreate a 3-point lighting setup in Maya.
- Download the provided Maya scene File.
- Open the Maya file containing the model and scene setup.
- Set up three lights: key light, fill light, and backlight, mimicking the positions and characteristics shown in the video.
- Render the scene using the Maya Software renderer.
- Adjust shadow attributes to achieve soft shadows in the Maya Software renderer.
- Experiment with light source size and shadow settings.
- Increase the resolution of depth map shadows to avoid pixelation.
- Adjust the shadow map resolution settings accordingly.
- Refer to the provided cheat sheet and recreate various studio lighting setups such as 2-point lighting or Rembrandt lighting.
- Change the types and colours of lights to observe their effects on the rendered lighting setup and overall look of the scene.
- Draw inspiration from lighting references such as Alfred Hitchcock's movies or Roger Deakins' cinematography to create an original lighting setup.
- Fine-tune your lighting setup, adjust camera angles if necessary, and render the final scene using either the Maya Software renderer or Arnold Render engine.
- Observe the nuances in lighting and shadows to achieve the desired mood and atmosphere.
- Save and Export a rendered jpg of your lighting setup.
What should you do after?
- How did experimenting with different lighting setups in Maya enhance your understanding of portrait lighting techniques? Reflect on the differences in the rendering results between the Maya Software renderer and the Arnold Render engine.
- In what ways did studying lighting references from Alfred Hitchcock's movies or Roger Deakins' cinematography inspire your original lighting setup? How did you translate those influences into your scene?
- Share your lighting and portrait recreation to forum:
- Select your forum thread by finding your name in the Forum: Lighting Forum.
- Select ‘Reply’ to your most recent Forum post.
- Enter the words ‘Task 2 Portrait and Lighting setups’ in your new post.
- Select the Post your response button, then select Edit in your new reply when it shows up.
- Upload your photo(s) or files using the Attachment field.
- Select Save changes to share your coursework to your forum thread.
Get feedback on this and other learning tasks at the next Live Session – check the Live Session calendar for dates and times.
Now that you've covered lighting and rendering, it's time to look at the direct lighting workflow to light an environment.
When lighting an environment using a direct lighting workflow, the number of lights and attributes the lighting artist must track can quickly get out of hand. To help keep lighting scenes organised and straightforward, you need to break downlights and their effect on a shot into several different categories and work on each category one at a time, slowly building up the lighting in the shot.
Select the headings below to view the different lighting effect categories used in lighting workflow.
Think of the key lights as your scene's main, most obvious light source. For example:
- the sun
- a lamp
- car headlights
- a streetlight outside
- a TV in a room etc.
Ambient or fill lights brighten up a shot so that the areas in a shot can be seen to the level required to tell that story of a shot.
When light hits a surface, it generally doesn't just stop. Light will reflect off surfaces to varying degrees depending on the surface type, colour and how reflective it is.
When a bright light hits a surface that is also a bright colour, the reflected light from the surface will take on some of the colours of the surface and create a coloured bleeding effect on any lit surfaces adjacent.
When bright light shines through an opening, you will sometimes see a soft halo effect around the edges of the opening and the edges of light being cast on the floor and or ceiling.
Occasionally, you will want to add areas of rim lighting or highlights around some of the objects in your scene so that they stand out more from the objects around them. Sometimes, this is done to help with composition and draw attention to an area or add some needed interest to a flat shot area.
Not all scenes will need all these categories of light, but it helps when working to work on each category one at a time slowly building up a lighting scheme for the scene. Working in this way helps to keep large, complicated scenes manageable and stops them from becoming too overwhelming.
Generally, when working on lighting a shot, you should follow a structured workflow. The ideal workflow has been outlined in the following step action table.
| Step | Action |
|---|---|
| Step 1 |
|
| Step 2 |
|
| Step 3 |
|
| Step 4 |
|
| Step 5 |
|
| Step 6 | Identify and place Bloom lighting. |
| Step 7 |
|
| Step 8 |
|
| Step 9 |
|
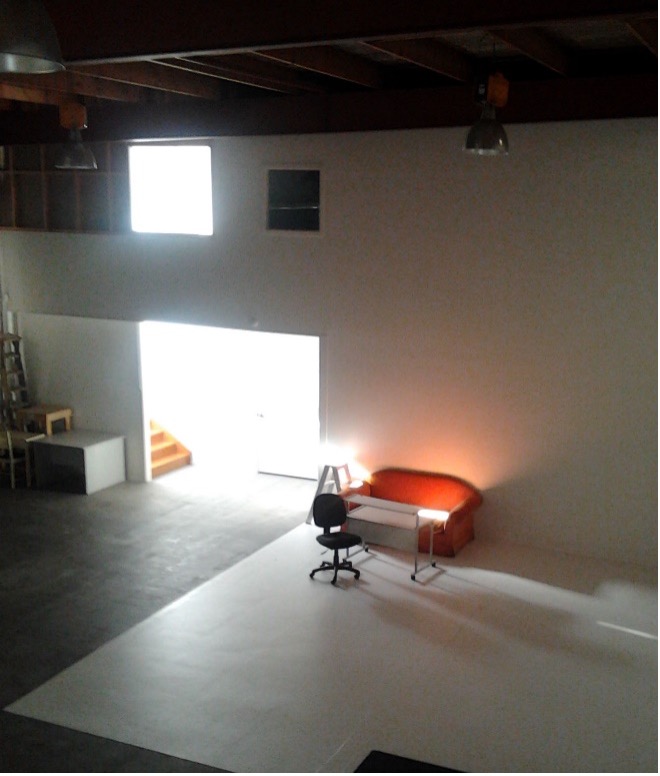
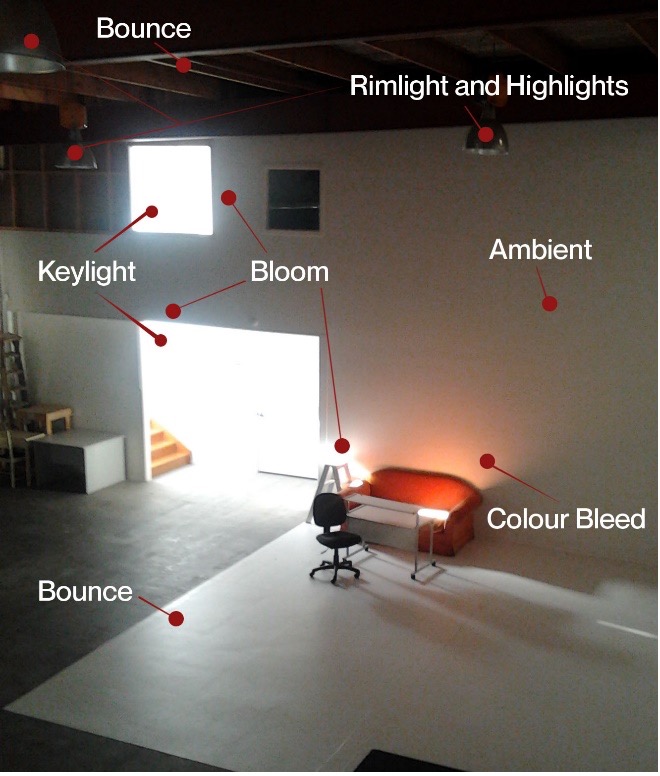
Lighting Reference: Warehouse space photograph
In this photograph of a large open studio space, you can see several of the above light categories represented.
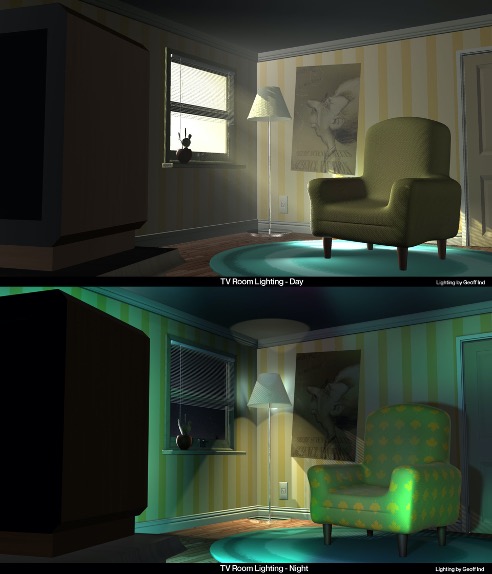
Lighting Reference Case Study: TV Room (Night) 3D Render
Now, look at a completed shot and look at the different lights and their placement in crafting the lighting scheme.
![[ADD IMAGE'S ALT TEXT]](https://cms-uped.baseux.com/sites/default/files/Lighting%20Placement%201.png)
![[ADD IMAGE'S ALT TEXT]](https://cms-uped.baseux.com/sites/default/files/Lighting%20Placement%202.png)
![[ADD IMAGE'S ALT TEXT]](https://cms-uped.baseux.com/sites/default/files/Lighting%20Placement%203.png)
Keylights
In the TV room night lighting setup above, there are four main Keylights. Two are area lights, one for the TV and one for simulating moonlight coming through the window. There are also two spotlights for the lamp in the corner of the room.
![[ADD IMAGE'S ALT TEXT]](https://cms-uped.baseux.com/sites/default/files/Keylight%201.jpg)
![[ADD IMAGE'S ALT TEXT]](https://cms-uped.baseux.com/sites/default/files/Keylight%202.jpg)
![[ADD IMAGE'S ALT TEXT]](https://cms-uped.baseux.com/sites/default/files/Keylight%203.jpg)
![[ADD IMAGE'S ALT TEXT]](https://cms-uped.baseux.com/sites/default/files/Keylight%204.jpg)
As all the key lights cast shadows, the TV casts the most obvious shadows. The TV light has an image attached to the colour attribute, so some colour variation is cast into the scene from the TV, as you would expect if a TV was on in the room.
Ambient or fill Lights
There are three fill lights in the lighting setup:
- One light fill in some light for surfaces facing the front of the room
- One light fills in light on surfaces to the left of the room.
- There is a smaller extra fill light that is adding some extra light on the cactus plant on the windowsill.
The cactus fill light has been light linked to the cactus and only affects the cactus models geometry
The images below show examples of ambient or fill lights.
![[ADD IMAGE'S ALT TEXT]](https://cms-uped.baseux.com/sites/default/files/Fill%20Lights%201.jpg)
![[ADD IMAGE'S ALT TEXT]](https://cms-uped.baseux.com/sites/default/files/Fill%20Lights%202.jpg)
![[ADD IMAGE'S ALT TEXT]](https://cms-uped.baseux.com/sites/default/files/Fill%20Lights%203.jpg)
Bleed or Bloom lighting
In this lighting setup, no bright lighting would create the exact conditions required for true bleed or bloom lighting. However, there is a need to create extra lighting around the lamp in the scene. Currently, the lamp only lights up the immediate areas above and below the lampshade, so some added lighting that illuminates the walls and area around the shade is required.
![[ADD IMAGE'S ALT TEXT]](/sites/default/files/Lamp%20Lighting.jpg)
Three area lights have been arranged around the lampshade to cast some much-needed light onto the surrounding surfaces.
A last light has been created inside the lamp to help brighten up the lampshade and make it look more like it is switched on in the shot.
![[ADD IMAGE'S ALT TEXT]](https://cms-uped.baseux.com/sites/default/files/Lights%201.jpg)
![[ADD IMAGE'S ALT TEXT]](https://cms-uped.baseux.com/sites/default/files/Lights%202.jpg)
![[ADD IMAGE'S ALT TEXT]](https://cms-uped.baseux.com/sites/default/files/Bleed%20Lights.png)
![[ADD IMAGE'S ALT TEXT]](https://cms-uped.baseux.com/sites/default/files/Bleed%20Lightning.png)
Rim lights and highlights
With some moonlight entering through the window, there is an excellent opportunity to create some rim lighting on the cactus plant on the windowsill, which will help define the plant's edge and help it stand out more from the dark background behind.
![[ADD IMAGE'S ALT TEXT]](/sites/default/files/Rim%20Lighting.jpg)
An area light placed outside the room facing the cactus plant creates the rim light around the edge of the plant's surface. The light has been light linked to the cactus plant, so it only illuminates the cactus model geometry.
![[ADD IMAGE'S ALT TEXT]](/sites/default/files/Rimlight%20Illuminating.jpg)
Extra Lights
There is an extra light in this scene that is placed outside the room facing a plane that has an image of a night sky mapped on its surface. This area light illuminates the plane making the night sky visible from inside the room.
![[ADD IMAGE'S ALT TEXT]](/sites/default/files/Light%20In%20Scene.jpg)
![[ADD IMAGE'S ALT TEXT]](/sites/default/files/Extra%20Light.jpg)
All lights combined before any postproduction processing or colour corrections added.
![[ADD IMAGE'S ALT TEXT]](/sites/default/files/Final%20Lighting.jpg)
Post-production
In addition to the raw colour pass above, an occlusion pass, and depth pass, of the scene were rendered and then brought into Adobe After Effects for post processing. These have been illustrated in the images below.
![[ADD IMAGE'S ALT TEXT]](/sites/default/files/Occlusion%20Pass.jpg)
![[ADD IMAGE'S ALT TEXT]](/sites/default/files/Depth%20Pass.jpg)
The colour occlusion and depth passes were combined in post-production to create the final image. The shot has been colour-corrected to create more contrast in the light-to-dark areas of the scene. The depth pass was used to add depth to the field lens blur.
![[ADD IMAGE'S ALT TEXT]](/sites/default/files/Final%20Composited.jpg)
This subtopic will guide you through the process of creating a light link in Maya. If at any point you need to refer to the steps, select this subtopic in your navigation bar.
In the previous subtopic's case study of the TV room at night, a few lights were linked to specific geometry. Light linking is a feature in Maya that can be great when you add accent lights that only affect one or two areas or objects in a scene. In the TV Room case study, the light linking has been used on the cactus plant as an accent to add a rim and fill light that only affects that geometry, not the window frame or walls surrounding the plant.
Creating a light link in Maya
To create a light link in Maya, you use the Light Linking Editor.
Follow the steps below to guide you through creating a light link in Maya.
- You can find the light linking editor in the Lighting/Shading menu which is part of the Rendering menu set.
![[ADD IMAGE'S ALT TEXT]](/sites/default/files/Shading%20Menu.png)
You can arrange the Light linking editor to be Light-Centric or Object-Centric. This means if you choose light-centric, the lights will be arranged in the editor's left column, and vice versa if you choose Object-Centric.
![[ADD IMAGE'S ALT TEXT]](/sites/default/files/Relationship%20Editor.png)
If you select a light in the editor, you will see that it is currently linked to everything in the scene as all the objects in the right-hand column are highlighted.
![[ADD IMAGE'S ALT TEXT]](/sites/default/files/Selected%20Light.png)
To edit the light only to illuminate the geometry you want to:
- break all the light connections to the light.
To do this, with the light that you want to light link selected, go to:
- the Edit menu on the light side of the editor
- choose 'Make Highlighted Lights Not Illuminate by Default'.
![[ADD IMAGE'S ALT TEXT]](/sites/default/files/Light%20Centric.png)
This will break all the connection to that light in the scene and the editor should now look like this with only the light highlighted.
![[ADD IMAGE'S ALT TEXT]](/sites/default/files/Broken%20Connections.png)
Now that you have broken the connection you can select the geometry that you want to link the light to in the right-hand column.
![[ADD IMAGE'S ALT TEXT]](/sites/default/files/Selected%20Geometry.png)
Now with the light highlighted and the geometry highlighted the new light link has been created and the light will only affect that geometry in the scene.
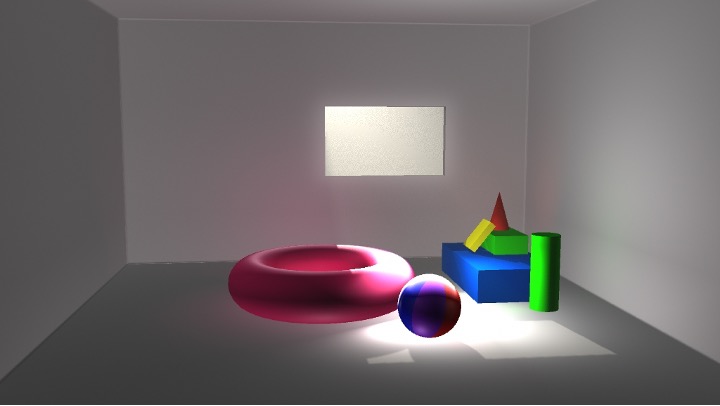
Light Room
In this basic environment you will practice the workflow detailed in the previous pages. Have a go at lighting the scene first using the Maya Software renderer. Once you have completed your lighting scheme, save your scene as a new version and try to relight the scene using Mayas Arnold Renderer and Maya Arnold lights (you can use standard lights in Arnold too).
- What differences did you find between the two different render engines?
- Was one harder to use than the other?
- Which did you enjoy using the most?
Watch Geoff in the following demonstration videos as he shows the process of lighting this scene using Maya software lights.
Watch Geoff in the following demonstration videos as he shows the process of lighting this scene using Arnold lights.
Practice
Task 3: Light a simple scene
This task requires you to practice your lighting skills and apply them to a simple scene.
What tools or resources do you need?
What steps should you take?
3 Hours
Set aside three hours to complete the steps below. Remember to save your work as you go when using Maya.
- Open the provided basic environment scene in Maya. (Lightroom_StudentStart.mb)
- Light the scene for daylight using the Maya Software renderer.
- Save the scene as a new version.
- Switch to Arnold Renderer.
- Recreate your daylight lighting setup using Maya Arnold lights.
- Save the scene.
What should you do after?
- Share your lighting scenes to forum:
- Select your forum thread by finding your name in the Lighting and Rendering Forum.
- Select ‘Reply’ to your most recent Forum post.
- Enter the words ‘Task 3 Simple Scene’ in your new post.
- Select the Post your response button, then select Edit in your new reply when it shows up.
- Upload your photo(s) or files using the Attachment field.
- Select Save changes to share your coursework to your forum thread.
- Get feedback on this and other learning tasks at the next Live Session – check the Live Session calendar for dates and times. All live sessions are recorded so you can watch them later if you miss a session.
Great work, you have completed your simple scene. Your next tasks takes you through lighting a day scene.
Lighting an environment
For the next learning task activity, you will get to light a premade environment. Light it first as if it is the daytime, then you may choose what time of the day you would like to try and recreate.
Remember to light the scene using the ShotCam as your render view. The Shot cam has already been setup and locked in the project file.
To help you get started there are some good examples of lighting reference at the following link.
Lighting reference https://in.pinterest.com/geoffind/lighting-reference/
Practice
Task 4: Light a day secene
This task requires you to practice your lighting skills and apply them to a more complex environment: day time.
What tools or resources do you need?
What steps should you take?
6 Hours
Set aside six hours to create a complex day lighting scene. Remember to save your work as you go when using Maya.
- Open the provided premade environment scene in Maya. (Hallway_StudentStart.mb)
- Choose a daytime setting to recreate (e.g., morning, afternoon).
- Use ShotCam as the render view.
- Reference lighting examples from the provided link (https://in.pinterest.com/geoffind/lighting-reference/ )
- Light the environment using the direct lighting workflow.
- Save the scene as a new version.
What should you do after?
- Share your lighting scenes to forum:
- Select your forum thread by finding your name in the Lighting and Rendering Forum.
- Select ‘Reply’ to your most recent Forum post.
- Enter the words ‘Task 4 Complex Scene Day’ in your new post.
- Select the Post your response button, then select Edit in your new reply when it shows up.
- Upload your photo(s) or files using the Attachment field.
- Select Save changes to share your coursework to your forum thread.
- All live sessions are recorded so you can watch them later if you miss a session.
- Get feedback on this and other learning tasks at the next Live Session – check the Live Session calendar for dates and times.
Great work, you have completed your day scene. Your next tasks takes you through lighting a night scene.
Now that you have completed lighting the environment for a daytime scheme. Save your scene as a new version and relight the scene for a nighttime shot. Again, light the scene using the ShotCam view.
Practice
Task 5: Light a night scene
This task requires you to practice your lighting skills and apply them to a yet more complex environment: night time.
What tools or resources do you need?
What steps should you take?
6 Hours
Set aside six hours to create a complex night lighting scene.
- Using the same environment scene from the previous activity re-light the scene for a night setting.
- Reference lighting examples from the provided link (https://in.pinterest.com/geoffind/lighting-reference/ )or source your own lighting reference.
- Continue using ShotCam as the render view.
- Save the scene.
What should you do after?
- Of the three light scenes you have just created, (simple, day and night), what differences did you find between the two different render engines?
- Was one harder to use than the other?
- Which did you enjoy using the most?
- Share your lighting scenes to forum:
- Select your forum thread by finding your name in the Lighting and Rendering Forum.
- Select ‘Reply’ to your most recent Forum post.
- Enter the words ‘Task 5 Night Lighting’ in your new post.
- Select the Post your response button, then select Edit in your new reply when it shows up.
- Upload your photo(s) or files using the Attachment field.
- Select Save changes to share your coursework to your forum thread.
- All live sessions are recorded so you can watch them later if you miss a session.
- Get feedback on this and other learning tasks at the next Live Session – check the Live Session calendar for dates and times.
Great work, you have completed your night lighting scenes. Your next task takes you through the modelling process.
Congratulations, you have now finished Lighting and Rendering! As you wrap up this topic, take a few moments to reflect on all that you have achieved, including the various learning tasks to hone your skills.
You have learnt how to :
- Create and set up image-based lights
- Recreate a studio lighting setup
- Use a light linking process
| Learning task # | Learning Task Name | Duration (Hours) | |
|---|---|---|---|
| 1 | Light and render a presentation video of your best piece of work | 3 |
|
| 2 | Recreate portrait lighting setups | 5 |
|
| 3 | Light a simple scene | 3 |
|
| 4 | Light a day scene | 6 |
|
| 5 | Light a night scene | 6 |
|
When you're ready, move to the next Digital Production topic, Sculpting.