In this topic we’ll:
- describe considerations for professional writing, including writing for a target audience
- describe some types of professional writing and additional, specific considerations
- explain how to conduct user testing
- provide guidance on when and how to include images and links in documents
- explore promotional documents
- explain how to take and annotate screenshots
- explore formatting basics including page layout, content layout, and text styles.
By the end of this topic you’ll be able to:
- Write professional documents.
- Conduct user testing.
- Include images, links, tables, lists, and annotated screenshots in documents.
- Apply design principles to creating promotional documents.
- Alter page and content layout options.
- Apply and customise text styles in documents
How to collaborate with others in documents will be covered in the next topic.
Professional writing encompasses a wide range of formats and styles, from business emails to reports, briefings, user guides, and more. Report writing will be explored later in this programme.
Professional writing considerations
The table below provides some considerations when it comes to professional writing.
| Your organisation | Your organisation may have a style guide for you to follow or some other form of guidance. There may be rules specific to your organisation that you are to follow, for example, how to refer to the name of the organisation in different situations. |
| Clarity | Always strive for clarity in your writing. Use clear and concise language to convey your message effectively. Avoid jargon. Avoid overly complex sentences that may confuse the reader. |
| Conciseness | Be concise and to the point in your writing. Avoid unnecessary words or phrases that add clutter and distract from your main message. |
| Audience awareness | Understand your audience and tailor your writing to their needs and preferences. Consider their level of expertise, background knowledge, and any specific expectations they may have. |
| Purpose | Clearly define the purpose of your writing. Whether it's to inform, persuade, instruct, or request, ensure that your message aligns with your intended goal. |
| Structure | Organise your writing in a logical manner, with a clear introduction, body, and conclusion. Use headings, subheadings, and bullet points to break up the text and improve readability. |
| Grammar and punctuation | Pay attention to grammar, punctuation, and spelling. Mistakes in these areas can undermine your credibility and professionalism. Proofread your writing carefully before sending it out. Where possible, get someone else to proofread your writing too. |
| Tone and style | Maintain a professional tone and style appropriate for the context and audience. Avoid overly casual language or humour unless it's suitable for the situation. |
| Consistent formatting | Pay attention to formatting, such as font type and size, line spacing, and margins. Consistent formatting helps create a polished and professional appearance. |
| Revision and editing | Take the time to revise and edit your writing thoroughly. Look for ways to improve clarity and overall effectiveness. |
| Feedback | Seek feedback from colleagues or peers to gain insights into areas for improvement. Constructive criticism can help you refine your writing skills and produce higher-quality work. |
Writing for a target audience

Let’s expand on the point of audience awareness in the table above. Writing for a target audience involves tailoring your language, style, and content to effectively communicate with a specific group of people who share common characteristics, interests, or needs. Here is some guidance to help you write for your target audience:
- Identify your audience: Begin by clearly defining who your target audience is. Consider their level of expertise, background knowledge, and any specific needs or challenges they may have. If relevant, you may also consider factors such as demographics (age, gender, location, education level) or psychographics (values, beliefs, interests, lifestyle).
- Understand their needs: Take the time to understand the needs, preferences, and motivations of your target audience. What are they looking for? What problems are they trying to solve? What questions do they have? This understanding will guide your writing and help you address their concerns effectively.
- Use language they understand: Adapt your language and vocabulary to match the level of understanding of your target audience. Avoid using technical jargon or industry-specific terminology that may be unfamiliar to them. Instead, use clear and simple language that resonates with your audience.
Briefings
A written briefing is a concise document that presents information, analysis, recommendations, or updates on a particular topic or issue. It is typically used to inform decision-makers or stakeholders about important matters and guide them in making informed decisions. Written briefings can vary in length and format depending on the purpose and audience but generally include key information presented in a clear and organised manner.
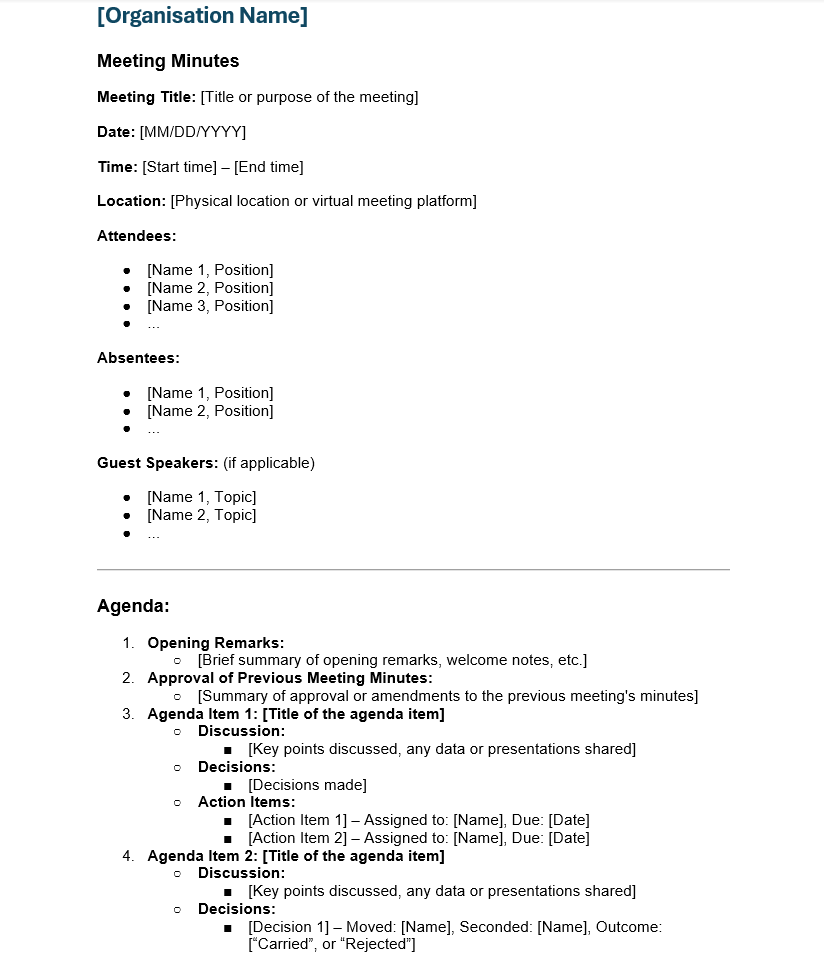
Meeting minutes
Capturing meeting minutes involves recording the essential points and decisions made during a meeting. Meeting minutes will be explored in more depth later in the programme, but here are the basics:
Preparation
- Agenda: Start with the meeting agenda, which outlines the topics to be discussed.
- Attendee list: Note who is present, absent, and any guests or speakers.
During the meeting
- Opening information: Record the date, time, and location of the meeting.
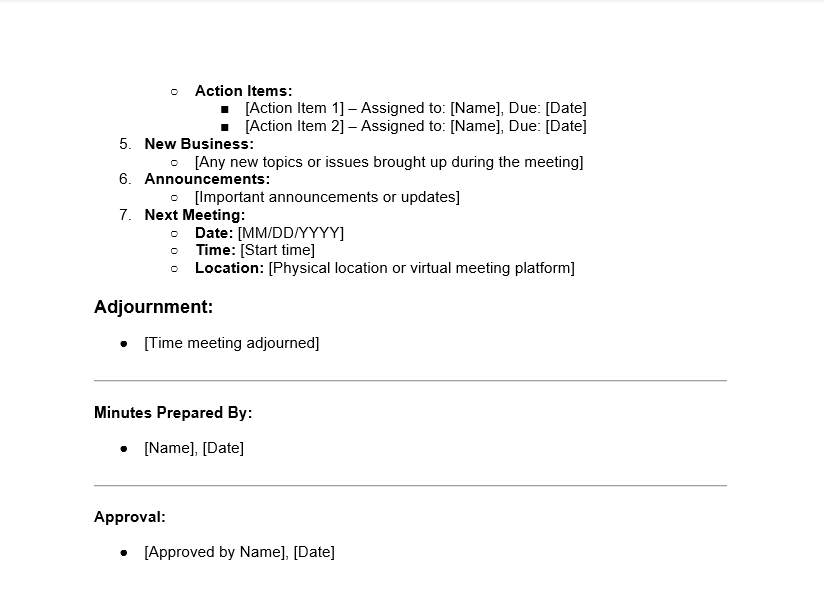
- Summarise key points: Note key points of discussions, decisions made, and any actions assigned, including who is responsible and deadlines. Where possible use the headings from the agenda in your notes so you can relate what was said back to the relevant part of the meeting.
- Motions and votes: Document any motions proposed, who proposed them, who seconded them, and the results of any votes. A motion is a proposal that the person “moving” it wants others to support. For example “I move that we approve the Living Wage Policy and implement it effective 30 June 2025.” Seconding a motion is the process of being the first official supporter of the motion. The name of the person who seconds the motion is usually recorded in the meeting minutes too.
- Questions and answers: Include important questions raised and the responses given.
After the meeting
- Review and clarify: Review the notes for accuracy and completeness, and clarify any points as needed with the meeting chair or a colleague who attended the meeting.
- Format and distribute: Type up the minutes in a clear and concise format, and distribute them to all attendees and relevant parties.
Remember that meeting minutes should be clear, objective, and free of personal opinions.
Your organisation may have a template or preferred format for meeting minutes. If not, you can search for templates online or use the format below and alter according to your organisation’s requirements and those of the meeting. Template can be downloaded here.
User guides
A user guide is a document or booklet that provides instructions and guidance on how to use a product, system, software, or service effectively. User guides are designed to help users understand the features and functionalities of the product or service and to provide step-by-step instructions for performing specific tasks or operations.
When writing a user guide, consider:
- whether the language you are using is easy to understand for the target audience
- the inclusion of illustrations, screenshots, diagrams, or other visual aids to assist with understanding
- the inclusion of a troubleshooting section that addresses common issues or problems users may encounter and provides solutions or workarounds
- the inclusion of a FAQs (Frequently Asked Questions) section with answers to commonly asked questions about the product or process
- the inclusion of a glossary with definitions of key terms or terminology used in the guide.
User testing
If you produce a user guide you should test it with users to check whether your guide is easy to follow. Make adjustments as needed.
Reading
Article Title: User Testing: The Ultimate Guide
Article Summary: Learn how user testing can help you improve user experience and reach your customers.
Links in documents
The table below provides some guidelines for effectively incorporating links into your professional documents.
| Reference to additional information | Links can provide readers with access to additional resources, such as research studies, articles, or reports, that supplement the information presented in the document. |
| Citation of sources | Including links to sources allows readers to verify the credibility of the information and facilitates proper attribution of references, supporting the document's integrity and transparency. |
| Supporting evidence or examples | Links can be used to provide supporting evidence, examples, or case studies relevant to the topic discussed in the document, enriching the content and enhancing the reader's understanding. |
| Navigation within document | Links can help readers navigate between related sections or chapters within the document. |
| Accessibility to data or documents | Links can provide access to datasets, documents, or multimedia content referenced in the document, enabling readers to explore the information further. |
| Call to action | In documents intended for marketing or outreach purposes, links can be used to encourage readers to take specific actions, such as visiting a website, signing up for a newsletter, or contacting a representative. |
| Providing updates or additional resources | Links can be used to direct readers to updated information or related resources available online, ensuring that the document remains relevant and useful over time. |
The guides linked below will show you how to insert links into Google Docs and Microsoft Word.
Reading
Article Title: Work with links & bookmarks
Article Summary: How to insert links into Google Docs.
Article Title: Create or edit a hyperlink
Article Summary: How to insert links into Microsoft Word.
Images in documents
Using images in professional writing can enhance understanding, engagement, and visual appeal.
The table below provides some guidelines for effectively incorporating images into your professional documents.
| Relevance | Ensure that the images you choose are directly relevant to the content of your document. They should complement the text and help convey key messages or concepts more effectively. |
| Quality | Use high-quality images that are clear, sharp, and well-composed. Avoid using low-resolution or pixelated images that may detract from the professionalism of your document. |
| Copyright | Respect copyright laws and obtain proper permission or licensing for any images you use in your document. Alternatively, use royalty-free or Creative Commons images that are available for commercial use. |
| Placement | Place images strategically throughout your document to break up text, highlight key points, or illustrate important concepts. Consider the flow of the document and place images where they will have the most impact. |
| Captioning | Provide descriptive captions for each image to provide context and explain its relevance to the text. Captions should be concise and informative, helping readers understand the purpose of the image. |
| Consistency | Maintain consistency in the style and formatting of your images. Use images of similar sizes, shapes, and styles to create a polished and professional appearance. |
| Balance | Maintain a balance between text and images in your document. Avoid overcrowding the document with too many images, which can overwhelm readers and detract from the clarity of the content. |
| Accessibility | Consider the accessibility of your document and ensure that images are accessible to all readers, including those with visual impairments. If the document is digital, provide alternative text descriptions for images to ensure they can be understood by screen readers. |
| File formats | Use appropriate file formats for your images, such as JPEG, PNG, or SVG, depending on the content and intended use. Consider factors such as file size, resolution, and compatibility with your document format. |
The guides linked below will show you how to insert images into Google Docs and Microsoft Word.
Reading
Article Title: Insert or delete images & videos
Article Summary: How to insert images into Google Docs.
Article Title: Insert pictures
Article Summary: How to insert images into Microsoft Word.
Screenshots
Screenshots provide visual representations of software interfaces, websites, or digital processes, aiding in understanding complex concepts or instructions. They can accompany step-by-step instructions, demonstrating each stage of a process visually and making it easier for users to follow along. Screenshots can also be used to illustrate examples, scenarios, or case studies discussed in a document, providing context for the information presented.
Reading
Article Title: How to Annotate a Screenshot like a Pro: Expert Tips
Article Summary: Read this comprehensive guide for capturing and annotating screenshots on Windows, Mac and Android and Apple phones.
Activity: Screenshots
Refer to the guides and guidance above to practice:
- Taking a screenshot
- Annotating the screenshot
- Inserting the screenshot into either:
- a Word document, or
- a Google Doc.
Promotional documents
A promotional document is a type of document designed to promote a product, service, event, or brand to a target audience. These documents are typically used as part of a marketing campaign to attract customers, generate interest, and drive sales or participation.
Promotional documents can take various forms, including posters, flyers and brochures, and they often highlight key features, benefits, and value propositions to encourage the audience to take a specific action, such as making a purchase or attending an event.
Promotional documents such as posters are visual. In an administrative role, you aren’t expected to be a professional graphic designer but there are some design principles you can put into practice to help you create visual documents.
Reading
Article Title: The 7 principles of design and how to use them
Article Summary: The fundamental principles of design are: emphasis, balance and alignment, contrast, repetition, proportion, movement and white space.
Tools such as Canva can help you create visually appealing documents with help from their range of templates.
Video Title: Designing your Poster in Canva
Watch Duration: 6:32
Video Summary: This video guides you through designing a poster in Canva.
Source: YouTube
You can also easily collaborate with your teammates on Canva, take a look at the guide below to learn how.
Reading
Article Title: How to invite your team and collaborate on designs
Article Summary: Guide to collaborating on Canva.

Document formatting is essential for creating professional and visually appealing documents. We will explore formatting basics below and follow with a set of guides that cover how to apply or adjust formatting mentioned – in both Microsoft Word and Google Docs.
Page layout
Orientation
Orientation refers to the direction in which the page is laid out, either as portrait (vertical) or landscape (horizontal). Portrait orientation is commonly used for documents with primarily vertical content, such as letters, essays, and reports. Landscape orientation is often preferred for documents with wide or horizontal content, such as spreadsheets, charts, and presentations. Choosing the appropriate orientation depends on the content and layout requirements of the document.
Margins
Margins refer to the space between the text and the edges of the page. They are typically set as blank areas around the content to improve readability and aesthetics. Margins ensure that text does not extend too close to the edge of the page, preventing content from being cut off during printing or binding. The default margins in your document software should be set to either 1 inch (2.54cm) or 2cm, depending on the application and your localisation settings, and this will suit most projects.
Page breaks
Page breaks are markers inserted into a document to indicate the end of one page and the beginning of the next. They help control the layout and flow of content, ensuring that sections or chapters start on a new page as needed. Use page breaks to separate sections or chapters of the document and avoid page breaks within paragraphs or lists.
Section breaks
Section breaks are used to divide a document into separate sections. Each section can have its own unique formatting applied such as margins and orientation.
Content layout
Alignment
Alignment refers to the positioning of text or other elements relative to a reference point or margin. Align text to the left or justified for most documents to create a clean and organised appearance. Centre or right-align text sparingly for emphasis or specific formatting purposes.
Tab stops
Tab stops are markers used to control the alignment of text within a document. They define specific points where the cursor moves when the ‘Tab’ key is pressed, allowing for consistent indentation and alignment of text.
Tables
Tables are used to present information in a structured and organised format. Take a look at the following article for some table guidelines. Your organisation may have templates or guidelines for tables. We will explore table formatting options further later in the programme.
Reading
Article Title: Tips for creating great tables
Article Summary: A good table should be like the shelves in a well-run bookshop, with contents that are easy to scan and organised logically. This article provides tips to help you create beautiful bookshop-quality tables in your next document.
Lists
Use bulleted or numbered lists to present information in a clear and concise manner. Ensure consistent formatting and indentation for list items to maintain visual consistency. Bulleted lists are suitable for presenting items or points that are not inherently ordered or prioritised. Numbered lists are appropriate for presenting items or steps that follow a specific order or sequence.
Columns
Using columns in documents can help organise information more effectively and improve readability. It's important to consider the content, purpose, and audience of the document before deciding whether to use columns as they may not be appropriate for all types of content or documents.
You can use columns in a document when you need to organise information in a structured manner, for the purpose of comparison, or to improve readability by reducing line lengths.
You should avoid using columns in a document when the space constraints make columns impractical, as they can lead to cramped text and reduced readability. Additionally, for documents with straightforward content or short bulleted items, using columns may introduce unnecessary complexity. Using columns can sometimes pose accessibility challenges, particularly for individuals using screen readers or viewing documents in different formats.
Spacing
Line spacing refers to the vertical space between lines of text within a document. It is also known as leading.
Line spacing plays a crucial role in readability, aesthetics, and overall presentation. Common line spacing options include single spacing, double spacing, and 1.5-line spacing. Single spacing is often used for most documents, providing a compact appearance, while double spacing is commonly used for drafts, academic papers, or documents with large amounts of text to enhance readability and allow space for editing. 1.5-line spacing offers a balance between single and double spacing, providing improved readability without excessive space between lines. Consistency in line spacing throughout the document is important to maintain a uniform appearance and readability. Adjustments to line spacing may be made based on the audience, purpose, and formatting requirements of the document.
Text styles
Text styles are predefined formats applied to text to give it a consistent appearance and structure throughout a document. Text styles are used to designate different levels of headings (such as Heading 1 and Heading 2) to organise content hierarchically. Text styles also define the formatting attributes of body text, such as font size, line spacing, alignment, and indentation. Applying consistent text styles ensures uniformity and readability in a document.
Microsoft Word and Google Docs provide default text styles. If you decide to define your own then use the existing styles as a guideline and ensure that the:
- text styles are consistent, in other words use the same font for all styles (or the same font for all headings and the same font for all body styles), and just change the size and other elements such as making text bold or italic
- heading styles clearly demonstrate the intended hierarchy
- fonts chosen are clear and easy to read
- font sizes are not too large or too small. The standard font size for body text is typically 11 or 12 points.
Concerning text in general, use colour sparingly and strategically to highlight important information or add visual interest. Ensure there is enough contrast between text and background colours for readability and consider readers with visual impairments or colour vision deficiency.
Formatting guides
Below are how-to guides related to the formatting basics described previously. You may notice within the guides or collections, references to other types of formatting. This topic covers the formatting basics, we will explore other types of formatting later in the programme.
Google Docs
- In the Format your document collection, refer to:
- Change page settings on Google Docs
- Add page breaks & move margins
- In the Create, edit, and format collection, refer to:
- Change how paragraphs & fonts look
- Add a numbered list, bulleted list, or checklist
- Copy and paste text and images (specifically, the ‘Copy text formatting (paint format)’ drop down)
- Add or delete columns in a document
- How to add, edit, and remove tab stops in Google Docs
- Add and edit tables
Microsoft Word
- In the Lay out pages collection, refer to:
- Change margins
- Create newsletter columns
- Change page orientation to landscape or portrait
- Insert a page break
- In the Format text collection, refer to:
- Add and format text
- Change the line spacing in Word
- Apply styles
- Use section breaks to change the layout or formatting in one section of your document
- Set or change the tab stops
- Insert a table
- Format a table
- Add and format lists
- Customize or create new styles
Activity: Formatting basics
Referring to the guides and guidance above, explore the formatting basics in either Microsoft Word or Google Docs. Start with creating a new document and either pasting or typing some text to format.
Assessments
And that’s it, you’re all done! You should now be ready to complete:
- Assessment 2: BATE301A2: Produce a business information document
- Assessment 3: BATE301A3: Work in a team
Have a read of the assessment instructions. If you don’t feel ready to make a start, reread the sections that cover the bits you’re not sure about.