In this section, you will learn basic project management concepts and tools that you need to manage your software project. You will be introduced to the tools that you can use to manage project scope, schedule and monitor project tasks, collaborate and communicate with your team members and perform version controlling.
You will be introduced to the processes under the following subsections:
- Project Scope Management
- Time Management in Project
- Version Control
- Project Communications Management
Note that each section includes an activity that you will need to complete before moving to the next section.
The expectation here is that after learning these processes, tools, and concepts, you will be able to translate the knowledge gained into your project planning and development phase.
Scope refers to all the work involved in creating the products or deliverables of a project. A deliverable is a product created as part of a project. It can be product related, such as a piece of hardware or software, or other related processes such as documentation. In your case, project deliverables might include software product(s) and some technical reports or documentation.
A shared understanding and a very clear vision of the scope of a project, at the outset, are crucial when working in a team.
Project scope management includes the processes involved in defining and controlling what work is or is not included in a project.
A well-defined project scope enables the project team and other stakeholders to have a mutual understanding of what deliverables or products the projects will produce and what processes the project team will use in producing them.
There are six processes that you must follow to develop your project scope management. They include:
- Planning how scope would be managed
- Collecting requirements
- Defining scope
- Creating Work Break Structure (WBS)
- Validating scope
- Controlling your project scope.
In this course, we may not be able to directly carry out all these processes in our project scoping due to the size of the project you will be working on and time constraint, but we will discuss each of them with focus on how to carry out the processes and the tools you can use to facilitate each of them.
We will begin with how to plan the scope of your project and how it would be managed throughout its lifecycle.
For a bigger software project, the inputs or information that drives this process may include a project plan, expert judgement, environmental factors, and organisation process assets.
After analysing the information (and deliberating with your team member if you are working in a team), you will develop your project scope and the associated requirements (we will look at what defines a requirement later in the section). This will form a key component of the document you submitted as your project proposal.
In general, your scope management plan will include the following information:
- How to prepare a detailed project scope statement. For example, are there templates or guidelines to follow?
- How much detail is needed to describe each deliverable?
- How to create a WBS. It is often difficult to create a good WBS. We will see some suggestions, samples, and resources for creating a WBS.
- How to maintain and approve the WBS. The initial WBS often changes, and project team members can disagree on what should be included.
- How to obtain formal acceptance of the completed project deliverable. It is extremely important to understand the process for obtaining formal acceptance of completed deliverables, especially for projects in which payments are based on formal acceptance.
- How to control requests for changes to the project scope.
Before, we continue with scoping of our project, let’s discuss what makes up the requirement of your software project (remember that requirement must be well defined in your scope plan document – and it is going to be the ‘driver’ of your scope)
What are the requirements in Software Project? According to the 1990 IEEE Standard Glossary of Software Engineering Terminology defines a requirement as follows:
- A condition or capability needed by a user to solve a problem or achieve an objective.
- A condition or capability that must be met or possessed by a system or system component to satisfy a contract, standard, specification, or other formally imposed document.
- A documented representation of a condition or capability as in 1 or 2.
In general, a requirement can be defined as a condition or capability that is necessary to be present in a product, service, or result to satisfy a business need. Requirements include the quantified and documented needs and expectations of the project sponsor, customer, and other stakeholders.
For software projects, it is helpful to divide requirements development into the software engineering steps called elicitation, analysis, specification, and validation.
These steps include all the activities involved in gathering, evaluating, and documenting requirements for a software or software-containing product.
Additionally, because requirements are frequently unclear at the beginning of a project, it is crucial to define them in an iterative manner.
For your proposed project, you may be required to clearly show your software project requirements and describe how you want to plan, track, prioritize, measure (using some metrics) and report requirements activities.
This information is very important during your scoping, as they will give you a clear idea of what you can achieve (in terms of product features) and how you want to measure those achievements with respect to your software product.
This is the second process involved in defining and managing the scope of your proposed project. A major consequence of not defining requirements well is rework, which can consume up to half of project costs, especially for software development projects. As illustrated in the following diagram, it costs much more to correct a software defect in later development phases than to fix it in the requirements phase.

There are several techniques you can use to gather requirements. However, the following are the ones that are relevant to software projects:
Prototyping technique
With this technique, you gather preliminary requirements (either through brainstorming with your team member or interviewing an expert) that you use to build an initial version of the solution - a prototype. You show this to the client or product owner (in your case, this could be your learning facilitator), who then gives you additional requirements. You change the application and cycle around with the product owner again. This repetitive process continues until the product meets the critical mass of business needs or for an agreed number of iterations.
Context Diagrams
This is a high-level diagram of a system like. (You can use this to clarify the interfaces and boundaries of a project or process)
Have a look at this short video to understand the elements of a context diagram.
Product owners in agile software development project can create a prioritized product backlog for each sprint.
Document analysis and user story (in your case, the document and user story are going to be provided by product owner or your learning facilitator). You can see examples of user stories here.
- Benchmarking: You can generate ideas by comparing specific product characteristics or project practises to those of other projects or products like yours.
- Brainstorming: If you are working in a team, you can brainstorm with the members of the team regarding the requirements of your project.
See an example of brainstorming here.
Defining scope
The next big step of your project scope management process is to provide detailed definition of the work required for project. A good scope definition is very important to project success because it helps improve the accuracy of time, resource estimation and even cost. It establishes a baseline for performance evaluation and project management, and it helps to convey precise work responsibilities.
To define scope, some of the tools and techniques you can use include expert judgement, data analysis, decision making, interpersonal skills and team skills. The main outputs of this process include scope statement and project documents update.
Your project scope statements should at the very least comprise of; a product scope description, product user acceptance criteria, and comprehensive information on all project deliverables, though their exact contents will vary. Other scope-related details, such as the project limits, restrictions, and assumptions, should also be written down. Functional and design specifications, which should also be mentioned in the scope statement.

The next stage in project scope management is to design a work breakdown structure after gathering requirements and defining scope. A project's overall scope is defined by a Work Breakdown Structure (WBS), which is a hierarchical and deliverable-oriented grouping of the work involved.
It involves subdividing the major project deliverables into smaller, more manageable component. All the steps of project work are outlined in the WBS chart.
It is crucial to plan and split the work into logical segments based on how the work will be carried out because most projects involve several individuals and a wide range of deliverables.
Here is a short video that describes WBS from project management perspective:
What do you need to create your own WBS?
The main inputs for developing your WBS are your project management plan and other environmental and organisational factors like availability of resources.
You can rely either on expert judgement (your learning facilitator could be the expert here or you can also look up some expert judgement relevant to your project online) or decomposition technique (by simply subdividing project deliverables into smaller pieces) to create your WBS.
The outputs of the process of creating the WBS are the scope baseline and project documents updates. The scope baseline includes the approved project scope statement and its associated WBS
What does WBS looks like?
You can depict your WBS as a task-oriented tree of tasks or activities, you can also use a tabular form.
See examples of both forms in the next two images.
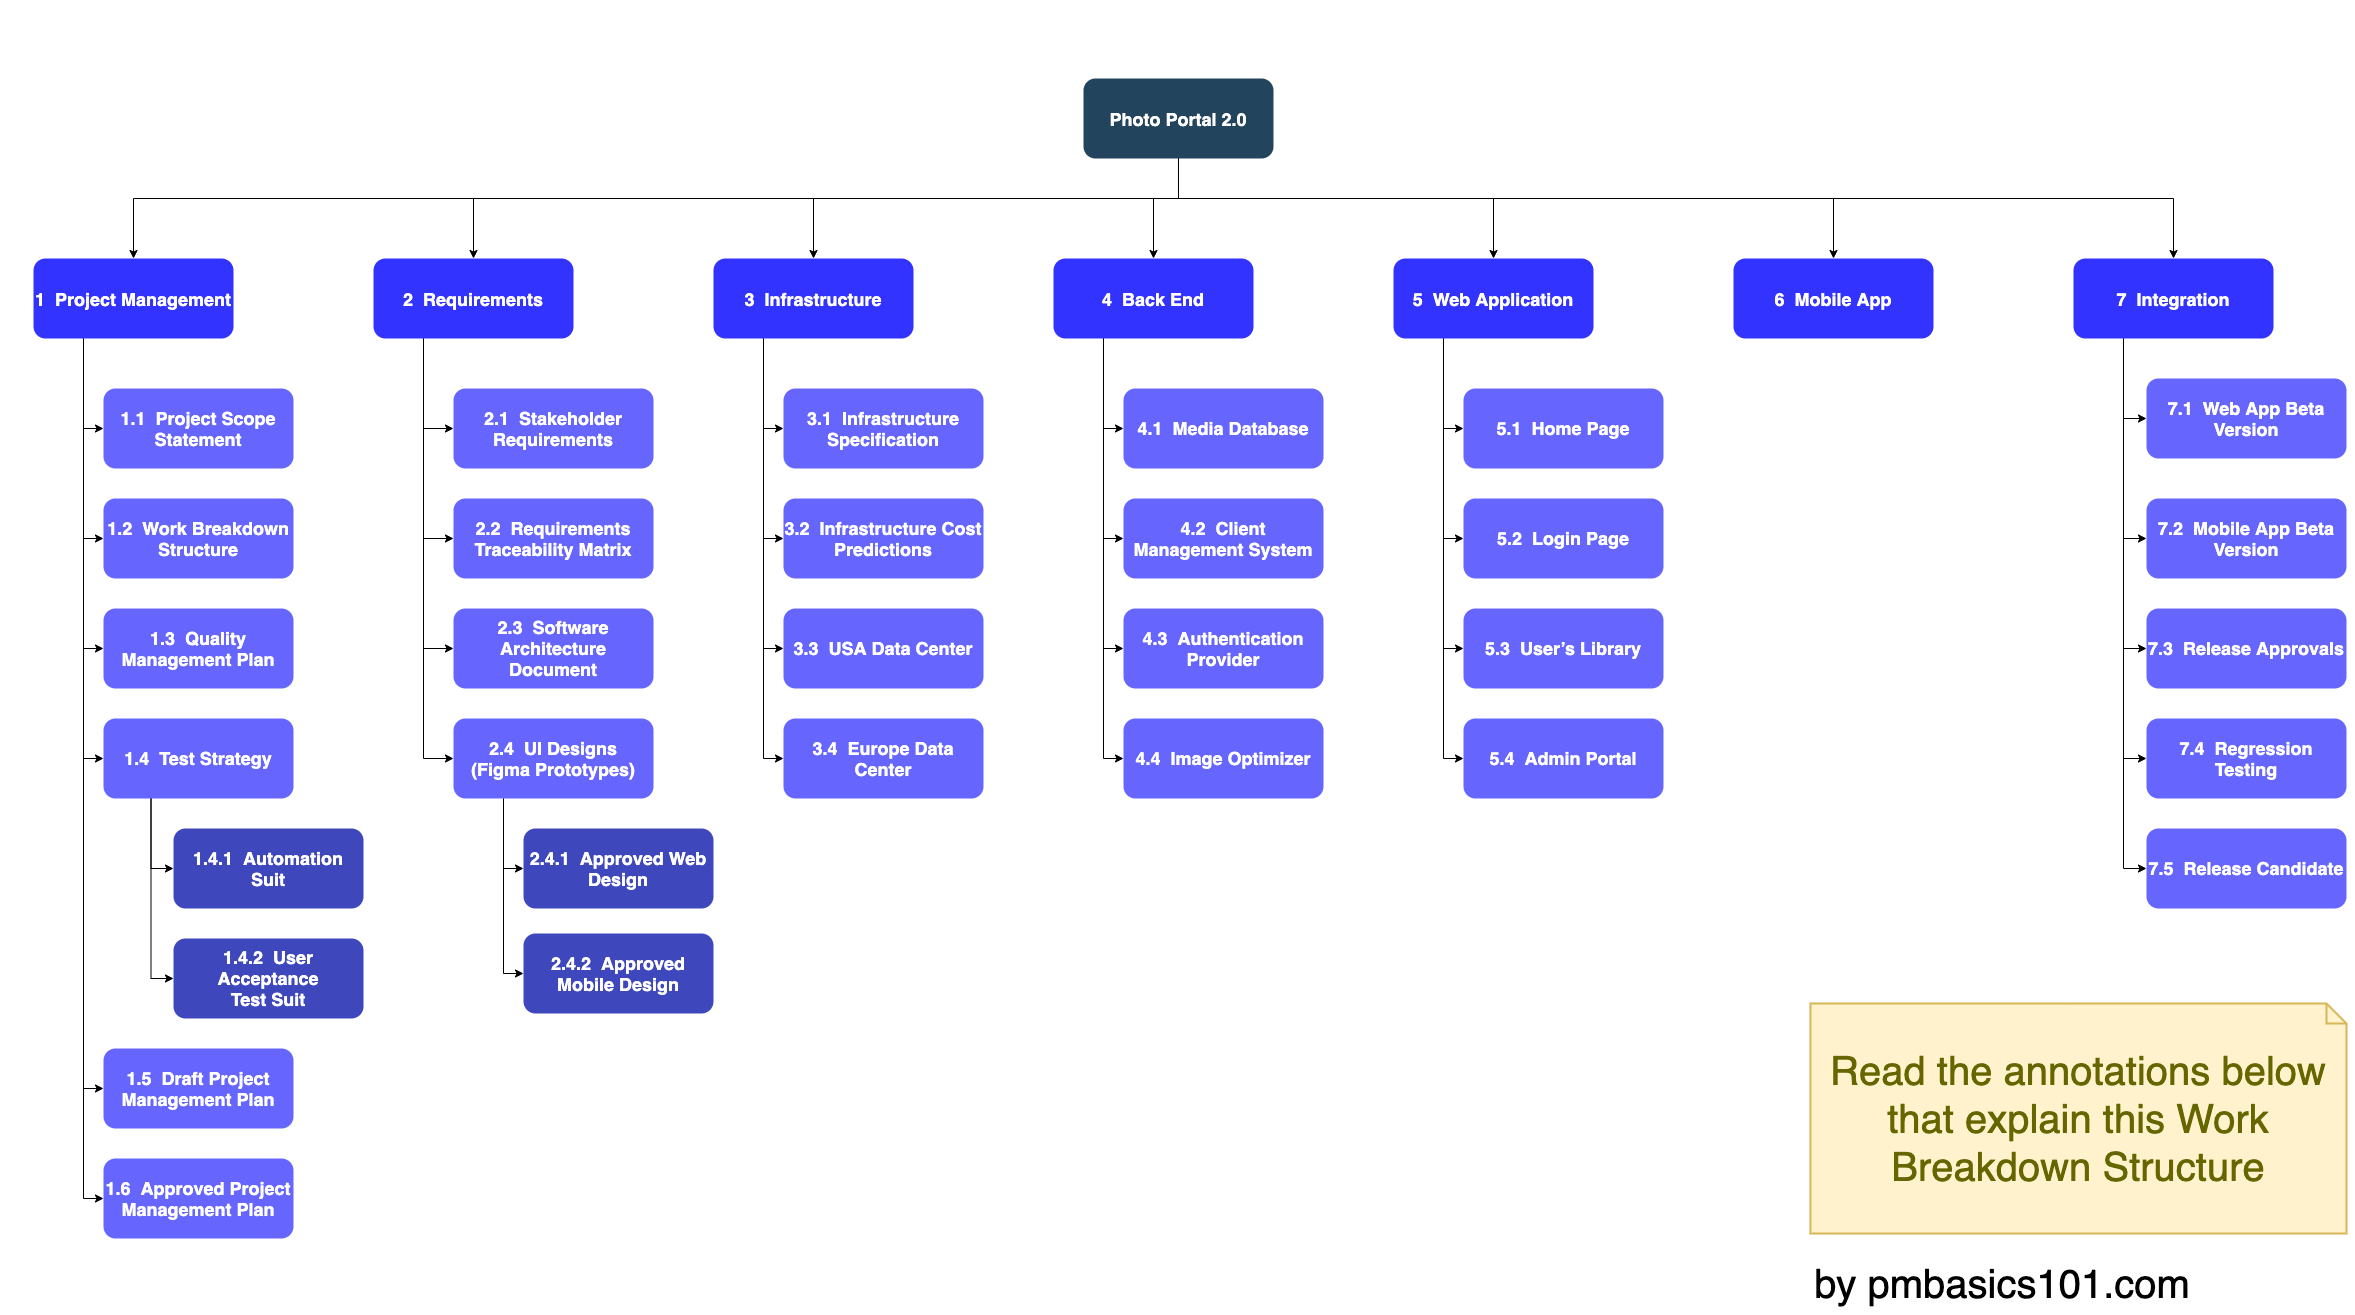
A Task-oriented Tree WBS Example for SWP from pmbasics101
- At the topmost level of the WBS is the final product (Photo Portal 2.0) or the product vision.
- The second decomposition level is where you have the major deliverables
- Then you have the lower level of the decomposition which are usually the tangible deliverables.
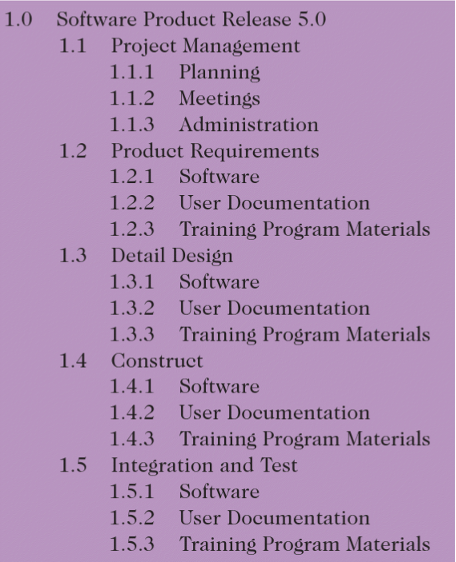
Figure C: The Tabular form of WBS
With Figure C, you need to use a numbering scheme that will allow you to present fine-grained task. It is also better to use only nouns when describing deliverables. For example, instead of using the words “define requirements” on your WBS, it is better to use “requirements definition”. For activities on a schedule below the deliverable, you should use verb phrases.
If you have Microsoft project software installed on your machine, you can use it to create your WBS, otherwise, there are various open-source online tools that you can use. See one here.
The remaining two processes in your scope management plan include validating scope and controlling scope.
Validating scope
Involves formalizing acceptance of the project deliverables. Key project stakeholders, such as the customer and sponsor for the project, inspect and then formally accept the deliverables during this process. If the deliverables are not acceptable, the customer or sponsor usually requests changes.
Controlling scope
Involves controlling changes to project scope throughout the life of the project— a challenge on many IT projects. Scope changes often influence the team’s ability to meet project time and cost goals, so project managers must carefully weigh the costs and benefits of scope changes.
Some Recommendations for Developing Project Scope
Ensure that you have sufficient user input. Lack of user input leads to problems with managing scope creep (changes, continuous or uncontrolled growth in a project’s scope, at any point after the project begins. This can occur when the scope of a project is not properly defined, documented, or controlled. It is generally considered harmful).
You can improve user inputs by:
- Having users on your project team
- Having a regular meeting with defined agendas. User can sign off key deliverables presented at the meetings.
- Having a regular interaction and getting feedback from users.
Do not promise to deliver what the team cannot deliver in a particular time frame. Make sure the project schedule allows enough time to produce the deliverables.
- Employ techniques such as prototyping to understand user requirements.
- Put all requirements in writing and keep them current and readily available.
You can use GitHub version control approach to document and control changes in requirements.
Note that:
- A unit of work should appear in only one place in the WBS.
- The work content of a WBS item is the sum of the WBS items below it.
- A WBS item is the responsibility of only one person, even though many people might be working on it.
- The WBS must be consistent with the way work will be performed; it should serve the project team first and serve other purposes only if practical.
- If you are working in team, your project team members should be involved in developing the WBS to ensure consistency and buy-in.
Sample Scope Statement
Download and review the components of a sample scope statement here (please do not copy and paste or reuse outrightly, you can adapt to suite your case).
In this section, you will learn how to manage your project schedule and deliver your software product in timely fashion.
Project schedule management simply involves the processes required to ensure timely completion of a project.
Again, we will consider six processes to follow when preparing your project schedule:
- Planning schedule management
- Defining activities
- Sequencing activities
- Estimating activity durations
- Developing the schedule
- Controlling your schedule
Planning schedule management
This involves in planning how the project schedule will be managed throughout the lifetime of the project.
In general, it includes the following information:
- Rules of performance measurement – this specifies how to determine the percentage of work completed.
- Process descriptions – describes how all schedule management processes will be performed.
- Reporting formats – Specifies the frequency and format of schedule report.
- Level of accuracy and units of measure – specifies how accurate schedule estimates should be and determines whether time is measured in hours, days or another unit.
- Project schedule model development – The schedule model which captures project activities with dependencies (activity that depends on another before it is carried out), estimated duration and other information that can be used to produce a schedule.
You can get this information through expert judgement or by brainstorming with your team member.
Defining Activities
You will revisit the activities you defined during the scope planning process here and further describe them in more details as part of your schedule management processes.
Here, you will identify specific actions that will produce the project deliverables in enough detail to determine resources you require to develop your project and schedule estimates.
Through this process, you will be able to develop and produce activity list, activity attributes, a milestone list and update your project plan.
Activity list is a tabulation of activities to be included on your project schedule. It usually includes activity name, number, and a description of the activity.
The activity attributes provide schedule-related information about each activity, such as predecessors, successors, logical relationships, leads and lags, resource requirements, constraints, imposed dates, and assumptions related to the activity.
- Note that your activity list and activity attributes should agree with the WBS.
- You can add information such as logical relationships and resource requirements to your activity attributes as it becomes available; this information is usually determined in later processes.
- Milestone: a milestone on a project is a significant event that normally has no duration. Milestones are your project’s most important and visible events. It usually takes several activities and a lot of work to complete a milestone, but the milestone itself is a marker to help in identifying necessary activities. Milestones are also useful tools for setting schedule goals and monitoring progress.
Defining your project activities in detail with all these information would allow you and your project team to completely understand all the work that must be done as part of the project scope so that you can start scheduling the work.
Sequencing Activities
After defining project activities, the next step is sequencing them or determining their dependencies. This process involves evaluating the reasons for dependencies and the different types of dependencies.
To understand different types of task dependencies, please read the following resource.
You will see different examples of task sequencing and dependencies on the page. For your project, you will use discretionary dependencies (you can speak to your learning facilitator if you are unsure about anything).
Estimating Activity Duration
This process involves estimating the duration of project activities. Note that the duration here includes the actual amount of time worked on activity plus elapsed time. For example, even though it might take five workdays to do the actual work, the duration estimate might be two weeks to allow extra time needed to obtain outside information.
The people or resources assigned to a task will also affect the task duration estimate.
The following are the key considerations in making activity duration estimates:
- Availability of resources: That is, if the resources you need for the project is readily available. Resources here may include skills. Do you and your team members have the required skills to do the activity within this duration?
- The number of people expected to be available to work on the project at any time.
The outputs of activity duration estimates include the estimates themselves and the basis of estimates.
Duration estimates are often provided as a discrete number, such as four weeks; as a range, such as three to five weeks.
Here, you will you use the results of all the preceding project scheduling management processes to determine the start and end dates of the project and its activities.
The ultimate objective of creating a realistic project schedule is to provide a basis for tracking project progress for the time dimension of the project.
The main outputs of this process are a project schedule, schedule data, project calendars, project management plan updates, and project documents updates.
Gantt chart
This is a common tool for displaying project schedule information. Other tools included critical path analysis (tool for developing and controlling project schedules), critical chain scheduling (technique that focuses on limited resources when creating a project schedule).
Gantt charts provide a standard format for displaying project schedule information by listing project activities and their corresponding start and finish dates in calendar form.
Gantt charts are sometimes referred to as bar charts because the activities’ start, and end dates are shown as horizontal bars.

Figure D shows an example of Gantt chart for software development project.
Here is a video that shows how you can make a Gantt chart with excel.
WBS with Gantt Chart
WBS can be used in combination with a Gantt chart to incorporate WBS levels and task hierarchies. See example here.
Consider you and your team members are collaborating on the same piece of a software project, and each of you must work on the project plans at the same time, contribute code to the same files, and make changes over and over.
If each of you in the team takes turns, each one of you will have to spend a lot of time waiting for the other to finish. If you all decided to work on your own copies of files and email changes back and forth to each other, things will be lost, overwritten, or duplicated. To address these challenges, you and your team will need some tools to help you manage changes to source code over time and effectively manage your code base.
This is where version control and collaborative tools come in.
Version control, also known as source control, is the practice of tracking and managing changes to software code. Version control systems are software tools that help software teams manage changes to source code over time.
Version control helps solve all the problems described earlier in the section:
- You will not need to be emailing code files or documentation back and forth. The version control system keeps track of every modification to the code in a special kind of database (the code base).
- Nothing that is committed to your code base with version control will ever be lost. This is because all old versions of files are saved. You can go back in time to see exactly which of your team members wrote what on a particular day, or what version of a program was used to generate a particular set of results.
- You have the record of who does what and when things are done, you know whom to ask questions about changes later, and you can revert to the previous version.
- You will also be able to avoid accidental overlook, overwritten, and duplications. The version control system also automatically notifies team members whenever there is a conflict between one member’s work and another’s.
Version control is very useful to keep track of changes you make to your code. It allows you to choose when you have reached a stage in your code that you think is worth keeping track of, like a new function that makes your data analysis so much better. Read more about the benefits of version control and version control systems here.
Note that not only teams can benefit from version control: lone developers or researchers can benefit immensely. Keeping a record of what has changed, when, and why is extremely useful for all developers if they ever need to come back to the project later (e.g., a year later, when memory has faded).
For this course, you will use the version control system to keep track of what you have done and to collaborate with other people. You can use it for large software development or small. You can also use it to keep track of other elements of your projects including documentation, report books, papers, small data sets, and anything that changes over time or needs to be shared can and should be stored in a version control system.
In this section, we will first introduce you to a free and open-source version control system called Git. Then, you will be introduced to GitHub which is a remote hosting system for sharing repositories. You will see how Git and GitHub can be used to facilitate versioning and collaboration in a software project.
For your team-based project, the general process would be for each developer to use Git locally to track and save changes to his or her work and then use GitHub to merge each developer’s work into a single project. At some point, each of you will have to copy code from and push code to the GitHub repo from your local copy of the project.
How to Setup Git
Before you get started with using Git, you may want to check if you already have a version of Git installed on your computer, otherwise, you will need to install it on your computer. Even if you already have a version installed, it’s probably a good idea to update to the latest version.
To check the Git version you are currently running, run
Follow the instructions below based on the operating system that your computer is running:
Installing Git on a Linux machine
See the installation instructions here.
(Instructions for installing Git on Mac OS are also included on this page)
Installing Git on a Windows machine
Follow the steps below:
Step 1: Git should be installed on your windows computer as part of your Bash installation. So, download the Git bash installer here.
Step 2: Once the download is finished, double-click on the installer (the .exe file) to run it.
Step 3: Follow the steps below:
- Click on "Next" four times (two times if you've previously installed Git). You don't need to change anything in the Information, location, components, and start menu screens.
- From the dropdown menu, "Choosing the default editor used by Git", select "Use the Nano editor by default" (NOTE: you will need to scroll up to find it) and click on "Next".
- On the page that says, "Adjusting the name of the initial branch in new repositories", ensure that "Let Git decide" is selected. Click Next.
- Ensure that "Git from the command line and also from 3rd-party software" is selected and click on "Next". Note that if you don't do this step as instructed, Git Bash will not work properly.
- Check "Use the OpenSSL Library".
- Ensure that "Checkout Windows-style, commit Unix-style line endings" is selected and click on "Next".
- Ensure that "Use MinTTY (the default terminal of MSYS2)" is selected and click on "Next".
- Ensure that "Default (fast-forward or merge) is selected and click "Next"
- Ensure that "Git Credential Manager Core" is selected and click on "Next".
- Ensure that "Enable file system caching" is selected and click on "Next".
- Click on "Install".
- Click on "Finish" or "Next
This installation will provide you with both Git and Bash in the Git Bash program
Step 4: To confirm your installation is working, search for Git Bash in your window search box, you will see an icon , click on it to launch Git Bash.

You see a window similar to figure 1 below:
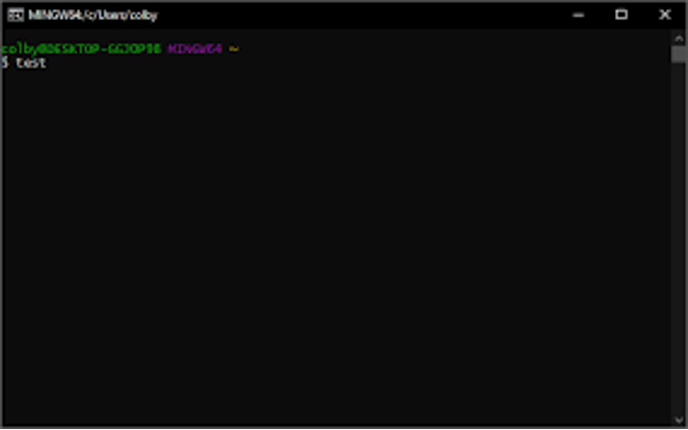
Figure 1: Git Bash window
Configuring Git on your computer the first time
You need to set up your identity the first time you use Git on a computer.
Below are a few examples of configurations that you need to get started with Git:
- Your name and email address,
- what our preferred text editor is,
- and that you want to use these settings globally (i.e., for every project).
Now launch your Git bash program and follow the instructions below
(If you are working on Linux or Mac OS, launch your terminal and follow the instructions):
To set up your profile using your name and email, run the following commands one at a time:
$ git config --global user.email "yourEmail"
You need to replace the “yourName” and “yourEmail” with your actual or profile name and your email respectively.
Looking at the commands, you can see they follow a sort of git verb options template, where the verb is the action, we want to perform, and in this case, we want to configure our profile. Options are additional information that may be required for the verb.
Note that the dollar sign $ appears in git bash, right before any shell commands you type appear. All the dollar sign signifies that what comes after is meant to be run on the command line (it is not actually a part of the command).
To check if the configuration is correct and well set up, run the following command:
To modify the existing configuration at the same time, run:
You can also configure your text editor or set it to default using the following commands:
To get some help in case you forget the subcommands or options of a git command, you can access the relevant list of options by running:
You need to replace the
You can also get the list of all the available git commands by running the command:
Now that we have configured git and set up a profile for our project, we will create a local git repository (a folder) on our PC to store content (codes and other relevant files and folders) and monitor changes made to the content using git.
Since Git can be used independently on the local machine without sharing work or use with GitHub, you would be able to follow the steps below.
- You will create a new folder on your Desktop for your project called “cs202_project”. To do this in Git Bash, run the following commands one at a time:
$ cd ~/Desktop
$ mkdir cs202_project
$ cd cs202_project - Now, you will need to tell Git to make “cs202_project” a new Git repository by running the following command:
$ git init
git init command here is used to initialize a new, empty repository (it can also be used to convert an existing, unversioned project to a Git repository).
Most other Git commands are not available outside of an initialized repository, so this is usually the first command you'll run in a new project.
Executing git init creates a .git subdirectory in the current working directory, which contains all the necessary Git metadata for the new repository.
git init is the command to start the tracking in a specific directory and transform it into a git repository.
Note that the creation of the “cs202_project” directory and its initialization as a Git repository are completely separate processes.
You can read more about git init here

Figure 2: Screen after running git init command
You can run ls -a command to show the content of your working directory after running git init. The output should be like what is in Figure 2.
You can also manually view the folder to have an idea of what the content of the .git subdirectory and files are.
In general, Git uses this special subdirectory to store all the information about the cs202_project, including the tracked files and sub-directories located within the project’s directory. If you ever delete the .git subdirectory, you will lose the project’s history
Git Status: We can use git status command to display the state of the working directory and the staging area. This command allows us to inspect our Git repo. See the output below:

There are a few things to note here:
- We are in the default branch called “master”. Branch and branching will be explained later in this session.
- Git indicated that there have not been any commits yet. Of course, this is true as we are working in a brand-new repository.
- Finally, Git indicated that it cannot see anything to commit. Like the previous note, but appears that Git must have checked some area of the directory or file structure and hasn’t found any commit (Again, we will explain commits later).
- The git status command allows us to inspect our repository. It shows the status of the working area (also known as the working tree) and the status of the staging area.
Let’s explain some of the terms used in the git status output description before we proceed:
- There are three places in Git where file changes can reside, and these are:
- the working directory,
- staging area,
- and the repository.

Figure 3: Git file changes locations and states
- The Working area (also called the working tree) is the first area you see when you look at a folder (in our case cs202_project folder) containing a git repository. When you work on your project and make some changes, you are dealing with your project's working directory. This project directory is available on your computer's filesystem.
The working tree may contain exactly the same content as a branch in your repository, but it can also be completely different, depending on the changes that you make to it. All the changes you make will remain in the working directory until you add them to the staging area. - Staging area (also called the index or cache), which is the area that you can use to prepare commits / temporarily save your work. When you create a git commit, Git takes changes that are in the staging area and makes them a new commit. You are allowed to add and remove changes from the staging area. The staging area can be considered as a real area where git stores the change.
So, the basic Git workflow goes as follows:
- You modify files in your working tree.
- You selectively stage just those changes you want to be part of your next commit, which adds only those changes to the staging area.
- You do a commit, which takes the files as they are in the staging area and stores that snapshot permanently in your Git directory.
If a particular version of a file is in the Git directory, it’s considered committed.
If it has been modified and added to the staging area, it is staged.
And if it was changed since it was checked out but has not been staged, it is modified.

Figure 4: Current Structure of cs202_project Folder
In summary, figure 4 shows our project workspace which includes our working area and the content of our .git folder (branch, commit, tags). A folder turns into a working tree whenever you create a git repository there or clone an existing one. Except for the top-level ".git" folder, the contents of that folder and its subfolders make up the working tree. Multiple working trees are possible in practice.
Everything that you commit (i.e., save/persist) to your repository will be stored within the .git folder and will be “added” to the “master” branch until we decide to switch to (i.e., checkout) a different one.
At the moment, we are in the default branch called “master”. We can change the default branch to be called main. This might be the default branch depending on your settings and version of git.
- To change the default branch to the main, run the following command:
$ git checkout -b main - Change the branch back to master.
Activity 1 - Git Exercise
How would you check to confirm that the checkout command is successful and that you are in the main branch and not the master branch? – See examples of commands used in previous sections to get some idea.
Branch is just one of the entities that the git checkout command operates on. Other entities include files and commits. For example, we can also use git checkout to view an old commit.
In general, “Checkout” here is simply the act of switching between different versions of a target entity. In our case here, we used git checkout to switch to the target branch “main”.
Share your attempt in the forum.
So far, we have been working with an empty working folder (i.e., the cs202_project folder).
In this section, we will try and achieve the following:
Understand how to record changes in Git, check the status of version control repos, and record notes about what changes were made and why.
We will go through a record-modify-add-commit cycle for some files (which we will create). Then, we will provide some context into how and where information or changes are stored at each stage of the cycle
Let’s record and add something to our cs202_project folder
Go ahead and create a text file named README. You can use the following command to create the file in the GitBash terminal and use your nano or vim editor for further modification (Note that you create the file manually and use whatever editor works for you):
Check if the file is created and the content is properly written:
$ cat README
Now, we have successfully created a README file to document our first git project and added the new file to your project. If the file didn’t exist before, and you run git status, you will see your untracked file
similar to figure 5:
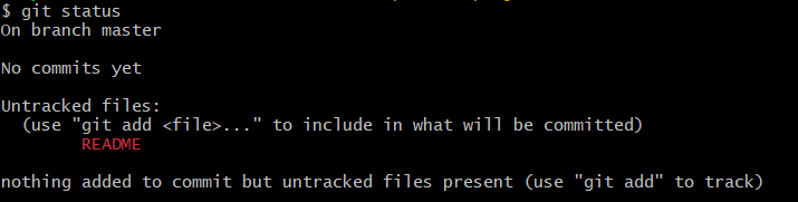
Figure 5: Untracked File in Git
You can see that your new README file is untracked because it’s under the “Untracked files” heading in your git status output.
Untracked basically means that there’s a file in the directory that Git isn’t keeping track of.
Tracking New Files
So, Git sees a README file that we didn’t have in the previous snapshot (commit), and which hasn’t yet been staged.
In Figure 5, Git told us “nothing added to commit but untracked files present” and suggested we “use git add to track”
That is, Git won’t start including files in our commit snapshots until we explicitly tell it to do so.
Git does this so that you don’t accidentally begin including generated binary files or other files that you did not mean to include.
You do want to start including README, so let’s start tracking the file. Run the following commands to begin tracking the README file:
Now run the git status again, your output should be similar to figure 6.
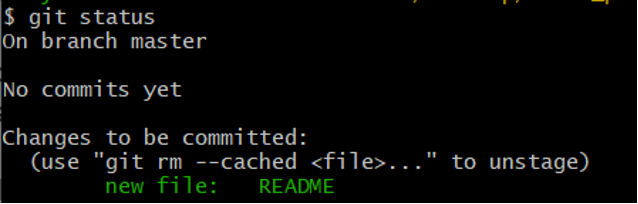
Figure 6: Git staged file

Before we make our first commit, let’s talk more about the staging area (also known as the Git index) and what happened when we ran git add.
The git add command takes a path name for either a file or a directory; if it’s a directory, the command adds all the files in that directory recursively.
As discussed in the previous section, although Git is aware of everything that occurs inside the working tree, it only keeps track of the files that are specifically requested.
After running git add, Git now knows that it’s supposed to keep track of README, but it hasn’t recorded these changes as a commit yet.
To get it to do that, we need to run one more command (git commit).
If we run git commit command at this point, the version of the file at the time we ran the git add is what will be in the subsequent historical snapshot.
We know now that the README file is staged because it’s under the “Changes to be committed” heading
You can add multiple modified files to the staging area at the same time by using * as an option with git add
Adding files to the staging area serves two objectives:
- Create a snapshot of the added files (i.e., sort of save point)
- Mark the changes to consider when creating a commit
With Git, commits (i.e., “save points”) are created based on what has been added to the index or the staging area.
(Recall that the staging area is the area between the working tree and your Git repository. It allows you to precisely control what Git should track, what it should include when you decide to create a commit, etc.)
Modify the README file that was already tracked to the text below:
and then run your git status command again
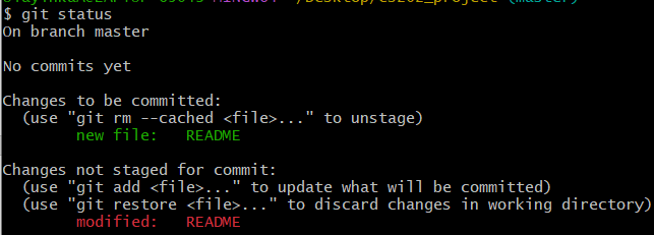
Figure 7: Modified and unstaged Git file
The README file appears under a section named “Changes not staged for commit” — which means that a file that is tracked has been modified in the working directory but not yet staged.
To stage it, you must run the git add command.
You can also use git diff to view exactly what has been changed and not just the file you changed.

Figure 8:Git diff output for unstaged modification
Figure 8 shows the differences between the current state of the file (as modified) and the most recently saved version. The output is a bit strange because it is essentially a set of instructions for tools like editors and patches telling them how to reconstruct one file given the other. Let us break it down into pieces:
- The first line tells us that Git is producing output like the Unix diff command comparing the old and new versions of the file.
- The second line tells exactly which versions of the file Git is comparing; 049d70d and c94da60 are unique computer-generated labels for those versions.
- The third and fourth lines once again show the name of the file being changed.
- The remaining lines are the most interesting, they show us the actual differences and the lines on which they occur. In particular, the + marker in the first column shows where we added a line
You can use git diff --cached to see what you’ve staged so far.
git add is a multipurpose command — you use it to begin tracking new files, to stage files, and to do other things like marking merge-conflicted files as resolved (we discuss this later).
It may be helpful to think of git add more as “add precisely this content to the next commit” rather than “add this file to the project”. So, for everything you modify a file by adding new or removing content, you need to add the content to the next commit.
Now that we have staged all our changes, we can perform the first commit. Keep in mind that anything that is still unstaged, or any files you have written or modified but have not run the git add command on since editing them will not be included in this commit. They will continue to exist on your disc as modified files.
Let's assume that you are prepared to commit your change because you observed that everything was staged when you last ran git status.
After reviewing the change, you can commit it by running the following command:

Figure 9 Commit for the README record
Now you’ve created your first commit! You can see that the commit has given you some output about itself: which branch you committed to (master), what SHA-1 checksum the commit has (691a9d8), how many files were changed, and statistics about lines added and removed in the commit.
Remember that the commit records the snapshot you set up in your staging area.
Sometimes you may want to skip the staging area and go directly to committing your changes, Git provides a shortcut for this by simply adding the -a option to the git commit command. This will automatically stage every file that is already tracked before doing the commit, letting you skip the git add part. Your commit command will look as follows:
Activity 2 - Git Exercise
Now that you understand the syntax, and structure of Git and you have used some Git commands. Create a new file TEST. Find out what the following commands do:
$ git rm –cached TEST
In addition, create a file name phonebook.txt and copy the content here into the file.
phonebook_dict = dict()
unwanted_chars = ".,- "
with open(filename,'r') as f:
for line in f:
raw_words = line.split() phonebook_dict[raw_words[0].strip(unwanted_chars)] = raw_words[1].strip(unwanted_chars)
return(phonebook_dict)
Copy the above code and save it in a new file in your git repo. Name the file phone.py. Make new commits each for phonebook and phonelookup.py. Call the commit “phonebook lookup”.
We will use this commit and file in subsequent examples.
See additional information on recording changes to the Git repository here.
Share your attempt in the forum.
Viewing and Exploring Commit History
In this section, we will try to do the following:
- Understand how to review the changes we have made to the Git repos.
- Understand how to identify and recover old versions of files.
- Understand how to use Git commit numbers
- Understand how to compare various versions of tracked files.
Achieving these objectives will help you a lot when you are collaborating with other developers in your team on the same project using Git.
Viewing the Commit history:
Now that you have made multiple commits, you may want to review your existing commit history. You can do this using the git log command:
What did you see after running the command?
There are different options to use with the git log command. See some of the options and what you can use them for here.
Exploring Git History
As discussed in the previous section, we can refer to commits by their identifiers. You can refer to the most recent commit of the working directory by using the identifier HEAD
Add the following line of code to the phonelookup.py file
Let’s try and track our progress in this file by looking at the changes we have made using HEAD.
Running the command above, you should get something similar to Figure 10.
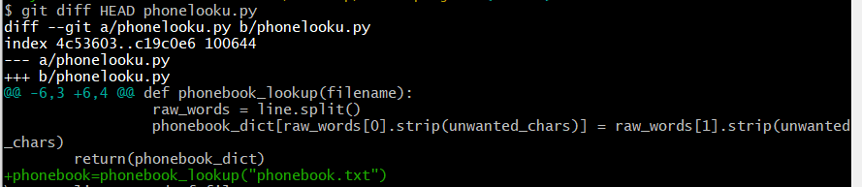
Figure 10: git diff with HEAD option
We can see the change we have made in this file. The actual benefit of this is when you can look back at earlier commits. By including ~1, ~2 ~3 etc. to refer to the previous.
To see this, commit this new change and then another line to the file:
print(phonebook_lookup("phonebook.txt"))
Say we want to see the differences between older commits, we can use git diff again, but with the notation HEAD~1, HEAD~2, and so on, to refer to them.
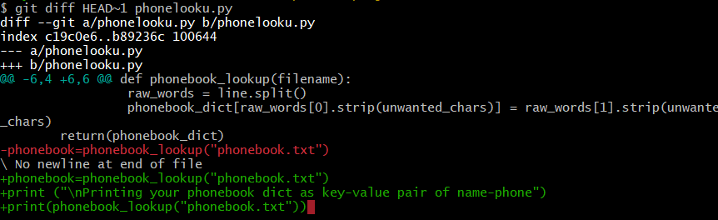
Figure 11: git HEAD with option ~1
Instead of using git diff to examine the differences between a commit and our working directory, we can also use git show to see the changes we made to the older commit as well as the commit message.
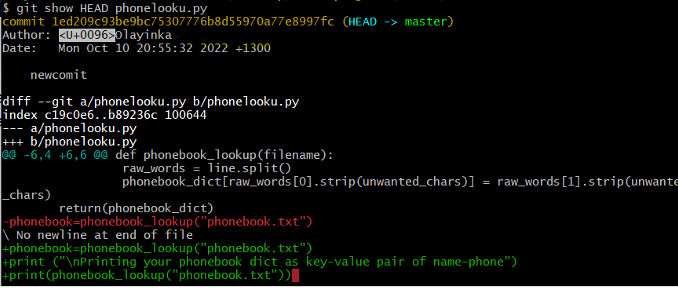
Figure 12: git show with HEAD option
You can see my previous, most recent commit in figure 12 with the message “newcommit”. In this way, we can build up a chain of commits. The most recent end of the chain is referred to as HEAD; we can refer to previous commits using the ~ notation, so HEAD~1 means “the previous commit”, while HEAD~123 goes back 123 commits from where we are now.
You can also see from Figure 12 the ID of the most recent commit:
1ed209c93be9c75307776b8d55970a77e8997fc
We can use git log to display similar IDs for all our commits (see figure 13):
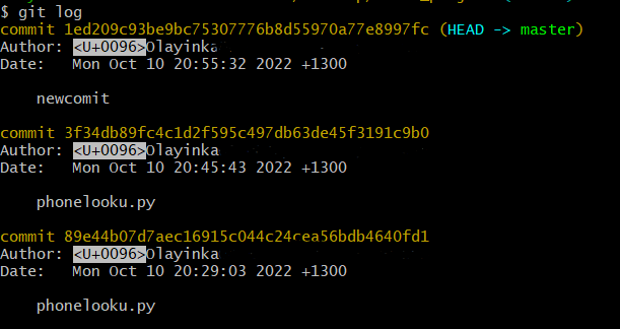
Figure 13: git log to retrieve commit hash IDs
These are unique IDs for the changes, and “unique” really does mean unique: every change to any set of files on any computer has a unique 40-character identifier.
We can also refer to specific commits using their corresponding IDs:
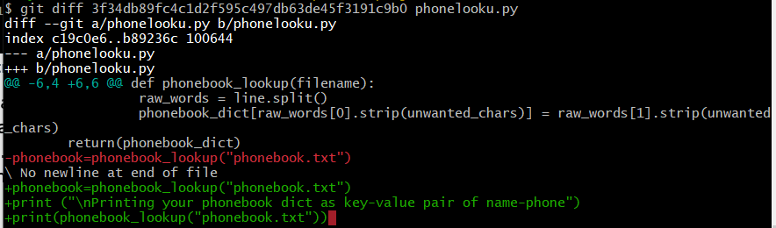
Figure 14: git diff with commit ID.
Instead of typing out random 40-character strings, Git allows us to use just the first few characters (typically seven):
Restoring Older Versions of Files:
Now that we understand how to view what we've altered and how to save changes to files. Let’s explore how we can bring back or restore earlier iterations of things.
Imagine that we decide to disregard the most recent update. We can use git checkout to check-out or restore old version of a file:
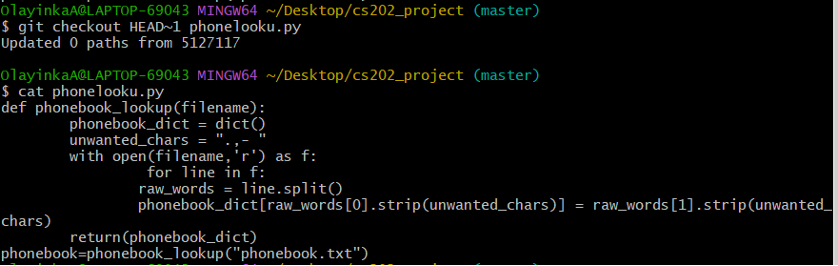
Figure 15: Restoring back to the commit before the most recent (HEAD) by checking out the HEAD~1
As you can see in Figure 15, We have restored the file back to the state we had before the commit displayed in Figure 10.
If you do git status, you will discover that the changes are currently in the staging area.
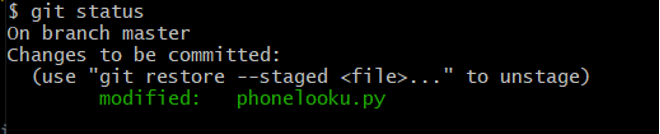
Figure 16 git status to show changes are in staging area
So, we can put things back the way they were before this change by running git checkout for the most recent changes:
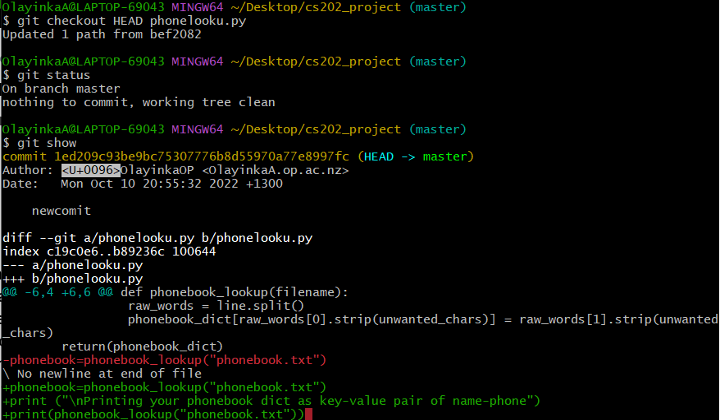
Figure 17
Git Amend:
Say, you commit too early and possibly forget to add some files, or you mess up your commit message. If you want to redo that commit, make the additional changes you forgot, stage them, and commit again using the --amend option
$ git commit -m ‘commit_to_amend’
$ git add forgotten file
$ git commit --amend
The git commit –-amend command takes your staging area and uses it for the commit. If you have made no changes since your last commit (for instance, you run this command immediately after your previous commit), then your snapshot will look the same, and all you’ll change is your commit message.
If you run the command without any changes, the commit-message editor is displayed with the message of your previous commit. You can edit the message the same as always, but it overwrites your previous commit.
Unstaging a Staged File
You can unstage a file from a staging area after adding it to the area.
For example, say you have to use git add * to add multiple files A, B, and C and if you want to remove file C from the staging area, you can run the following command:
The command will unstage file C (but C will stay modified).
Figure 18 below summarizes how we describe git to work so far.

Figure 18: How Git works from swcarpentry
Here is a visual Git cheatsheet to summarize our discussion
Note:
- Focus on the Workspace (same as working area), Index (same as the staging area) and Local repo.
- You can click on each column and command in this area to get the corresponding descriptions below the window.
- Note that there are some commands we have not covered, especially the branching and remote repository-related commands. These we will cover in subsequent sections.
Note that the command git revert is different from git checkout [commit ID] because git checkout returns the files not yet committed within the local repository to a previous state, whereas git revert reverses changes committed to the local and project repositories
Additional information for reverting and checkout can be found here.
Activity 3 - Git Exercise
Suppose you have made some changes to the Python script that you have been working on since the beginning of this session, and the modifications you made before your last commit broke the script and the code is no longer working as expected. You have tried to fix the issues but no luck.
Describe in steps two different commands that can be used to recover the working version of your script.
Share your attempt in the forum.
Activity 4 - Git Exercise
Suppose you are collaborating with your team members on the same script in activity 3. You realize that your last commit to the project’s repo contained an error and wants to undo correctly so that your team member in the project repo gets the correct change.
Describe how you would use either git checkout or git revert to do this.
Given the following commands:
git diff [ID] phonelookup.py
What do you predict these commands will do if you execute it? What happens when you execute them? and why?
git checkout can be used to restore a previous commit when unstaged changes have been made, but will it also work for changes that have been staged but not committed? Make a change to phonelookup.py by adding a comment and use git checkout to see if you can remove the change.
Share your attempt in the forum.
So, far we have been using Git in our local cs202_project repository on our PC. When you start collaborating with other people, version control really comes to its own. By now, you should have a clear idea of how to go about version control using Git.
The only thing we have not done so far is to replicate changes between repositories. Git also allows us to do this.
When collaborating with others on the same project, it is best and easiest to use one copy as a central hub or keep a central repo for the project.
This central repo is better to have on the Web rather than on someone’s laptop so that every member of the team could have access to the content and make changes or add/ remove /modify at anytime and anywhere.
So, in order to be able to collaborate on any Git project, you need to know how to manage your remote repositories. Remote (upstream) repositories are versions of your project that are hosted on the Internet or network somewhere.
You can have several of them, each of which typically allows you to do either read-only or read/write operations.
Collaborating with others involves managing these remote repositories and pushing and pulling data to and from them when you need to share work.
Adding remote repositories, removing expired remotes, managing different remote branches, designating which ones should be tracked, and more are all part of managing remote repositories. We'll go through a few of these remote management techniques in this section. Here, you will learn how to Push and Pull from a remote repository.
GitHub
Watch this video for a quick introduction to GitHub,
Most software developers use hosting services like GitHub, Bitbucket, and GitLab to remotely host the main copies of their projects. For us, we will be using GitHub.
If you do not already have a GitHub account, you will need to create one. And then create a GitHub repository that will be linked with your local repository. Here is a short video on GitHub Repository.
To create a GitHub account, follow the instructions here.
You can also have a look at this YouTube video here if you are struggling to set up the account (you can start the video from the 4th minute).
After signing up to GitHub, create a remote repository called “cs202_project” following the steps below:
- Click on the + sign at the top of the right corner of your account

- Select “New repository"
- Name the repository “cs202_project”
- This repository must be empty because it will be linked to a local repository. Keep "None" selected under "Add.gitignore" and "Add a licence" and uncheck "Initialize this repository with a README." We will refer to the decisions we made here in Activity 5.
- You can add a little bit of description to describe what project you want to host in the repository
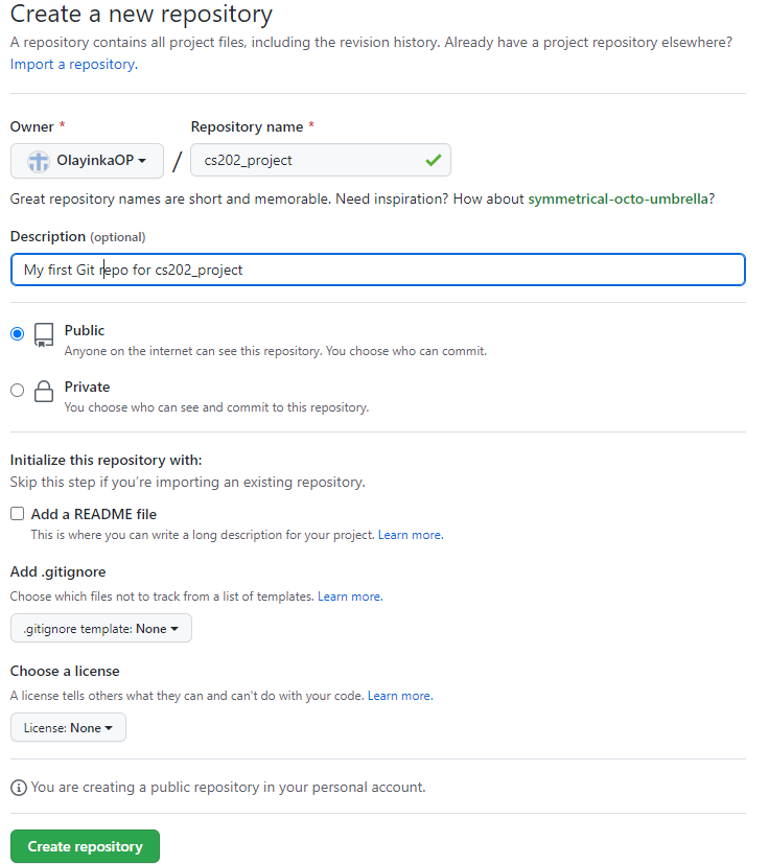
- Now create the repository by clicking “Create repository” button below the page.
- GitHub will show a page with a URL and instructions on how to set up your local repository.
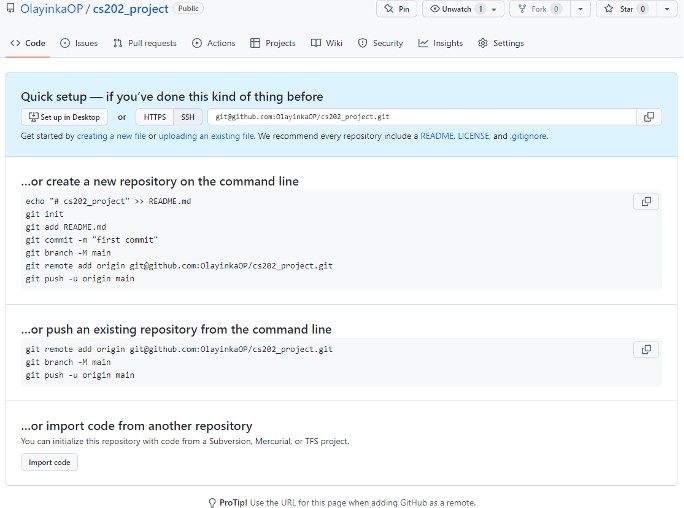
Figure 21: GitHub quick remote setup page
- If you look at the blue area of the page (similar to Figure 21), you will see button for HTTPs and SSH. If you click on either, you see a path to a .git repository (cs202_project.git)
- This simply means that, in the above steps, we have been able to create similar folder we created on our local directory when we ran git init command. That is, we have done the following in GitHub environment:
- mkdir cs202_project
- cd cs202_project
- git init
It is time to connect our local repository (cs202_project) with the newly created GitHub repository (cs202_project). Making the GitHub repository a remote for the local repository allows us to achieve this. There are two protocols we can use ways to connect remotely: SSH and HTTPs. For this session, we will use SSH (You can follow the instruction provided here for the https approach). So, follow the steps below to connect your local and remote repos using SSH:
- Click on the SSH tab in the blue section as shown in Figure 21.
- Copy the URL string in front of the SSH tab
- Go to the GitBash terminal inside your local project repository, append the URL string you copied from GitHub project page to the command git remote add origin and run. Your resulting git command should look like the following:
$ git remote add origin git@github.com:OlayinkaOP/cs202_project.git - Make sure to use the URL for your repository rather than OlayinkaOP’s. The only difference should be your username instead of OlayinkaOP’s.
- origin is a local name used to refer to the remote repository. It could be called anything, but origin is a convention that is often used by default in git and GitHub, so it’s helpful to stick with this unless there’s a reason not to.
- To check if the command has worked the way we wanted, we can check by running the following command:
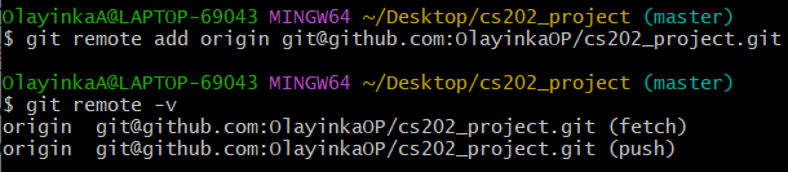
Figure 22:git remote command and confirmation
Your results for both commands execution should be similar to Figure 22.

Before proceeding, let’s try and understand the process of connecting the two repository a bit more. First, we will provide some background to ssh and then described how it is used to connect remotely to a repository.
SSH Background
- You can connect to and authenticate with remote servers and services using the SSH protocol. You can login to GitHub using SSH keys without providing your username and unique access token each time. Commits can also be signed with an SSH key.
- SSH uses what is called a key pair. The two keys work together to validate access. One key is publicly known and called the public key, and the other key called the private key is kept private
- SSH can be used to read and write data in GitHub.com repositories. Using a local machine's private key file, you authenticate while connecting over SSH.
- When you set up SSH, you will need to generate a new private SSH key and add it to the SSH agent. You must also add the public SSH key to your account on GitHub before you use the key to authenticate, or sign commits.
- Imagine the public key as a padlock that can only be opened by you using the private key. Wherever you need a safe form of communication, like your GitHub account, you utilise the public key. Giving this padlock, or public key, to GitHub, you instruct the platform to "lock the communications to my account with this so that only machines with my private key can unlock communications and send git instructions as my GitHub account."
- For more information about ssh key, read the document here.
Checking for existing SSH Keys
- First, we will start by checking if there are existing keys on our local machine before creating a new one. Because key creation typically only needs to occur once before being forgotten about. If you have an existing SSH key, you can use the key to authenticate Git operations over SSH
- From GitBash, run the following commands to check what key pairs already exist on your computer: ls -al ~/.ssh
- The command will simply list the files in your .ssh directory if they exist
- If SSH has been set up on the computer you’re using, the public and private key pairs will be listed. The file names are either id_ed25519/id_ed25519.pub or id_rsa/id_rsa.pub id_ecdsa/id_ecdsa.pub depending on how the key pairs were set up.
- If you receive an error that ~/.ssh doesn't exist, you do not have an existing SSH key pair in the default location. You can create a new SSH key pair in the next step. See more information for checking for existing SSH keys here.
Generating a new SSH key pair
- Create a new SSH key if you don't have a supported public and private key combination or don't want to use one that is already available.
- If you want to use an existing public and private key pair to access GitHub, you can add the key to the ssh-agent.
- On your local computer, you can generate a new SSH key. To enable authentication for Git operations over SSH, you can add the generated key to your GitHub.com account.
- Paste the command below, substituting in your GitHub email address.
ssh-keygen -t ed25519 -C "your_email@example.com" - When you are prompted to "Enter a file in which to save the key", you can press Enter to accept the default file location.

Figure 23 - It then prompts you for a passphrase. This is to protect against unauthorized access to your machine. There is no "reset my password" option, so make sure to use something you will always remember. See more information here on how to create or work with SSH passphrase
- The command -t option specifies which type of algorithm to use and -C attaches a comment to the key.
- Figure 24 below shows the expected confirmation you will received after running the command:
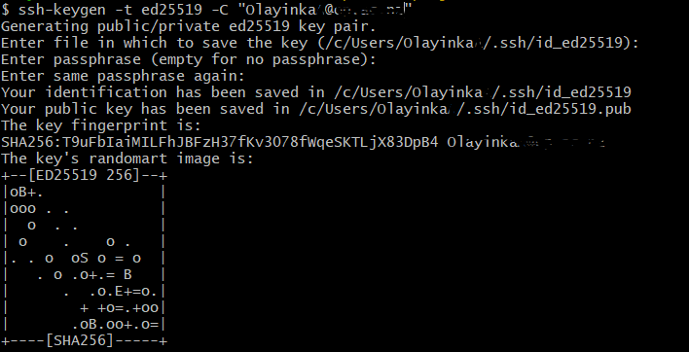
Figure 24 - You can see where the identification is saved. The “identification” is the private key. Please do not share it with anyone. The public key is appropriately named. The “key fingerprint” is a shorter version of a public key.
- Confirm the keys are well generated by running by finding the SSH files in your ~/.ssh directory.
ls -al ~/.ssh

Figure 25 Listing the SSH files
Copying the public key to GitHub
- Now that we have created the keys, we can run the command to check if GitHub can read our authentication.
- To do this, run the following command:
ssh -T git@github.com
Figure 26 - The output in Figure 26 says permission denied. This is because we are yet to copy our public key to GitHub.
- Open and copy the public key by running the following commands.

Figure 27 - Make sure that the file you open has an extension .pub
- Go to you GitHub account, click on your profile icon at the top right corner to get the drop-down menu.
- Click “Settings” and select “SSH and GPG keys” under Access section on the left side.
- Click “New SSH key”. Select See figures 28 and 29.
- Fill the form in figure 29 by adding Title “cs202 on My PC”, then copy and paste your public key from the terminal (figure 27). See the description of what the string should look like in the text box provided for key.
- Click “Add SSH key”
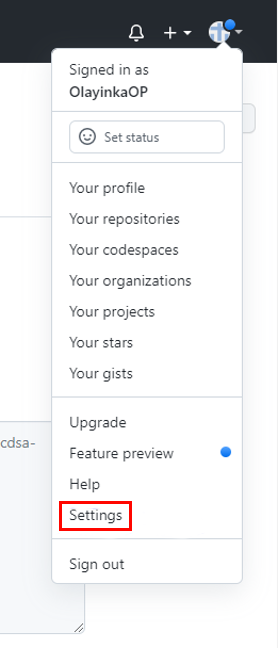
Figure 28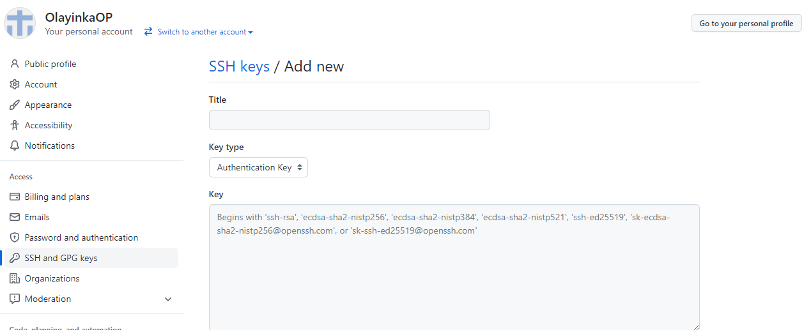
Figure 29 - Now, try the same command we to check if GitHub can read our authentication again.
ssh -T git@github.com - And this time, it works! We have a confirmation in Figure 30

Figure 30
In the next section, we will look at how we can use GitHub as a central repository for Team-based or collaborative project.
Push your local Repo changes to the GitHub Remote repo
- Now that we have the authentication all set up, we try and push our project changes from our local repository to the remote repository in GitHub.
- Run the following commands from your local directory workspace in the GitBash terminal:
git push origin master
Figure 31 - If you are prompted for passphrase, input the one you use when setting up the repo.
- In certain documentation, a -u option for git push may be used. To link the current branch to a remote branch so that the git pull command can be used without any arguments, use this option, which is equivalent to the —set-upstream-to option for the git branch command.
- Simply use git push -u origin master to accomplish this after configuring the remote.
Pull from the GitHub Remote repo to the local Repo changes
- To copy changes from a remote repository to a local repository, use,
git pull origin master
Figure 32
A key part of this course is to teach you how you can work in teams and collaborate with others on the same project. The ability to exchange and co-edit codes and files with developers or researchers in your team using git and GitHub's excellent collaborative features is one of the strengths of the tools. Git and GitHub can also assist you in moving files across computers (such as your work desktop, laptop, servers, etc.) and in maintaining file synchronisation between these computers.
In this section, we will try and understand how we can use version control to collaborate with other people, describe the collaborative workflow, push to and pull from a central repository and clone existing remote repository.

Figure 33: A Basic Collaborative Workflow
Figure 33 provides a simple overview of collaborative workflow using Git and GitHub. As you can see, a good portion of what we need to do has already been done on the local repository. The other part where we have git pull and git push commands has to do with interaction with the remote repository which is on GitHub.

Figure 34: Git and GitHub Collaborative Activities
Activity 5 - Git Exercise
To demonstrate the collaborative workflow using Git and GitHub, you are going to pair up with one of your team members. One of you will be the owner of the project repository and the other person will be the collaborator. Figure 35 shows the expected setup for this activity. Figure 34 shows the different commands that will run during this activity. Only git fetch and git merge are new to us. We will see how these commands are used and what they are used for later.
The idea here is to allow the collaborator (Your teammate) to perform read and write operation on the owner’s GitHub repo (Your GitHub repository) and be able to make modify and add changes to the owner’s repository.
- We can call the collaborator’s repository as
- Before making our modifications, you should git pull to ensure that you have the most recent version of the repository you are working on.

Figure 35: Activity 5 Set Up: Collaborating with Your Team Member
As shown in Figure 35, the GitHub owner (You) and your collaborator (Your teammate) will work on and make changes to the same repository.
At the conclusion, we shall trade positions, making both of us the Owner and Collaborator.
- The owner of the GitHub repository will need to give the collaborator access to the repository. To do this, follow the steps below:
- Click on the project repository in GitHub
- Click on the “Settings” button on the right, select “Collaborators”. You see a page similar to Figure 36
- Click “Add people”, and then enter your partner’s username.

Figure 36: GitHub Give Access Page
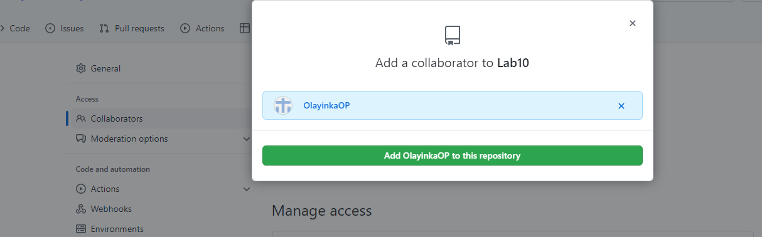
Figure 37: Your collaborator username should come up
As a collaborator, for you to accept access to the Owner’s repository, you need to go to github.com/notifications

or check for email notification.
Once you are there, you can accept access to the Owner’s repo.
Next, the Collaborator needs to clone (download) a copy of the Owner’s repository to his or her machine.
Make sure you do not overwrite your own local repository. You can simply clone the owner’s repo to a different location (e.g., your document/colabproject/owner_cloned_repo).
As collaborator, to clone the owner’s project, run the following commands:
$ mkdir colabproject
$ cd colabproject
$ git clone git@github.com:OlayinkaOP/cs202_project.git
$ cd cs202_project
In the above commands, the collaborator will first change directory to document, then make new directory called colabproject, clone the Owner’s GitHub project repository into the colabproject directory.
- Replace ‘ownersusername’ with the repository Owner’s username.
As collaborator, you can now make changes to the Owner’s repository locally on your machine, stage and commit ( describe your commit as “collaborator filename commit”, then push the changes to the owner’s repository on GitHub. The result of the clone should be similar to Figure 38.
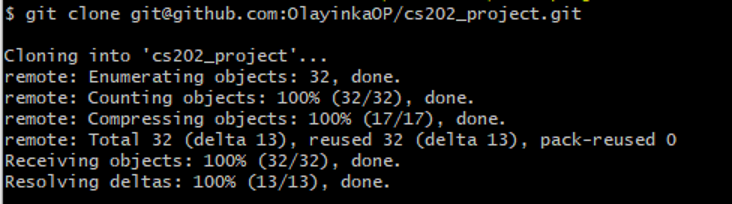
Figure 38: Cloning output
Activity 6 - Git Exercise
Following the Git/GitHub collaborative steps described above, update the README file for the cs202_project downloaded from the owner’s repository and push the changes to the owner’s repository on GitHub.
Add to the following string to the file “I have successfully cloned and modified your owner name repository, here is the new version pushed by yourname”
Share your attempt in the forum.
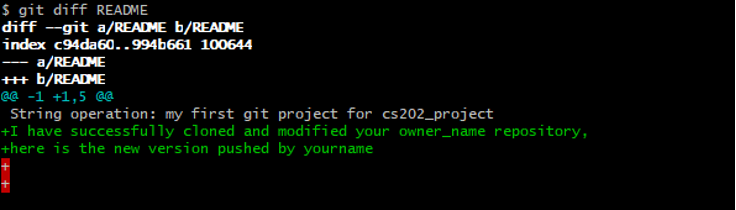
Figure 39: README after modification
Look at the Owner’s repository on GitHub again, and you should be able to see the new commit made by the Collaborator and the changes made to the README file. Figure 40 shows examples of commands with outputs for the collaborator’s tasks.
You may need to refresh your browser to see the new commit. Figure 41 shows what the README file in Owner’s GitHub repository looks now after the collaborator’s modifications.
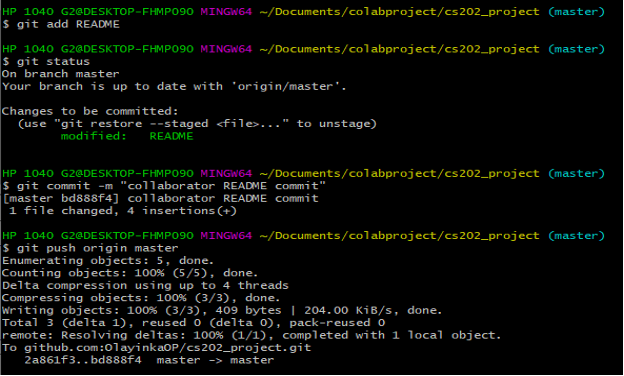
Figure 40: List of commands by the owner to modify and push changes to owner's GitHub Repo.
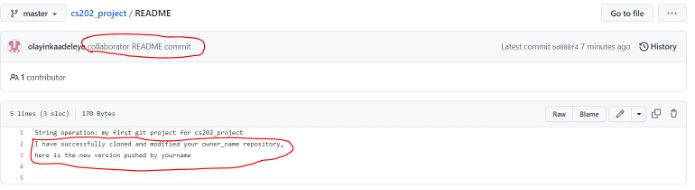
Figure 41 README file on Owner's Repository after Modification.
- As Owner, you need to pull the changes made by the collaborator and add your own changes to the README file.
- Add “I got your changes collaborator!”.
- Then stage, commit and push the new version back to your GitHub repository.
- Now swap roles with your team member and go over the processes again in your new role.
- The Collaborator can use git fetch origin master to get the remote changes into the local repository, but without merging them.
- The Collaborator can view the changes made by the Owner by running the following command:
git diff master origin/master
Without going into detail on what branches are, how they are made, etc. at this time, let's try an analogy: picture a branch as a "book". You can expand it with new pages (via commits), edit existing pages (using amend), rearrange the pages (using rebase), or even combine a story with others (using merge, rebase). Of course, the book's pages are numbered and appear one after the other in a specific sequence.
Let's try and understand branching and Merge Conflict by doing things manually through the GitHub page.
Follow the instructions provided in this link to create and study branching and merge conflict.
Activity 7 - Git Exercise
While creating a remote repository on GitHub and initialized the GitHub repo, you didn’t add a README.md or a license file. If you had, what do you think would have happened when you tried to link your local and remote repositories?
Share, discuss and comment with your peers in the forum.
- Your presentation here will majorly be your project proposal.
- Use the provided project proposal template as a guide
- Your proposal must include a clear project scope, WBS, Schedule using Gantt chart, and milestones.
- Make sure you properly describe every element of your proposal.
- For your code documentation and versioning, please use Git and GitHub.
- Make sure you use specific tools recommended in this chapter for generating or documenting your project processes and deliverables. For example, use excel for your Gantt chart, and Lucid chart for your context diagram.
Make sure all your codes for this course are uploaded to your GitHub account, so that you are able to extend or reuse in CS203.