In this section, you will learn about Object-Oriented Programming (OOP) in Python using examples.
After completing this topic, you should be able to:
- Model a real-world problem using various OOP paradigms.
- Understand the concept of creating reusable code.
Object-oriented programming is a programming paradigm that provides a means of structuring programs, such as bundling related properties and behaviours into individual objects.
So, what is an Object?
Think about anything around you: a car, a person, an employee, a cup, a laptop etc.
These are all objects.
So, we can say an object is anything that has;
- an identity
- some state (or attributes/properties)
- and certain behaviours (or functions)
An identity
Each object must have its own unique identifier (could be a name) that differentiates it from another object.
A state
A state defines the properties of an object.
For example, looking at a colour of a car or a cup - the values of variable colour for these objects contain colour data (e.g., red, blue, green etc), which can be added, changed, or deleted.
A behaviour
A behaviour refers to actions that the object can take.
For example, the object car, can move, stop, and start.
Another example; an object could represent a person with properties or states like a name, age, and address and behaviours such as walking, talking, breathing, and running. Or it could represent an email with properties like a recipient list, subject, and body and behaviours, like adding attachments and sending.
What does this mean for our Python Program?
The above description means that almost everything can be defined as an object in Python.
Some of the things in programming that can be defined as objects include the following:
- variables, which hold values that can be changed.
- data structures, which are specialized formats used to organize and process data.
- functions, which are named procedures that perform a defined task.
- methods, which are programmed procedures that are defined as components of a parent class and are included in any instance of that class.
So, in OOP, objects are the things you think about first in designing a program.
Our programs are usually made up of one or more working together.
OOP is a programming approach that enables us to model concrete, real-world entities (like person, car or airplane) as software objects that have some data associated with them and can perform certain function.
It also enables us to be able to define relationship between these entities (for example, relationship between school, teacher, student and courses).
In summary, objects are at the centre of OOP in Python, not only in representing the data but in the overall structure of the program as well.
Why use OOP and some other programming paradigm like Procedural Programming?
See the descriptions of procedural programming here.
Why we use OOP?
We use OOP because of its flexibility in modelling complex, real-world entities and because of benefits such as:
Simplicity
The process of creating large and complex systems is challenging and involves several issues. The task can be made simpler if the complexity can be divided into smaller issues or objects.
Easy to modify
Finding the system components that require modification is easier when you rely on objects and model your system using them. For instance, you might need to fix a bug or add a new feature.
Maintainability
Code maintenance is challenging in general, and it gets more challenging with time. It necessitates discipline, including clear and consistent architecture, excellent naming, and other factors. Locating a particular section of your code that requires maintenance is made simpler by using objects.
Reusability
You can use an object's definition many times in many parts of your system, or potentially in other systems too. When you reuse code, you save time and money because you need to write less code and you reach your target faster.
Data encapsulation
Data encapsulation is the process of isolating data from the rest of the system and limiting access to specific portion of it.
This is because the data holds state, and that state can consist of one or more variables. If these variables must be modified simultaneously, you must secure them and restrict access to only public methods to ensure that changes are made consistently.
OOP has mechanisms like access levels, where data that's on an object can only be accessed by the object itself or can be made publicly available.
Analogy - The Auckland Public Library Scenario
Let’s explore the concept using the Auckland Public Library scenario.
The library itself like many other public libraries contain an organized collection of books, periodicals, newspapers, audiobooks, films, etc.
In the library, there are typically two opposing ways to maintain the stock.
- Using a closed-access method.
In which the stock is not on open shelves. In this method, library users can request books and other publications, which are delivered on demand by trained staff. - Or an open-access method.
Commonly referred to as open shelves, an alternate approach for managing a library. Open refers to the library being accessible to all users, not only the trained staff. In this instance, the books are openly displayed. The problem with open-access is that books are often misplaced and hard to locate.
The analogy of closed-access method is similar to the data encapsulation method.
- The books and other publications, which a library offers, are like the data in an object-oriented program.
- Access to the books is restricted like access to the data is restricted in OOP.
- Getting or returning a book is only possible via the staff.
- The staff functions like the methods in OOP, which control the access to the data.
- So, the data, often called attributes, in such a program can be seen as being hidden and protected by a shell, and it can only be accessed by special functions, usually called methods in the OOP context.
- Putting the data behind a "shell" is called Encapsulation.
- So, a library can be regarded as a class and a book as an instance or an object of this class.
The following images show the roles of objects within the input and output systems.
Objects hide detail- they allow us to ignore the detail of the "rest of the program"

Objects are bits of code and data

Objects get created and used

Objects hide details- they allow the "rest of the program" to ignore the detail about "us".

Figure 1:Objects enable data encapsulation and information hiding
Object Oriented Model
Before we explain what goes into a typical Object-Oriented Design (OOD), let’s briefly discuss some activities or processes that precede it.
When you design or implement object-oriented program, you first need to analyse the object by determining its properties, classes and identify the relationships among the classes.
You will also have to identify the attributes and behaviours that characterize each class. Simply put, you will identify actors (the elements that are associated with action or perform actions).
For example, a printer (actor) print (action).

Figure 2 Identify an Object and its behaviour during OOP modelling phase
This process is referred to as object modelling – during this phase, you look at the description of a domain and try to analyse what takes place in there.
After you identify actors, you look at what they do, which is their behaviour.
Then you look at descriptions of the actors and any data that's needed to carry out the action.
Actors are made into objects, the traits are encoded as data on the objects, and the behaviours are functions that also get added to the object.
In general, the object-oriented modelling allows us to visualize the elements in a software application in terms of object.
Case Study: Modelling an Invoice Management System Using OOP paradigm
When using OOP, modelling is just as important as developing the code to carry out the logics. Learning to recognise the actors, actions, the necessary data, and the type of interaction taking place is a key component of modelling. Even just reading about a system can help you mimic it.
For example, consider a manual flow of invoice management.
Many businesses receive invoices, and they must be paid on time. Late fees are incurred as a result of late payments, which costs money. An invoice needs to be processed before it can be paid. An invoice frequently goes through several hands before it is registered and paid for.
As shown in Figure 3, the invoicing management process usually starts with an initial sorting phase, during which the invoice is submitted to the appropriate department.
Next, the invoice is checked for correctness before being approved by someone with appropriate level of authorization.
Finally, the invoice is paid.

Figure 3: Invoice system case study
For a small business, the business owner might do all of the steps.
Invoice management can be a complicated procedure in a large firm because of the potential involvement of several individuals and systems.
Turning this workflow to an OOP:
If you are to turn the manual workflow into a working software, the first thing is to is to try and do what we described as Object modelling by modelling the invoicing management system.
The first step here is to identify the actors (objects), behaviours, states, and data involved in the invoice management processes.
To do this, you will need to read the description of the problem domain as presented in the case study.
You can begin to fill in the blanks in the following table if you think of the domain as having stages, input, processing, and output.
See example table below:
| Stages | What | Who |
|---|---|---|
| Input | Invoice | - |
| Processing | Sorting, Approval & Rejection, Penalty | - |
| Output | Payment | - |
| Feedback | Optimize based on Performance | - |
Table 1 provided a snapshot of what happened throughout each stage. You have been able to find the data, things that happen to the data during processing, and the ultimate result, which is a payment and feedback which could be based on user experience.
Now you can see at a glance, the component of the problem and you can now attempt to solve the invoice management system workflow using OOP paradigm.
Object Analysis and Modelling Phase
What’s next?
You will need to do the following during object analysis and modelling phases in OOP:
- Identify objects and group into classes
- Identify states of each object
- Identify the relationships among classes
- Create user object model diagram
- Define user object attributes
- Define the operations that should be performed on the classes
- Identify events and analyze the applicability of actions
- Construct dynamic model diagram, comprising of state transition diagrams
- Express each state in terms of object attributes
- Validate the state–transition diagrams draw
- Identify all the inputs and outputs
- Construct data flow diagrams showing functional dependencies
- State the purpose of each function
- Identify constraints
You will be able to find the different artifacts listed above for your system, by asking questions like:
- Who interact with whom?
- Who does what to whom?
For the invoice management case, let’s highlight the different artifacts in these problem statements so it becomes clear what parts are important to our system.
- The mail service delivers an invoice to the system.
- The invoice is sorted by either a reference code or manually by a sorter to ensure it ends up in the correct department.
- The invoice is approved or rejected by an approver based on factors like (for example) correctness and size of the amount.
- The invoice is paid by a payment processor by using the payment information provided.
- The workflow is rated high or low by end user.
If we extract the objects, data, states(attributes) and behaviour from the user story or problem statement, and organise them in a table as in Table 2:
| Stage | Actor | Behaviour | Data |
|---|---|---|---|
| Input | Mail Service | Deliver | Invoice |
| Input | System | Receives | Invoice |
| Output | Sorter | Sorts | Invoice |
| Processing | Approver | Approve/reject | Invoice Amount |
| Processing | Payment Processor | Pays | Invoice Amount |
| Processing | Late Fee Penalizer | Pay late fee | Due date/Late criteria |
| Output | Pays | Pays | Invoice (payment info) |
The initial description of the invoice management system has undergone many changes.
Actors (Objects) have been identified.
Important data has been grouped with identified objects.
Additionally, behaviour has been discovered, which clarifies how actors (objects) interact with one another. We have been able to identify who acts in what manner towards whom as a result.
At this point, you have performed an initial object-oriented analysis, which is a fantastic start. But the issue of how to translate this analysis into code still exists.
We will work on finding the solution to that problem throughout this chapter.
The object-oriented paradigm is built on the concepts of objects and classes, which are fundamentally interconnected.
Object
We already defined what objects are in the previous sections, and also said almost everything in Python is an object.
Remember from previous lectures we can use type () to check the type of object something is:
Objects are the actors; they do something within a system.
As a result of taking an action, object changes state within itself or other objects. You will model objects in your program based on the needs of the application.
Let's imagine an object in the real world. You're in a car park. What do you see?
- You are likely to see many cars, in different shapes, sizes, and colours.
- To describe a car, you can use properties like make, model, colour, and type of car.
- If you assign values to these properties, it quickly becomes clear whether you're talking about a red Ferrari, or a four-wheel-drive Jeep, or a yellow Mustang, and so on.
- Like a consumer, a car, etc., an object can have a physical presence. It can also have an intangible conceptual existence like a project, a process, etc.
We know what objects are, so how can we create our own Object types?
That is where the class keyword comes in.
Class is simply an object constructor, or you can say a blueprint or template for creating objects.
User defined objects are created using the ‘Class’ Keyword.
In the car example above,
- the class is the blueprint of a car,
- the object is the actual car you drive around.
The class is what you write in code. The object is what you get when you tell the runtime environment to run your code.
| Class | Object |
|---|---|
| Blueprint of a Person | Male, Female |
| Blueprint of a Car | Ferrari, Honda, Benz, Jeep |
| Description of Ice Cream | Strawberry, Chocolate, or Vanilla |
A class in Python is created by using the keyword class and giving it a name.
Let’s use a simple example.
Scenario 1
Since we said anything can be modelled as an object, let’s try and model a notebook with the following requirements:
We want to model a notebook for storing short memos.
Each memo would be recorded or written as a note with information about the day it was created, memo ID, title and tags for easy querying and filtering.
This means, we should be able to search for a memo, and should be able to modify existing notes.
The following table and diagram describe the actors (Notebook, Note, Menu) in the Notebook app and their relationships. It also shows the attributes and methods of each actor.
Let’s start with creating a table that summarizes the elements of this scenario.
| Class | Attributes | Object | Functions |
|---|---|---|---|
| Noebook | Notes (list of memos) | myNotebook | Search_memo(?):list, new_notes(), modify_memo() |
| Note | Memo_id, creation_date, tags title |
NewMemo | Match(searchfilterLstr): boolen |
| Menu | Choices: dictionary of number-note-functions pair | NoteMenu | show_notes(notes), modify_note(notes),’ display_menu() show_tags(), run(), quit() |

Figure 4: Notebook model
In the above, you can see that class definition in Python has a basic syntactical structure. It consists of two parts: the header and the body.
The header is usually a single line of code that begins with the keyword class followed by a space and an arbitrary name for the class. By convention we give classes a name that starts with a capital letter.
pass is often used as a placeholder indicating where code will eventually go. It allows you to run this code without Python throwing an error.
In the 4th and 5th lines of the code example, we created two instances of class Notebook (MyNotebook and YourNotebook). An instance is specific object created from a particular class.
We also created an Alias name for YourNotebook, so YourNotebook is the same as YourNotebookAlias.
You can run the code below.
Adding attributes to a Class
An attribute is a characteristic of an Object. A variable attached to an object. When an attribute is attached to an object, it could be used in one of two ways:
- Describe the object: An example of a description variable is, for example, the color of a car or the number of spots on a giraffe.
- Hold the state: A variable can instead be used to describe an object's state. An example of a state is the floor of an elevator, or whether it's running or not.
Sometimes people use attribute and property interchangeably, but properties mean something else in Python.
The following table reiterates the list of attributes that we want our Notebook, Note and Menu to have.
| Class | Attributes |
|---|---|
| Notebook | Notes (list of memos) |
| Note | Memo_id, creation_date, tags title |
| Menu | Choices: dictionary of number-note-functions pair |
Part of modelling is deciding which attributes (variables) should be included in your class. How can you add an attribute to the class you created using the code you learnt earlier?
You need to tell the class what attributes it should have at construction time, when an object is being instantiated.
When an Object is instantiated, a unique function known as a constructor is called.
Constructor
Many program languages have the notion of a constructor, the special function that's only invoked when the object is first being created. The constructor will be called only once.
In this method, you create the attributes the object should have. Additionally, you assign any starter values to the created attributes.
In Python, the constructor has the name __init__().
You can give __init__() any number of parameters (attributes passed into your functions during definition), but the first parameter must always be a special parameter called self.
The parameter self refers to the object's instance. When a new class instance is created, the instance is automatically passed to the self parameter in __init__() so that new attributes can be defined on the object.
The syntax for creating an attribute is: self.attribute = something
If you don't add an attribute to self, it will instead be treated as a temporary variable that won't exist after __init__() is done executing.
For example, every time a new object (e.g. our Notebook or Note object) is created, __init__() sets the initial state of the object by assigning the values of the object’s attributes.
Let’s update the Notebook class with an __init__() method that creates notes ( list of notes) attribute ( See the attribute mapping in Table 4 ).
"Notebook class modelled a collection of notes that can be searched, modified and tagged".
Remember the Notebook class is the blueprint for our Notebook object, and it models a collection of notes that can be searched, modified, and tagged.
So, in the above code snippet, we included 2 things to our Notebook class: the constructor __init__() with parameter self, and then the class attribute self.notes, which we set to an empty list.
Let’s do for our second actor, the Note class:
Remember the Note class is the blueprint for each page or not in the Notebook.
And that it has different attributes such as memo, tags, creation date and id.
Notice that the __init__() method’s signature is indented four spaces. The body of the method is indented by eight spaces. This indentation is vitally important. It tells Python that the .__init__() method belongs to the Notebook or Note class.
Remember the syntax for creating an attribute is ( self.attribute = something). The statement simply means create an attribute called attribute and assign to it the value of the variable something.
For example, in the Note class, we have self.memo = memo this means creates an attribute called memo and assigns to it the value of the memo parameter. Same for the other attributes in the defined in the class.
Class and Instance Attributes
Attributes created in __init__() are called instance attributes. An instance attribute’s value is specific to a particular instance of the class.
For example, all Notebook objects have a notes attribute, but the values for the notes attribute will vary depending on the Notebook instance.
On the other hand, class attributes are attributes that have the same value for all class instances.
You can define a class attribute by assigning a value to a variable name outside of __init__(). Let’s see an example by updating our Note class:
In the above example, we have included some more attributes to the class Note.
For example, we have included attribute author, which would stay the same for any instance of Note.
We have also included a last_id attribute defined with using the keyword global. Usually, when you create a variable inside a function (a local variable), it can only be used within that function. That is where the global keyword comes in the play, which helps to create global variables inside the function, and which can be accessible in a global scope.
For attribute creation_date, we used a python inbuilt library called datetime to get the value ( we will need to import datetime in our code at some point).
Class attributes are defined directly under the first line of the class name and are usually indented by four spaces. They must always be assigned an initial value. When an instance of the class is created, class attributes are automatically created and assigned to their initial values.
When defining attributes that must be the same for each instance of a class, use the class attributes. For attributes that differ between instances, use instance attributes.
We can try and test these two classes (Notebook and Note) based on the attributes they now have by adding the following code:
We created an instance of class Notebook (myNotebook), 2 instances of class Note (note1 and note2), we initialize both notes with memo and tag, and then append the two notes to our notebook (myNotebook). The remaining lines are just printing the attributes of both objects.
You can run the full code bwlow.
Adding behaviour with methods
The ultimate objective of a system is to produce or generate useful output. You must process the input to get the output. While processing, you might need the help of various methods and data.
In object-oriented programming (OOP), your methods that carries out the actions of the actors and your data are placed on objects. That action can be a computation that only relies on inputs, or it can change the value of a variable. So, in order to process the input and produce a result in OOP, we need to define some methods of our objects.

Methods on objects in OOP can be:
- External methods: accessible to other objects, that is other objects can invoke them.
- Internal methods: not accessible to other objects. Additionally, internal methods help carry out a task started by an invocation to an external method.
- Instance methods: Instance methods are usually internal methods. They are functions that are defined inside a class and can only be called from an instance of that class. Just like __init__(), an instance method’s first parameter is always self
No matter what type of method, they can change the value of an object's attribute, in other words, its state.
Let’s now add some methods to our two classes Notebook and Note.
Notebook class
We want to apply the following methods:
- new_note(…): used to create a new note and add it to our list of notes. It will take our memo and tags attributes for create the new notes ( this will be given to the new Note object) - new_note(self, memo, tags=’’).
- search_note(…): used to find notes that match the given search string. It will take the search string as parameter - search_note(self, searchstring).
- find_note_with_id(…): This will find note using a given note id. It will take the note id as parameter - find_note_with_id (self, note_id)
- modify_memo(…): This will find a note with a given id and change its memo to the given memo value – modify(self, note_id, memo)
- def new_note(self, memo, tags=''):
- self.notes.append(Note(memo, tags))
- def new_note(self, memo, tags=''):
We use def keyword to begin definition of our method name.
The new_note method take two parameters and use these to create a new instance of Note class which is then appended to our Notebook’s notes attributes. Notice how we referenced the Notebook’s notes attributes using self.notes and then just appended an instance of Note to this attribute.
The search_note takes a searchstring and returns a list of notes where the string appears. Notice we call function match(str) on note, this is because,
The find_note_with_id takes a note_id, maps it with each note’s id in the notes (Notebook’s attribute) and returns a list of notes where the string appears. Notice we call function match(string) on note just to match the string with the content of note.
For the Note class, we just want to include only one method (see figure 4 and Table 4):
- match(…): This function is going to be used to determine if the note matches the filter text, if it does, we will return true, otherwise , we return false (we call this type of function Boolean function) -
The match takes a string and returns True if the string is appearing in memo or tags.
Finally, to make it easy to run our Notebook app, let’s include the Menu class.
The Menu class will display our menu options.
The Menu will include a collection (dictionary) of functions as options to select from, to run and quit the app, to add note and search for note, to display memo, to show tags.
Take a look at the completed code below.
See the output of our app:
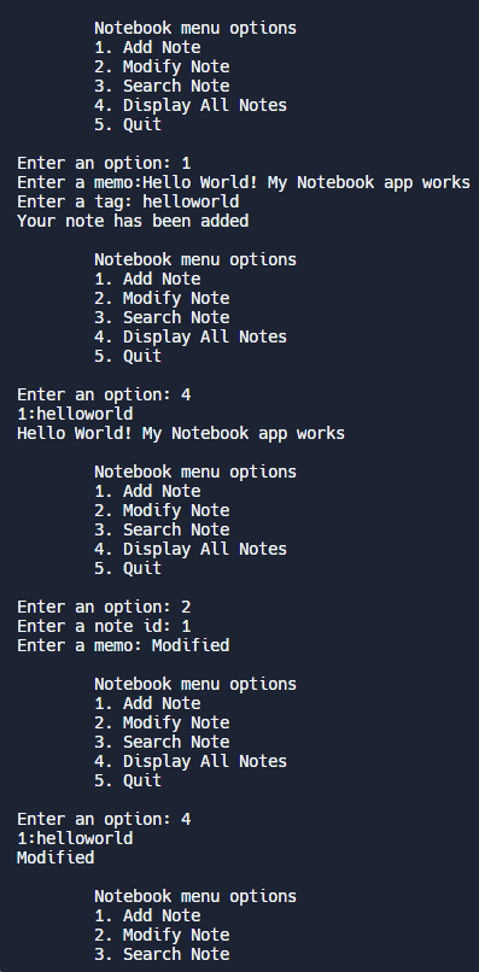
Figure 5: The Notebook App Using OOP Paradigm
Activity 1 - Your turn to write some code
- Add another method for modifying tags to the Notebook app. (Hint, see how the modify_note method).
- Include show_tag methods to display all tags for all the notes in your notebook.
- Include this in your Menu as an option.
See if you can improve the app based on your programming experience so far.
Share your activity in the forum.
Data Encapsulation
Let’s revisit data encapsulation.
As mentioned before, the general ideal behind data encapsulation is simply being able to bundle data with the methods that operates them.
Protect your data
As you have seen in our Notebook app, data is required for an object and the methods to carry out their tasks.
We already mentioned that the data on an object is usually internal, belonging to only the object.
What does this mean? It means that we need to protect such data from other outside manipulation.
Data should not directly be touched by another object.
For example:
You shouldn't know the internals. Say instead of a pedal to interact with the car, imagine you had a screwdriver or a soldering kit to try to accelerate. Sounds scary, right? That's because it is.
Or let us use a more concrete example, a Square class, with the following code:
By changing the height variable in the square example, you defy the definition of what a square is.
You can print the attributes of your square and see.
The square's coding requires that you call the method set _side() in order for it to operate as intended. It is thought to be safer to let the object handle its data. Almost always, you should choose to interact via a method rather than explicitly setting the data.
So, the question on you mind right now would probably be,
“How can we protect our class and our objects from unwanted manipulation of data?”
This is where access levels and accessors come in.
Data and functions can be marked with specific keywords to make them invisible to other objects and the outside world. Access modifiers is the term for these keywords.
Python hides data by prefixing attribute names with an underscore _.
- A single leading underscore,
_ single
tells the outside world that it's probably best to leave this data alone. - Two leading underscores,
__ double
tells the world that the data is private.
Let’s make some changes to our Square class:
Because of this modification we made, any attempt to modify the internal attribute of our object will through an Attribute Error.
So, we are kind of safe now but not entirely! Run both example below and see the results.
We are not entirely safe because, by entering this code below, we can still modify the value of our internal attributes:
Accessors and Mutators
Since we now agree that it's a good idea to keep internal data of an object private, we frequently need methods in the class to enable users of objects to edit or access the internally stored data, in a controlled way.
This is where accessor and mutator comes in. Both are dedicated methods used for reading or changing object data.
A method defined within a class can either be an Accessor or a Mutator method.
Accessors
This is a method that returns a copy of an internal variable or computed value. A common practice is to name this method a getter. Getter makes your inner data readable to the outside.
Mutators
This method is a function that modifies the value of an internal data variable in some way.
The simplest form of mutator function is one that sets a variable directly to a new value.
A common practice is to name this method a setter.
Setters
Setters are methods that have direct access to your data.
The purpose of a setter is to serve as a guard, preventing the setting of a bad value. Let us use setter and getter methods for our Square class:
Property Decorators
Using @Property Decorators for getters and setters in Python
@Property decorator is the “Pythonic” way of working with attributes. Generally, decorators are functions that add new functionality to a function that is passed as argument.
That is, decorator functions take your other function as an input. The idea is to give your other function a feature it did not have before.
So, we can encode reusable functionality as decorator functions and then ‘decorate’ other function with it, thereby adding new functionality to the other function without having to modify it.
A special decorator @property in the context of OOP and getters and setters can assist you in removing some code duplication when you add getters and setters methods.
The @property have the following attributes:
- You can access instance attributes exactly as if they were public attributes while using the getters and setters to validate new values and to avoid accessing or modifying the data direct
- By using @property, you can "reuse" the name of a property to avoid creating new names for the getters, setters, and deleters.
- Creates a backing field: When you decorate a function with the @property decorator, it creates a backing private field.
- Identifies a setter: A setter method can change the backing field.
- Identifies a getter: This function should return the backing field.
- Identifies a delete function: This function can delete the field.
The decorator @property is used in the code above to wrap the method height(). The private field __height is created by this decoration operation.
Since the decorator already defines the __height field, it is not necessary to do so in the __init__(). Another decorator, called @height.setter, is also included.
This decorative draw attention to a height() method that resembles the setter. The second parameter for the new height technique is a different parameter value.
It will still be problematic to modify the height independently of the width. Before allowing getters and setters, you should be aware of what the class does because doing so introduces risk.
Inheritance
Inheritance is the process by which one class takes on the attributes and methods of another.
Newly formed classes are called child classes, and the classes that child classes are derived from are called parent classes.
Child classes can override or extend the attributes and methods of parent classes.
In other words, child classes inherit all the parent’s attributes and methods but can also specify attributes and methods that are unique to themselves.
You can think of object inheritance like the genetic inheritance between parent and child. A child usually inherits genetic attributes from parents such as eye colour, hair colour, height etc.
Let’s assume your parents don’t have purple hair, and then you went ahead to dye your hair purple. You have just overridden the hair colour attribute that you inherited from your parent.
You also inherit, in a sense, your language from your parents. If your parents speak English, then you’ll also speak English.
Now imagine you decide to learn a second language, like German. In this case you’ve extended your attributes because you’ve added an attribute that your parents don’t have.
Let’s look at another example:
In the previous example, we have two classes: Animal and Dog.
The Animal is the base class, the Dog is the derived class. The derived class inherits the functionality of the base class.
It is shown by the eat() method. The derived class modifies existing behaviour of the base class shown by the whoAmI() method.
Finally, the derived class extends the functionality of the base class, by defining a new bark() method.
Based on your understanding of class, object, and inheritance, write a simple contact manager python program to track and manage the names and emails of your friends.
You will need to create 3 different Classes (Contact List, Contact, Supplier). The Classes and their functions requirements are defined as follows:
Contact List
This class should model a typical lecturer contact list object with relevant attributes and functions.
Attributes such as name and email could be considered. The class should have a member function called search_name that takes a name and returns the list of lecturers’ contacts that contains the search name in their name.
Contact
The contact class is responsible for maintaining a list of all contacts in a class variable, and for initializing the name and address, in this simple class.
This is the class you will used to populate the contact list (the list object created by your contact list class). That is, the class should be able to instantiate a contact list object and append
Supplier
Imagine that some of your friends are also your business associates. They are suppliers that you need to order supplies from.
To avoid mistakenly ordering things from your other friends (instead of your supplier friends).
You need to create another Class to manage the suppliers’ contacts. This class will inherit the Contact Class ( because all contacts share same attributes – email and name). That is, the Supplier class will act like a Contact but will have a member function for ordering.
Supplier class should be able to do everything a Contact can do (including adding itself to the list of all_contacts) and all the special things it needs to handle as a supplier. This is the beauty of inheritance.
Give it a go! Compare your solution with the sample solution in the forum.
Polymorphism means having many forms.
In programming, polymorphism means same function name(but different signatures) being used for different types.
Polymorphism in Python describes the ability for many object classes to share the same method name and be called from the same location despite receiving a variety of different objects as arguments.
Let’s explain this with an example:
In the above example, we use abstract classes and inheritance.
An abstract class is one that never expects to be instantiated. For example, we will never have an Animal object, only Dog and Cat objects, although Dogs and Cats are derived from Animals.
In the example, we have a Dog class and a Cat class that both inherited the Animal class attributes, and each has a .speak() method. When called, each object .speak() method returns a result unique to the object.
Run and study this example here.
Conclusion
Now that you have explored different object-oriented programming concepts and practice with examples. It is time to begin to think about your own project. What problem can you solve using OOP paradigm?