Welcome to the CS204 Art Pipeline for Games Extension topic! In this topic, we will be extending the work you have done in CS204 by putting it to work in a leading game development application, Unreal Engine. By the end of this topic, you will have familiarised yourself with Unreal Engine and its workflow and will be able to:
- Understand and use the controls
- Utilise blueprints for game creation
- Develop first-person shooter games
- Develop third-person mechanics
- Access and utilise materials
- Create landscapes
- Develop collisions
- Utilise AI or NPC's
- Use the C++ feature
Let's get started by familiarising ourselves with the Unreal Engine.
Unreal Engine is a powerful and popular game engine developed by Epic Games. It is a comprehensive suite of tools designed to create and develop video games, simulations, virtual reality (VR) experiences, and interactive visualizations for various platforms. Unreal Engine provides developers with a wide range of features and capabilities to bring their ideas to life. Let's take a look at why Unreal Engine is one of the leading game development applications.
- Real-time Rendering: Unreal Engine excels in real-time rendering, allowing developers to see changes instantly while working on their projects. This capability facilitates rapid iteration and helps create immersive, high-quality visuals.
- Blueprint Visual Scripting: Unreal Engine includes a node-based visual scripting system called "Blueprints," which enables developers without extensive coding knowledge to create gameplay mechanics, events, and interactions.
- High-fidelity Graphics: Unreal Engine is renowned for its stunning and realistic graphics capabilities. It supports advanced lighting, materials, particle systems, and post-processing effects that contribute to visually impressive game worlds.
- Cross-platform Support: Unreal Engine provides built-in support for various platforms, including PC, consoles (such as PlayStation, Xbox), mobile devices (iOS, Android), VR headsets (Oculus Rift, HTC Vive), and AR platforms.
- Animation and Physics: The engine offers robust animation and physics systems, allowing developers to create realistic character movements, physics simulations, and interactions.
- Asset Marketplace: Unreal Engine has an extensive online marketplace called the Unreal Engine Marketplace, where developers can buy and sell assets, such as 3D models, textures, animations, and sound effects, to speed up development and enhance their projects.
- Blueprints and C++: While Unreal Engine provides visual scripting with Blueprints, it also supports traditional C++ programming for developers who prefer more direct control and optimization over their code.
- Multiplayer Networking: Unreal Engine offers built-in networking features to create multiplayer games and experiences, including replication and seamless integration with popular online platforms.
Unreal Engine has been used to develop many successful and critically acclaimed games, including Fortnite, Gears of War, and Unreal Tournament. It is widely adopted by professional game developers, indie developers, and enthusiasts due to its versatility, robustness, and active community support. Additionally, Unreal Engine provides a royalty-based business model, where developers pay a percentage of their revenue to Epic Games once a certain revenue threshold is reached, making it accessible to developers of all sizes.
The Gameplay Framework in Unreal Engine is a robust and versatile system designed to provide developers with a solid foundation for creating interactive and engaging gameplay experiences. It serves as the backbone for managing game logic, player input, character movement, interactions, and much more. Let's explore the key components and features of the Gameplay Framework in Unreal Engine:
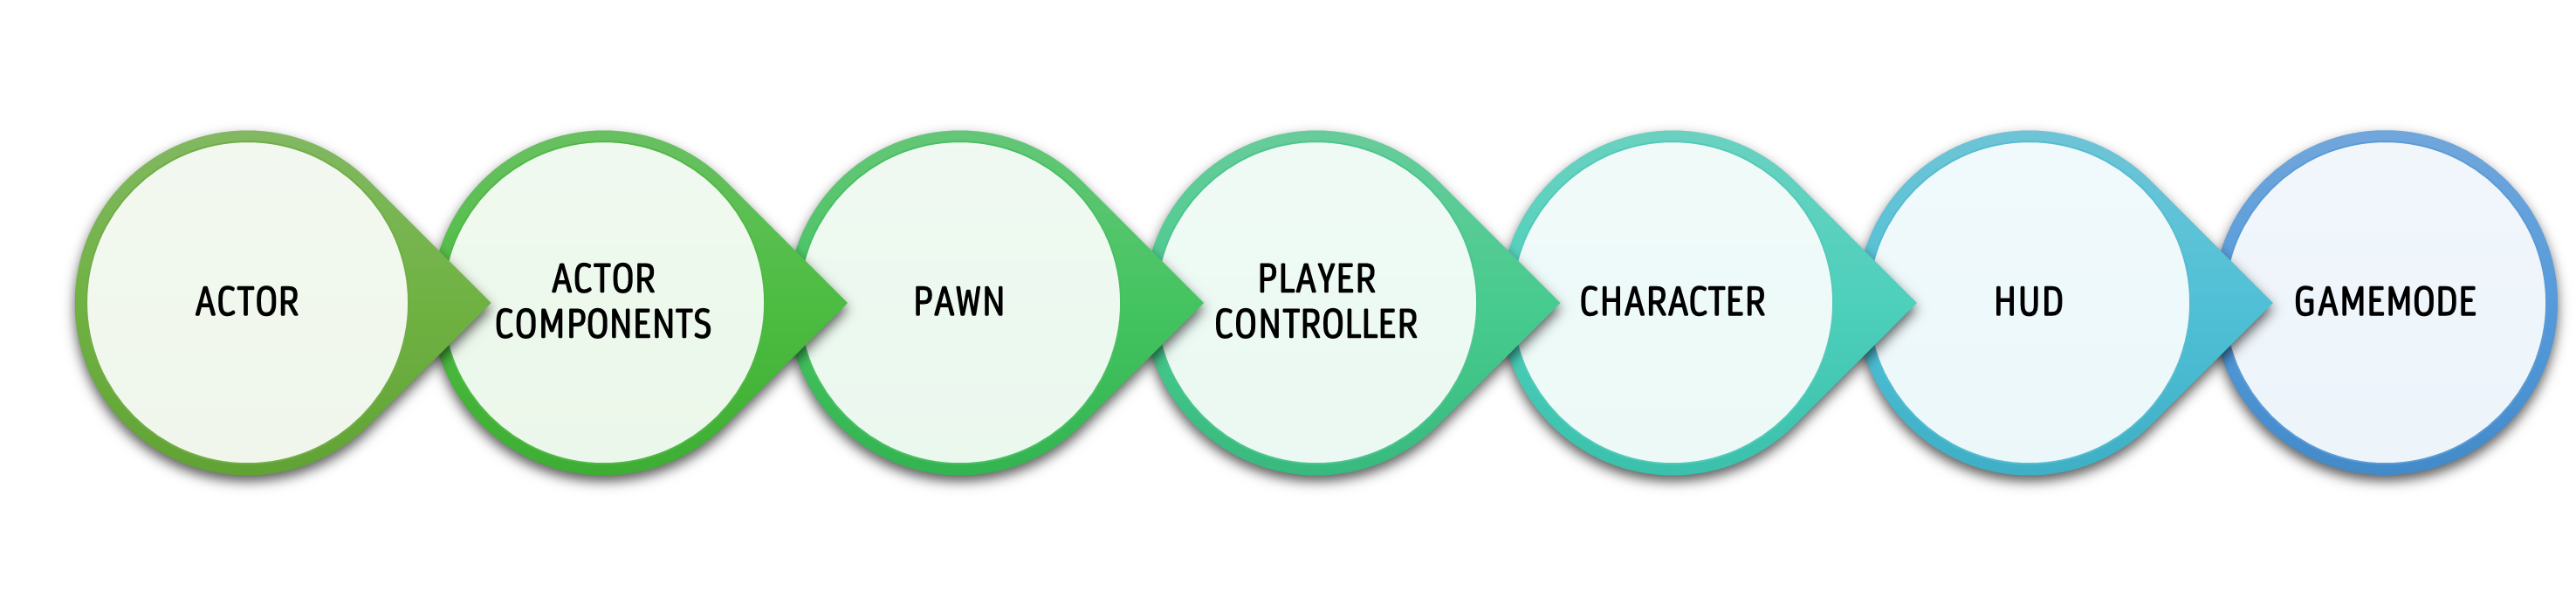
Actor
Actors are the primary means by which designers populate and interact with the game world.
Actors are fundamental building blocks that represent objects or entities within the game world. They are a central concept in the engine's object-oriented architecture and play a vital role in defining the behaviour and interactions of various elements in your game. An actor is a class that serves as the base for all objects that can be placed and interacted with in the game world. They encompass a wide range of entities, including characters, props, lights, cameras, triggers, AI characters, and more.
Actors are organized in a hierarchical inheritance structure, where various specialized actor classes inherit functionality and properties from parent classes. For instance, a character actor might inherit from a base character class that includes generic movement and animation capabilities. Every actor has a Transform that represents its position, rotation, and scale in 3D space. The Transform consists of three components: Location (position), Rotation (orientation), and Scale.
Actors can be dynamically spawned into the game world during runtime or placed in the level during design time. They can also be destroyed when they are no longer needed or as part of scripted events. Actors, therefore, have a lifecycle within the game. They are:
- spawned
- initialized
- ticked (updating logic)
- destroyed (when no longer needed)
Actors can communicate with each other through events, interfaces, and other mechanisms. For example, a trigger volume actor can send an event to another actor when a player character enters it, triggering specific actions.
Understanding actors and their interactions is crucial when designing and implementing gameplay mechanics, creating interactive elements, and developing a dynamic and immersive game world in Unreal Engine. They provide the foundation for building engaging and interactive experiences in your game.
Actor Components
Actor Components make it easier to manage complex systems
Actor Components are classes that inherit from the 'UObject' class and are designed to be attached to Actors. Each component encapsulates specific functionality, such as rendering, collision, movement, audio, and more. They allow you to extend and customize an Actor's behaviour without modifying its base class directly. These are critical concepts in Unreal Engine's object-oriented architecture, allowing for a more flexible and reusable approach to building complex game entities. They enable developers to break down functionality into smaller, manageable pieces and create more dynamic and interactive gameplay experiences.
Actors can be composed of multiple components, each responsible for a specific aspect of the Actor's behaviour. For example, a character Actor may have components for its mesh, animation, collision, movement, and health management.
Actor Components make it easier to manage complex systems by breaking them down into smaller, self-contained pieces. This modular approach simplifies development, debugging, and maintenance. They also promote reusability as they can be shared across multiple Actors. For instance, you can create a health component that can be attached to different characters, enemies, or interactive objects.
Unreal Engine provides a wide range of built-in components, such as Static Mesh Component, Skeletal Mesh Component, Character Movement Component, Camera Component, and more. These components cover common functionalities used in games however developers can create their own custom components to extend an Actor's functionality based on the specific needs of their game.
Pawn
Pawns form the core of player control and interaction
Pawn is a fundamental class representing game objects that can be controlled by players or AI. Pawns are the basis for characters and other objects that can move and interact in the game world. They provide the foundation for implementing player characters, enemies, vehicles, and various interactive elements in a game.
Pawns have built-in support for player input, allowing players to control their movement and actions. This input can be handled through the Pawn's input component or through Player Controllers that possess the Pawns. Unreal Engine includes a specialized class called Character that inherits from Pawn. Character Pawns are commonly used for player-controlled characters and come with built-in functionality for smooth movement, animation, and collision handling. Developers, however, can create custom Pawns by inheriting from the Pawn class and extending their behaviour according to the game's specific requirements.
As mentioned above, however, they can also be controlled by AI Controllers to create enemy characters or NPCs (Non-Player Characters) that exhibit specific behaviours and respond to the player or other game events.
Player Controller
Player Controllers enable players to interact with the game world and have a direct impact on the gameplay experience.
Player Controller is a specialized class responsible for managing player input and interactions within the game world. Player Controllers act as a bridge between players and the Pawns they control, enabling players to interact with the game environment, control characters, and trigger actions based on their input.
Player Controllers are responsible for receiving and processing player input, such as keyboard keystrokes, mouse movements, and gamepad button presses. They interpret this input and translate it into game actions, like moving a character or triggering an attack.
Unreal Engine allows developers to create Player Controllers using visual scripting with Blueprints. This enables designers and non-programmers to define player interactions and behaviours without writing code. Developers can also customize these to implement specific game mechanics and behaviours. For example, they can add functions for special abilities, inventory management, or other gameplay features.
Character
Characters provide a foundation for designing lifelike and engaging virtual beings within the game world.
Character is a specialized class that extends the Pawn class and represents a game entity that can be controlled by players or AI. Characters are designed to have a humanoid or creature-like appearance and come with built-in functionalities for smooth movement, animation, and interactions with the game world. Unlike generic Pawns, Characters can generally pick up items, open doors, or perform combat actions and often have health and damage systems to handle combat and interactions with other characters or entities.
Unreal Engine provides a specialized component called Character Movement Component that handles character movement, including walking, running, jumping, and falling. It supports various movement modes and physics simulation for smooth and responsive character control.
Heads-Up Display (HUD)
The HUD is a vital component of the gameplay framework in Unreal Engine,
The HUD is a graphical user interface (GUI) element that displays important information directly on the screen, typically superimposed over the game's viewport. It is visible to the player throughout the game session and updates dynamically based on in-game events and changes. It can display various types of information, such as health and stamina bars, ammunition count, minimaps, quest objectives, and any other relevant data that players need to monitor during gameplay. It is continuously updated during gameplay to reflect the current state of the game. As the player's health changes, ammo depletes, or objectives are completed, the HUD responds accordingly.
In Unreal Engine, the HUD is created using Canvas and Widget Blueprints. The Canvas Blueprint handles the drawing and positioning of elements on the screen, while the Widget Blueprint defines the layout and appearance of the HUD's visual components.
The HUD can also be used for debugging and development purposes. Developers can display debug information, such as variable values and game state, to assist in testing and optimization.
GameMode
GameMode is a critical component that sets the foundation for how the game functions and interacts with players.
GameMode is a special class that defines the rules and behaviour of the game. It acts as a controller for the game and manages the game's state, including initializing players, handling win/lose conditions, and coordinating various aspects of gameplay. When a level is loaded or a new game session starts, the GameMode is responsible for initializing the game state. It sets up the necessary components, player controllers, and other essential elements. It also handles the spawning of players and determines where and how players will appear in the game world. For example, in a multiplayer game, the GameMode can handle player spawning across different locations and balance the gameplay.
Unreal Engine allows developers to create GameMode using visual scripting with Blueprints. Blueprint GameMode enables non-programmers to define game rules and logic without writing code, however, developers can create custom GameMode classes to tailor the game rules and behaviour to their specific requirements. This allows for the implementation of unique game modes and variations.
Summary
The Gameplay Framework in Unreal Engine provides a robust and flexible structure for building immersive and interactive gameplay experiences. Whether you're creating a simple 2D game or a complex 3D world, this framework empowers developers to bring their creative visions to life while maintaining efficient and scalable game logic. You can review more details by downloading this attachment from Unreal.
So now we understand the framework behind Unreal Engine, let's now take a look at navigating Unreal Engine and the basic controls.
Unreal Engine offers a robust and versatile set of controls, empowering developers to create immersive and interactive experiences. From character movement and camera manipulation to handling user input and triggering events, the engine provides a comprehensive system for controlling various aspects of the game. With the flexibility to utilize visual scripting through Blueprints or traditional C++ programming, Unreal Engine grants developers the freedom to tailor controls to their specific gameplay mechanics and design. Whether creating complex character animations, implementing responsive user interfaces, or crafting engaging gameplay interactions, Unreal Engine's control capabilities are at the heart of bringing captivating worlds to life.
Unreal Engine Interface

Create a New Project
The first thing you will need to do is to create a new project. Follow the step-by-step guide we have provided below.
To create a new project, follow the steps below and refer to the images provided:
- Select or Create a New Project Page
- Select Games and click 'Next'

- Select Games and click 'Next'
- Select Template Page
- Select Blank and click 'Next'
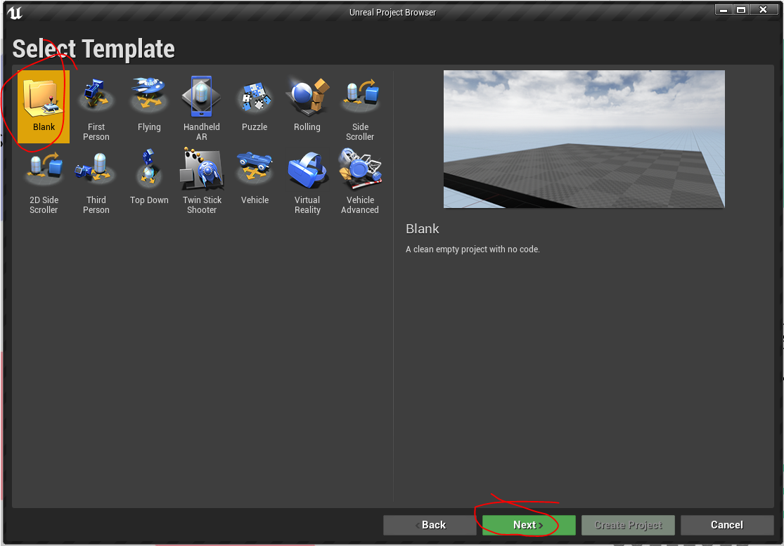
- Select Blank and click 'Next'
- Project Settings Page
- Select Blueprint from the Project Settings screen
- Select Enable Starter Content from the Project Settings screen
- Select the storage location for your project from the Project Settings screen
- Enter the name of your project in the Project Settings screen
- Once the above is complete click on 'Create Project'
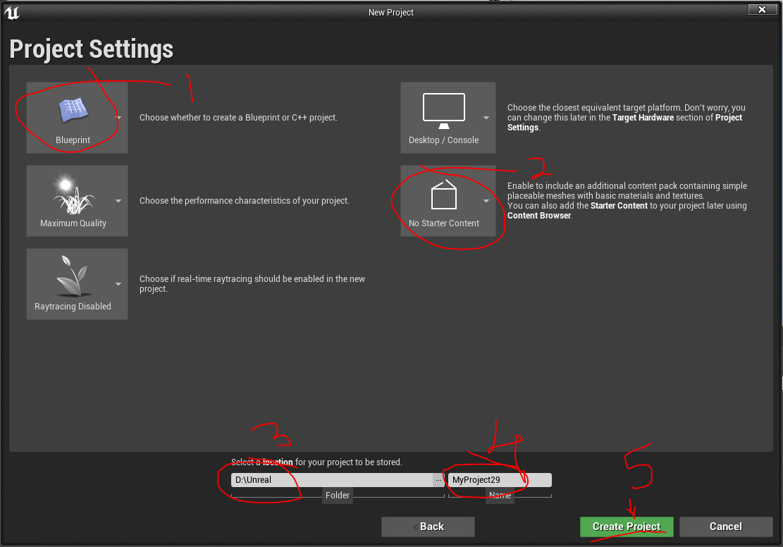
A note on Project Settings
The Project Settings tab allows you to select base project settings, such as target hardware and graphics quality, and to include some basic assets to work with.
Blueprint-based project or a C++-based project
- Blueprint is the visual scripting environment used to script functionality for a game project.
- C++-based projects allow users to program functionality in the traditional manner of writing
Target hardware
With this, you can choose between the following options:
- Desktop/Console
- Mobile/Tablet
Target graphics
With this, you can choose between the following options:
- Maximum Quality or Scaleable
- 3D or 2D
These options change the project's default settings for content development.
Starter Content
Here you can add basic assets to your project to work with.
Using the interface
Once you have created your new project, you should now see the UE Interface. The main UE Editor interface, referred to as the Level Editor, is primarily used for world and Level building and for asset placement. The UE Interface is comprised of seven (7) core sections as outlined in the image below. Click expand on each of the numbered sections below the image to find out about each.
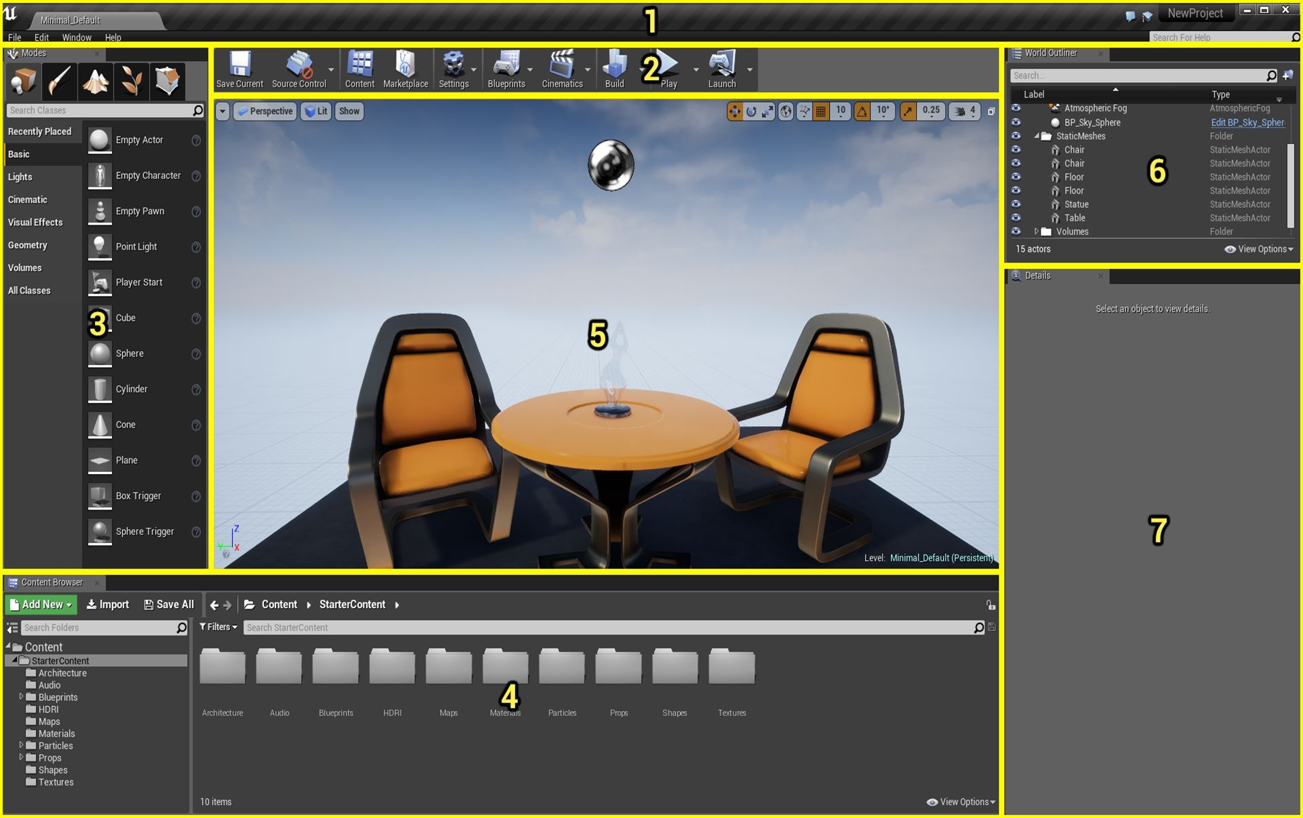
The menu bar consists of File, Edit, Window, and Help menus.
- File contains operations for loading and saving projects and Levels.
- Edit has your standard copy-and-paste operations, as well as Editor preferences and project settings.
- Window opens Viewports and other panels.
- Help contains links to external resources, such as online documentation and tutorials.
The Level Editor toolbar provides quick access to commonly used tools and operations, such as;
- Saving the current Level
- Building pre-calculated lighting for static Actors
- Changing Editor display properties
- Playtesting the current Level
The Content Browser is the primary area for creating, importing, organizing, viewing, and modifying content assets within the Unreal Editor. It also provides the ability to manage content folders and perform other useful operations on assets, such as renaming, moving, copying, and viewing references.
The Content Browser can search for and interact with all assets in the game.
The Viewports are your window into the worlds you create in Unreal. They can be navigated just as you would in a game, or they can be used in a more schematic design sense, as you would for an architectural blueprint.
The Unreal Editor Viewports contain a variety of tools and visualizers to help you see exactly the data you need.
Controls for the Viewport
Unlike in other 3D applications, which are set up for focusing and orbiting around a single asset as it’s being built, the Unreal Engine Viewport movement controls are designed for set-dressing large game Levels, where moving through large areas quickly is key.
Navigating Perspective
| Control | Action |
|---|---|
| Left-click + drag | Moves the Viewport camera forward and backwards and rotates left and right. |
| Right-click + drag | Rotates the Viewport camera in place without forward or backward movement. |
| Left-click + right-click + drag | Moves the Viewport camera up and down in the world. |
| Ctrl + Alt + click + drag | Creates a marquee selection box. |
| Hold RMB + WASD keys | Moves you through the Level as you would in a typical first-person shooter. |
Orbiting, Dolly, and Track
You can still work with Actors the same way as you do in traditional 3D applications.
| Control | Action |
|---|---|
| F key | Focuses the Viewpott camera on the selected Actor in the VIewport. |
| Alt + LMB + drag | Tumbles the Viewport around a single pivot or point of interest. |
| Alt + RMB + drag | Dollies (zooms) the camera toward and away from a single pivot or point of interest. |
| Alt + middle click + drag | Tracks the camera left, right, up and down in the direction of the mouse movement. |
The World Outliner panel displays all the Actors within the current Level in a hierarchical tree view.
You can select an Actor simply by clicking its name in the World Outliner panel. The selected Actor’s properties will show up in the Details panel (7).
The Details panel displays all the editable properties for a selected Actor. Common properties include:
- The name of the Actor
- Transform edit boxes for moving, rotating, and scaling the Actor
- Rendering display properties
Learning Activity
Create a new Blueprint project using the following:
- Third-person template
- Desktop/Console
- Maximum Quality
- With Starter Content
- Find differences in Content Browser
- Find differences in World Outliner
- Play the game
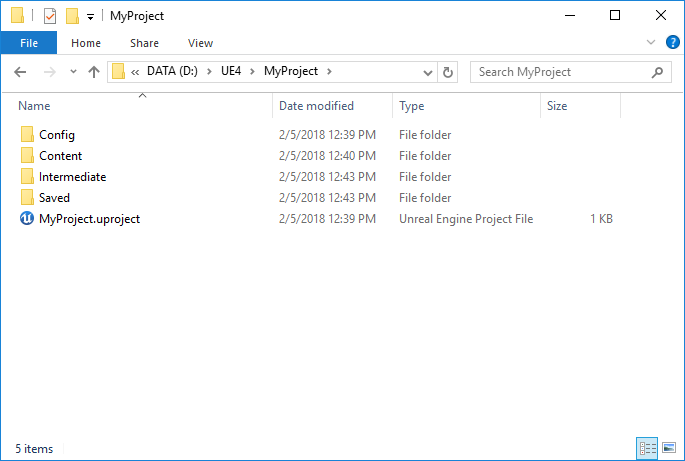
Unreal Engine Folder Structure
The folder structure of Unreal Engine projects is organized to keep assets, configurations, and code in a structured and manageable way. Once a project is created, the Editor copies a collection of default folders and files into the project folder. Check the folders in the Content browser in UE4 and the folder Content in the Project folder.
Learning Activity
Explore the following templates:
- First-person
- Third-person
- Vehicle
Epic Games Launcher

The Epic Games Launcher is a digital distribution platform and game launcher developed by Epic Games. It serves as a central hub for accessing and managing various aspects of Epic Games' products and services. The launcher is primarily known for its role in distributing and updating games developed by Epic Games, including the immensely popular battle royale game, Fortnite.The Epic Games Launcher consists of four main tabs;
Marketplace: Discover and explore a vast marketplace of game assets, tools, and resources. Find everything you need to enhance your gaming projects, from stunning visuals and captivating sound effects to powerful scripts and plugins. Unleash your creativity and take your games to the next level with the Marketplace.
Library: Access and manage all your Epic Games titles in one convenient location. Your digital game collection awaits you in the Library, where you can easily install, update, and launch your favourite games. Organize your gaming experience and never miss a beat with quick and seamless access to your entire game library.
Unreal Engine: Experience the power of Unreal Engine, the industry-leading game development platform. Dive into a world of endless possibilities as you create stunning, immersive, and high-performance games. From design to deployment, Unreal Engine provides you with the tools and resources to bring your visions to life.
Learn: Expand your knowledge and skills with comprehensive learning resources tailored to developers of all levels. Whether you're a beginner or an experienced developer, Learn offers a variety of tutorials, documentation, and videos to help you master the intricacies of game development. Stay up-to-date with the latest techniques and best practices in the ever-evolving world of game design.
Blueprints in Unreal Engine democratize game development, allowing a wider range of individuals to contribute to the creation of interactive experiences.
Blueprints in Unreal Engine are a visual scripting system that allows developers, including those without extensive programming knowledge, to create gameplay mechanics, behaviours, and interactions using a node-based interface. Instead of writing code in a traditional programming language, developers can construct game logic and behaviour using interconnected nodes that represent functions, variables, and events.
Blueprints offer several benefits:
- Visual and intuitive: Blueprints provide a visual representation of game logic, making it easier to understand and follow the flow of events. The node-based interface allows developers to create and connect nodes to define the behaviour of game elements, reducing the complexity of traditional coding.
- Faster iteration: With Blueprints, developers can quickly prototype and iterate on game ideas. The visual nature of Blueprints enables rapid experimentation and tweaking of game mechanics, allowing for more efficient development cycles.
- No programming background required: Blueprints empower non-programmers, such as artists or designers, to contribute to the development process. They can create interactive gameplay elements, tweak parameters, and implement behaviours without relying heavily on programming assistance.
- Code-agnostic collaboration: Blueprints provide a common ground for collaboration between programmers and non-programmers. Programmers can implement complex systems using code, while non-programmers can create and modify game behaviour using Blueprints. This promotes cross-disciplinary collaboration and fosters a more inclusive development environment.
- Extensibility and modularity: Blueprints can be easily reused and modified. They can be encapsulated into custom Blueprint nodes for better organization and efficiency. This modularity allows for the creation of libraries of reusable functionality, saving development time and effort.
- Debugging and error handling: Blueprints include debugging tools that enable developers to identify and troubleshoot issues more efficiently. Developers can track the flow of execution, inspect variables, and set breakpoints within the Blueprint graphs, making it easier to locate and resolve errors.
- Seamless integration with C++: Blueprints can work in conjunction with C++ code. Developers can use Blueprints for high-level logic and leverage C++ for more performance-intensive operations. The combination of Blueprints and C++ provides a flexible and powerful development environment.
Blueprints in Unreal Engine streamline the development process, promote collaboration, and offer an accessible and visual approach to implementing game logic and behaviours.
Let's start with the basics of Blueprints. As mentioned above, Blueprint is a complete gameplay scripting system based on the concept of using a node-based interface to create gameplay elements from within the Unreal Editor. As with many common scripting languages, it is used to define object-oriented (OO) classes or objects in the engine.
There are six different Blueprint types, although the most common and the ones you will be using the most are 'Level Blueprint' and 'Blueprint Class':
- Level Blueprints
- Blueprint Class
- Data-Only Blueprint
- Blueprint Interface
- Blueprints Macros
- Animation Blueprints
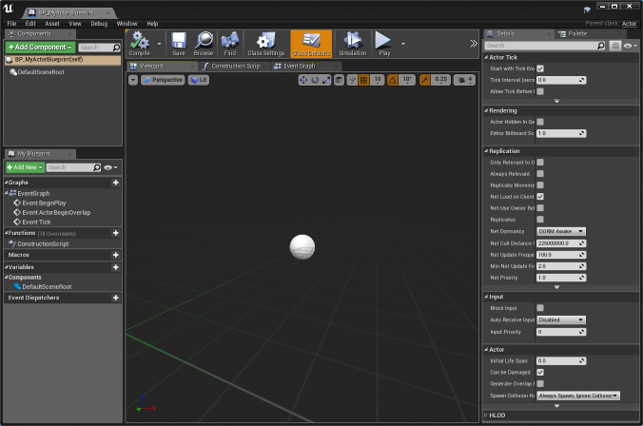
The Blueprint Editor is comprised of five (5) core sections as outlined in the image below.

- Menu Bar
- Tool Bar
- My Blueprint
- Details
- Graph Editor
Let's take a look at the most important aspect of this interface, the Graph Editor. This is where most of the development will take place.
The Graph Editor
The Graph Editor in Blueprints is a powerful visual tool in Unreal Engine that allows developers to create and modify complex logic and behaviour with ease. Through a node-based interface, the Graph Editor enables the creation of intricate connections and relationships between nodes, representing functions, variables, and events. It provides an intuitive and efficient way to design and organize the flow of gameplay, making it accessible to both programmers and non-programmers alike. Let's start by understanding the controls of the Graph Editor, click on the expand button below to view.
| Control | Action |
|---|---|
| Right-click + drag | Pans the Event Graph |
| Mouse scroll | Zoomd the Event Graph in and out |
| Right-click in empty space | Brings up the Blueprint Context Menu |
| Click on node | Selects the node |
| Click + drag in empty space | Selects the nodes inside the marquee selection box |
| Ctrl + click + drag in empty space | Toggles selection of the nodes inside the marquee selection box |
| Shift + click + drag in empty space | Adds the nodes inside the marquee selection box to the current selection |
| Click + drag on the node | Moves the node |
| Click + drag from pin to pin | Wires the pins together |
| Ctrl + click + drag from pin to pin | Moves wires from the origin pin to the destination pin |
| Click + drag from pin to empty space | Brings up the Blueprint Context Menu showing only the relevant nodes. Wires the original pin to a compatible pin on the created node |
| Alt + Click on a pin | Removes all wires connected to the pin |
Let's begin by taking a look at the Blueprint Editor by watching the following video.
Having looked through the controls for the Graph Editor, let's take a look at the different components and steps associated with the development pipeline.
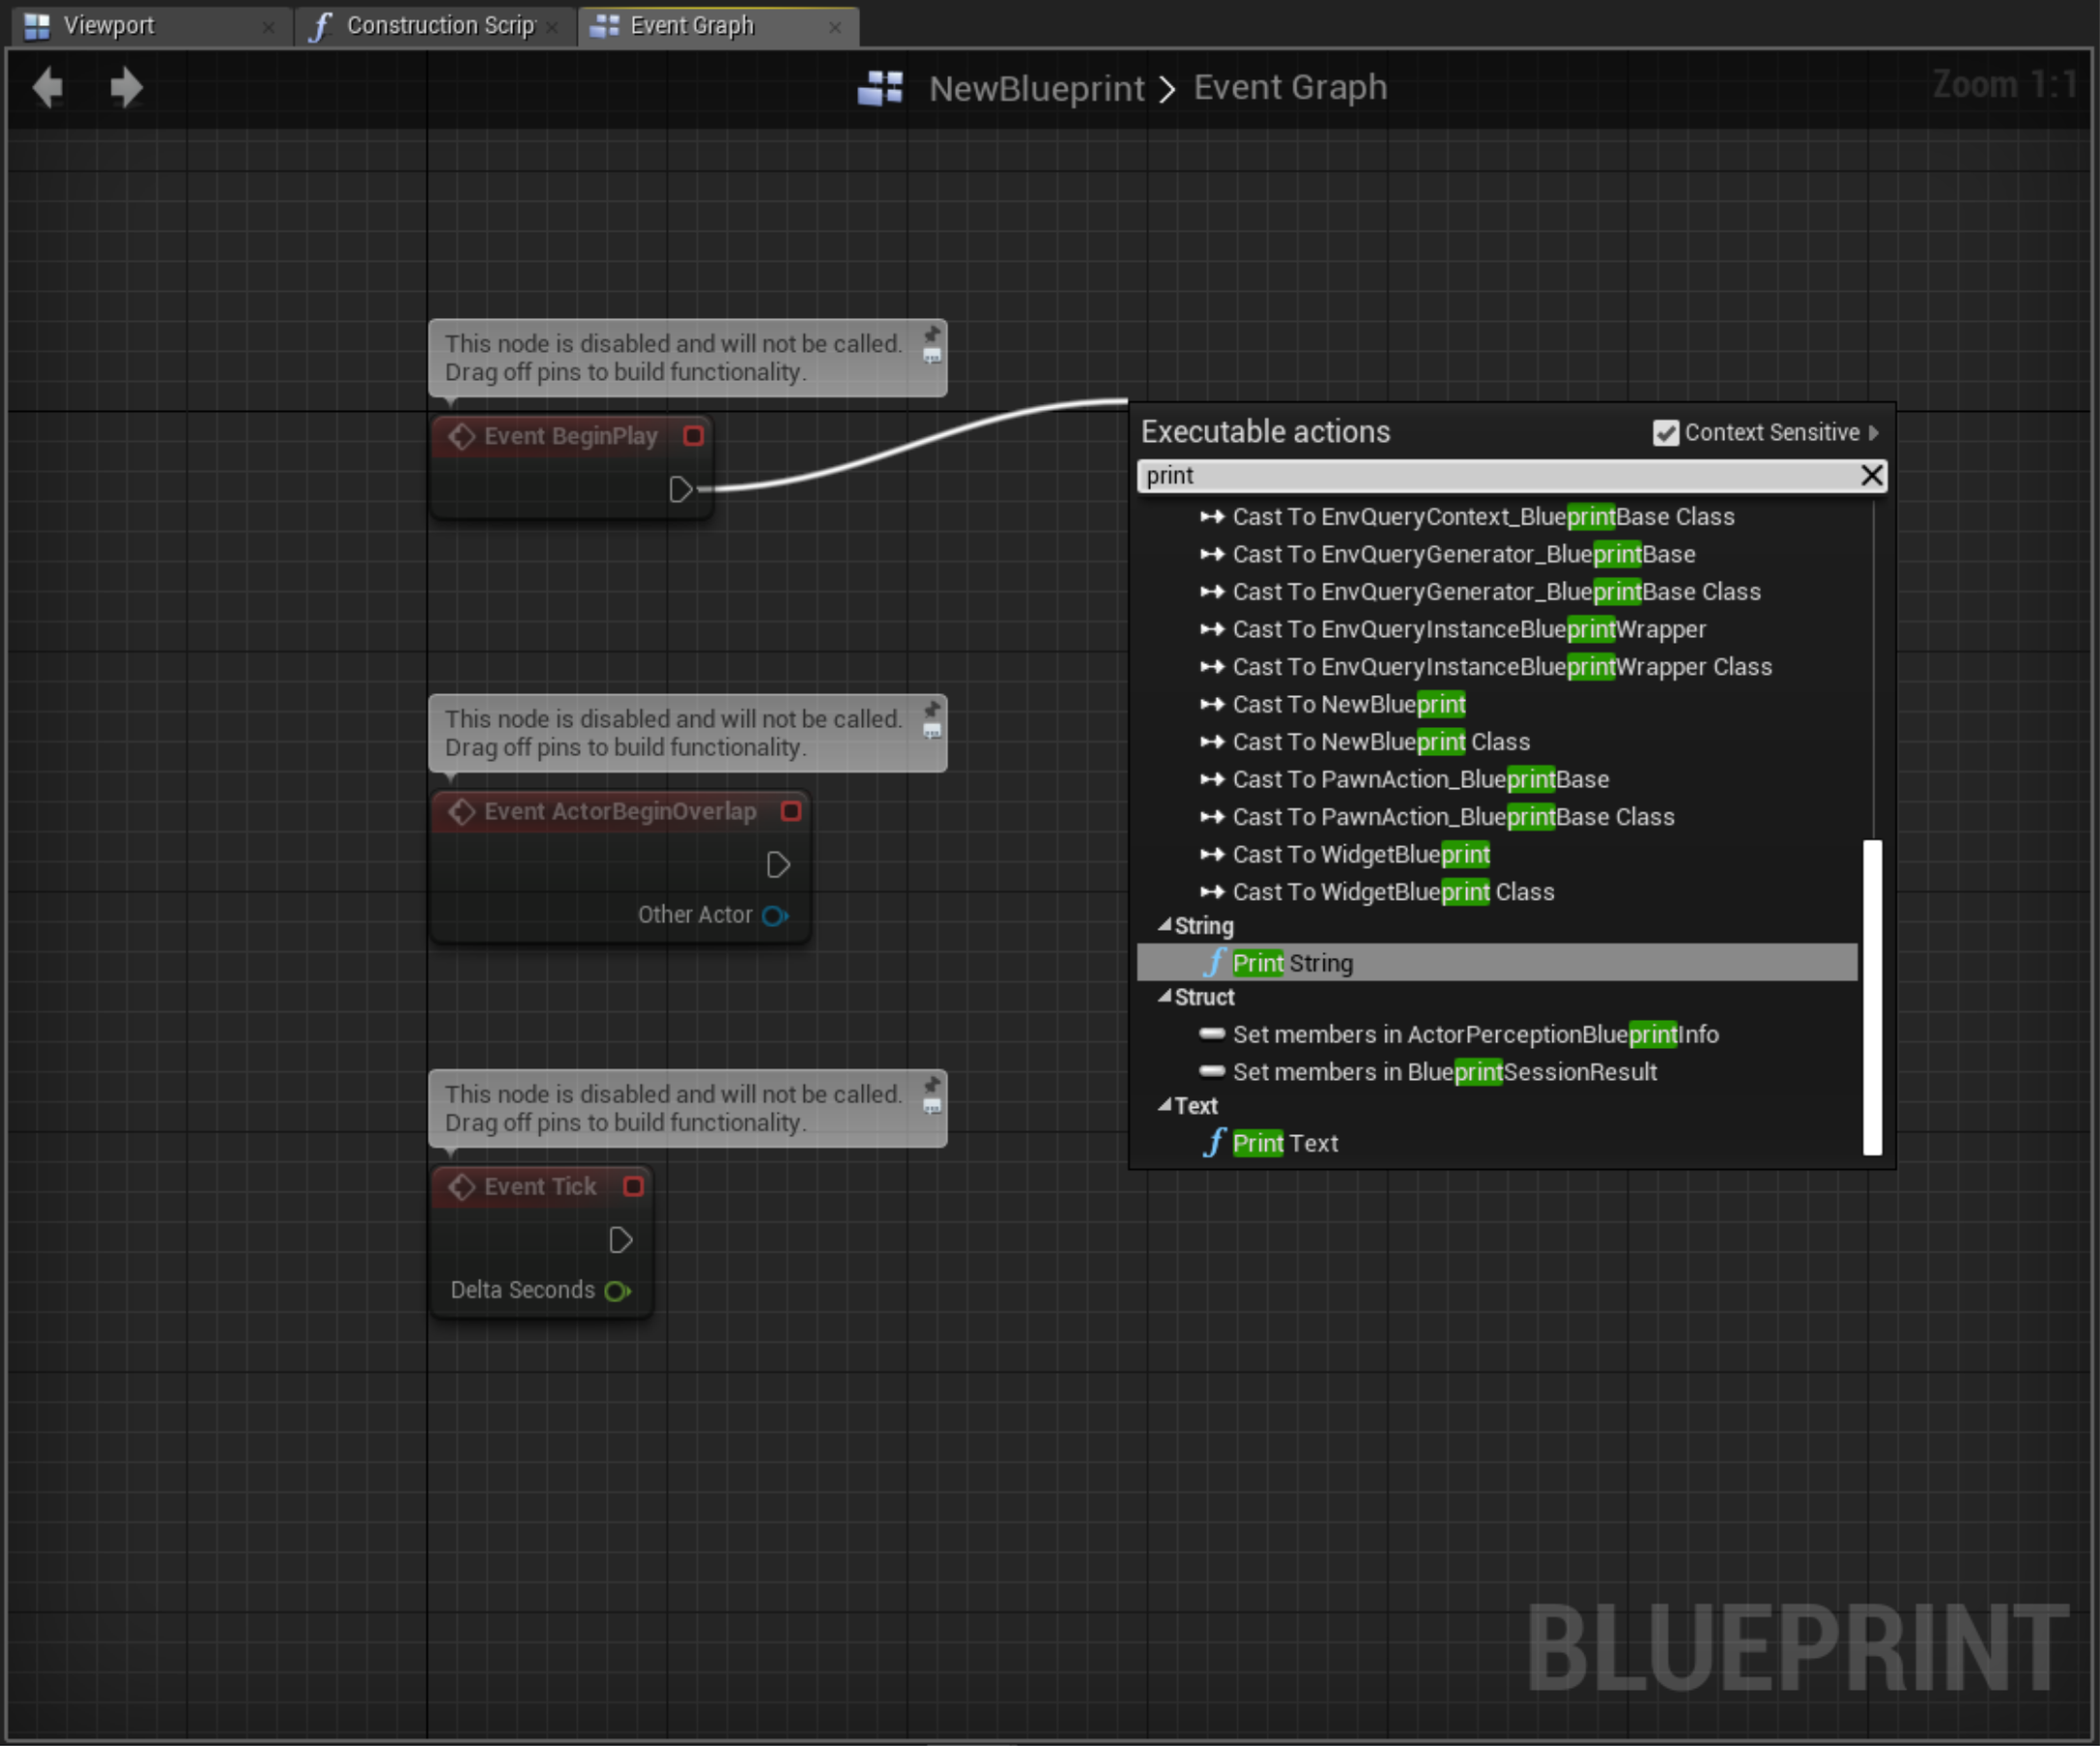
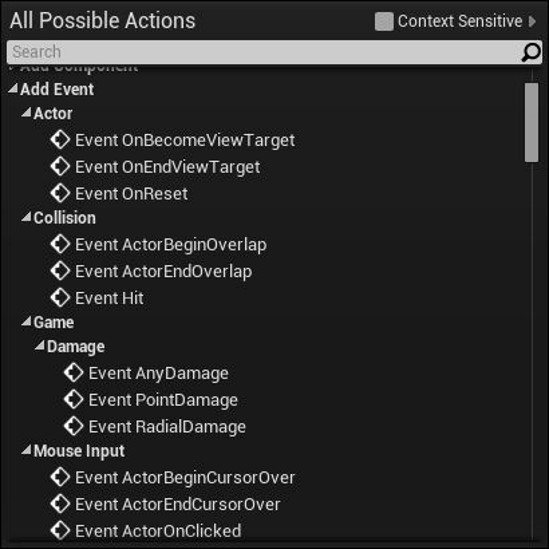
The Blueprint Context Menu is used to add events, functions, and conditional nodes to the Graph Editor. It is context-sensitive by default and can be opened by right-clicking on an empty location in the Graph Editor.
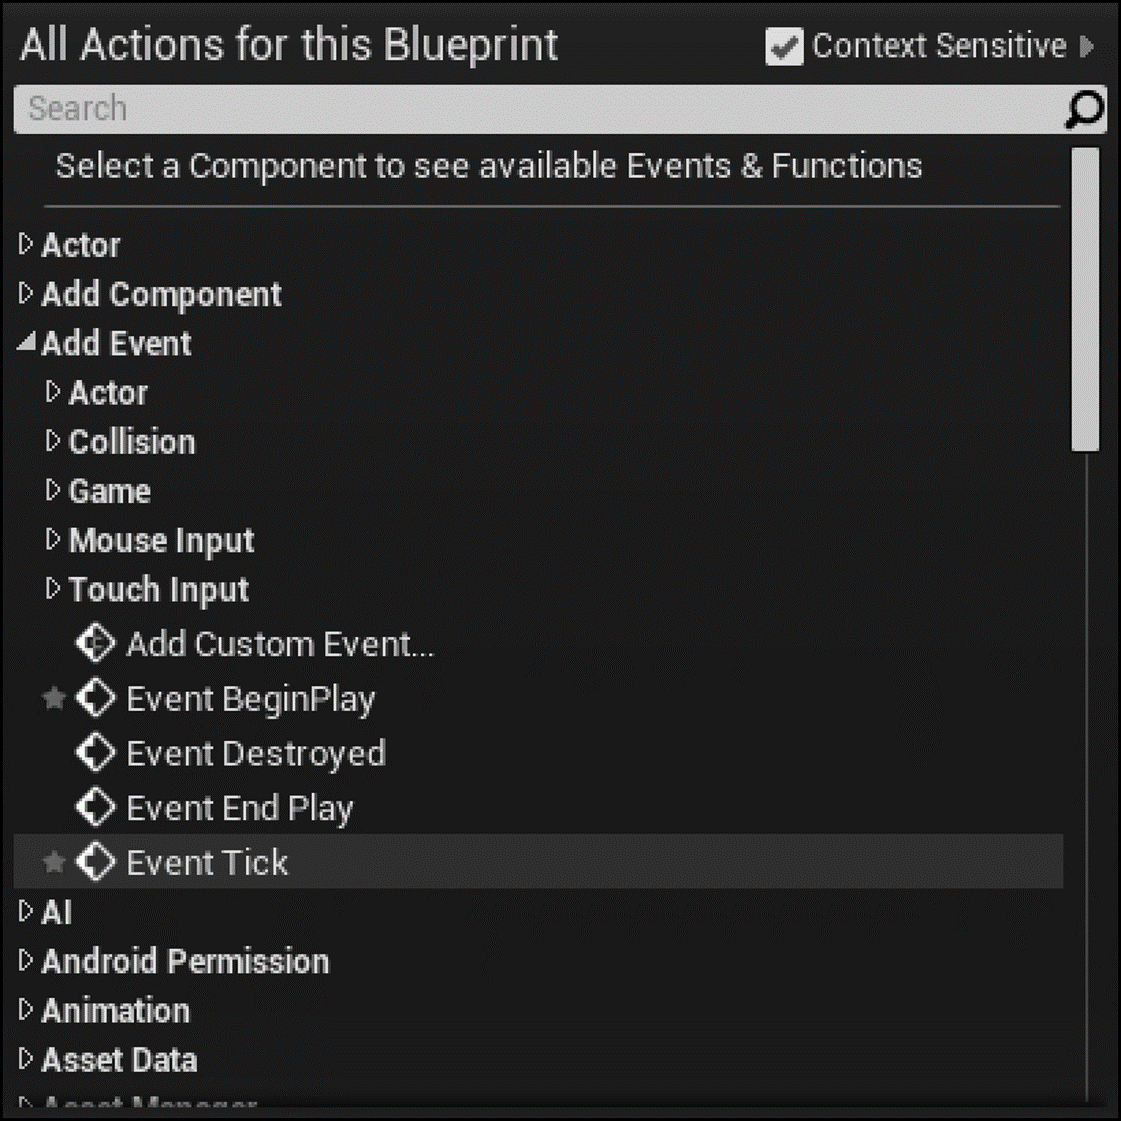
Nodes are objects such as events, function calls, flow control operations, and variables that can be used in graphs to define the functionality of the particular graphs and Blueprints that contain them. Each type of node performs a unique function; however, the way in which nodes are created and used is common to all nodes. This helps make for an intuitive experience when creating node graphs.
Placing nodes
New nodes are added to a graph by selecting the type of node from the Blueprint Context Menu. The node types listed in the context menu depend on how the list is accessed and what is currently selected.
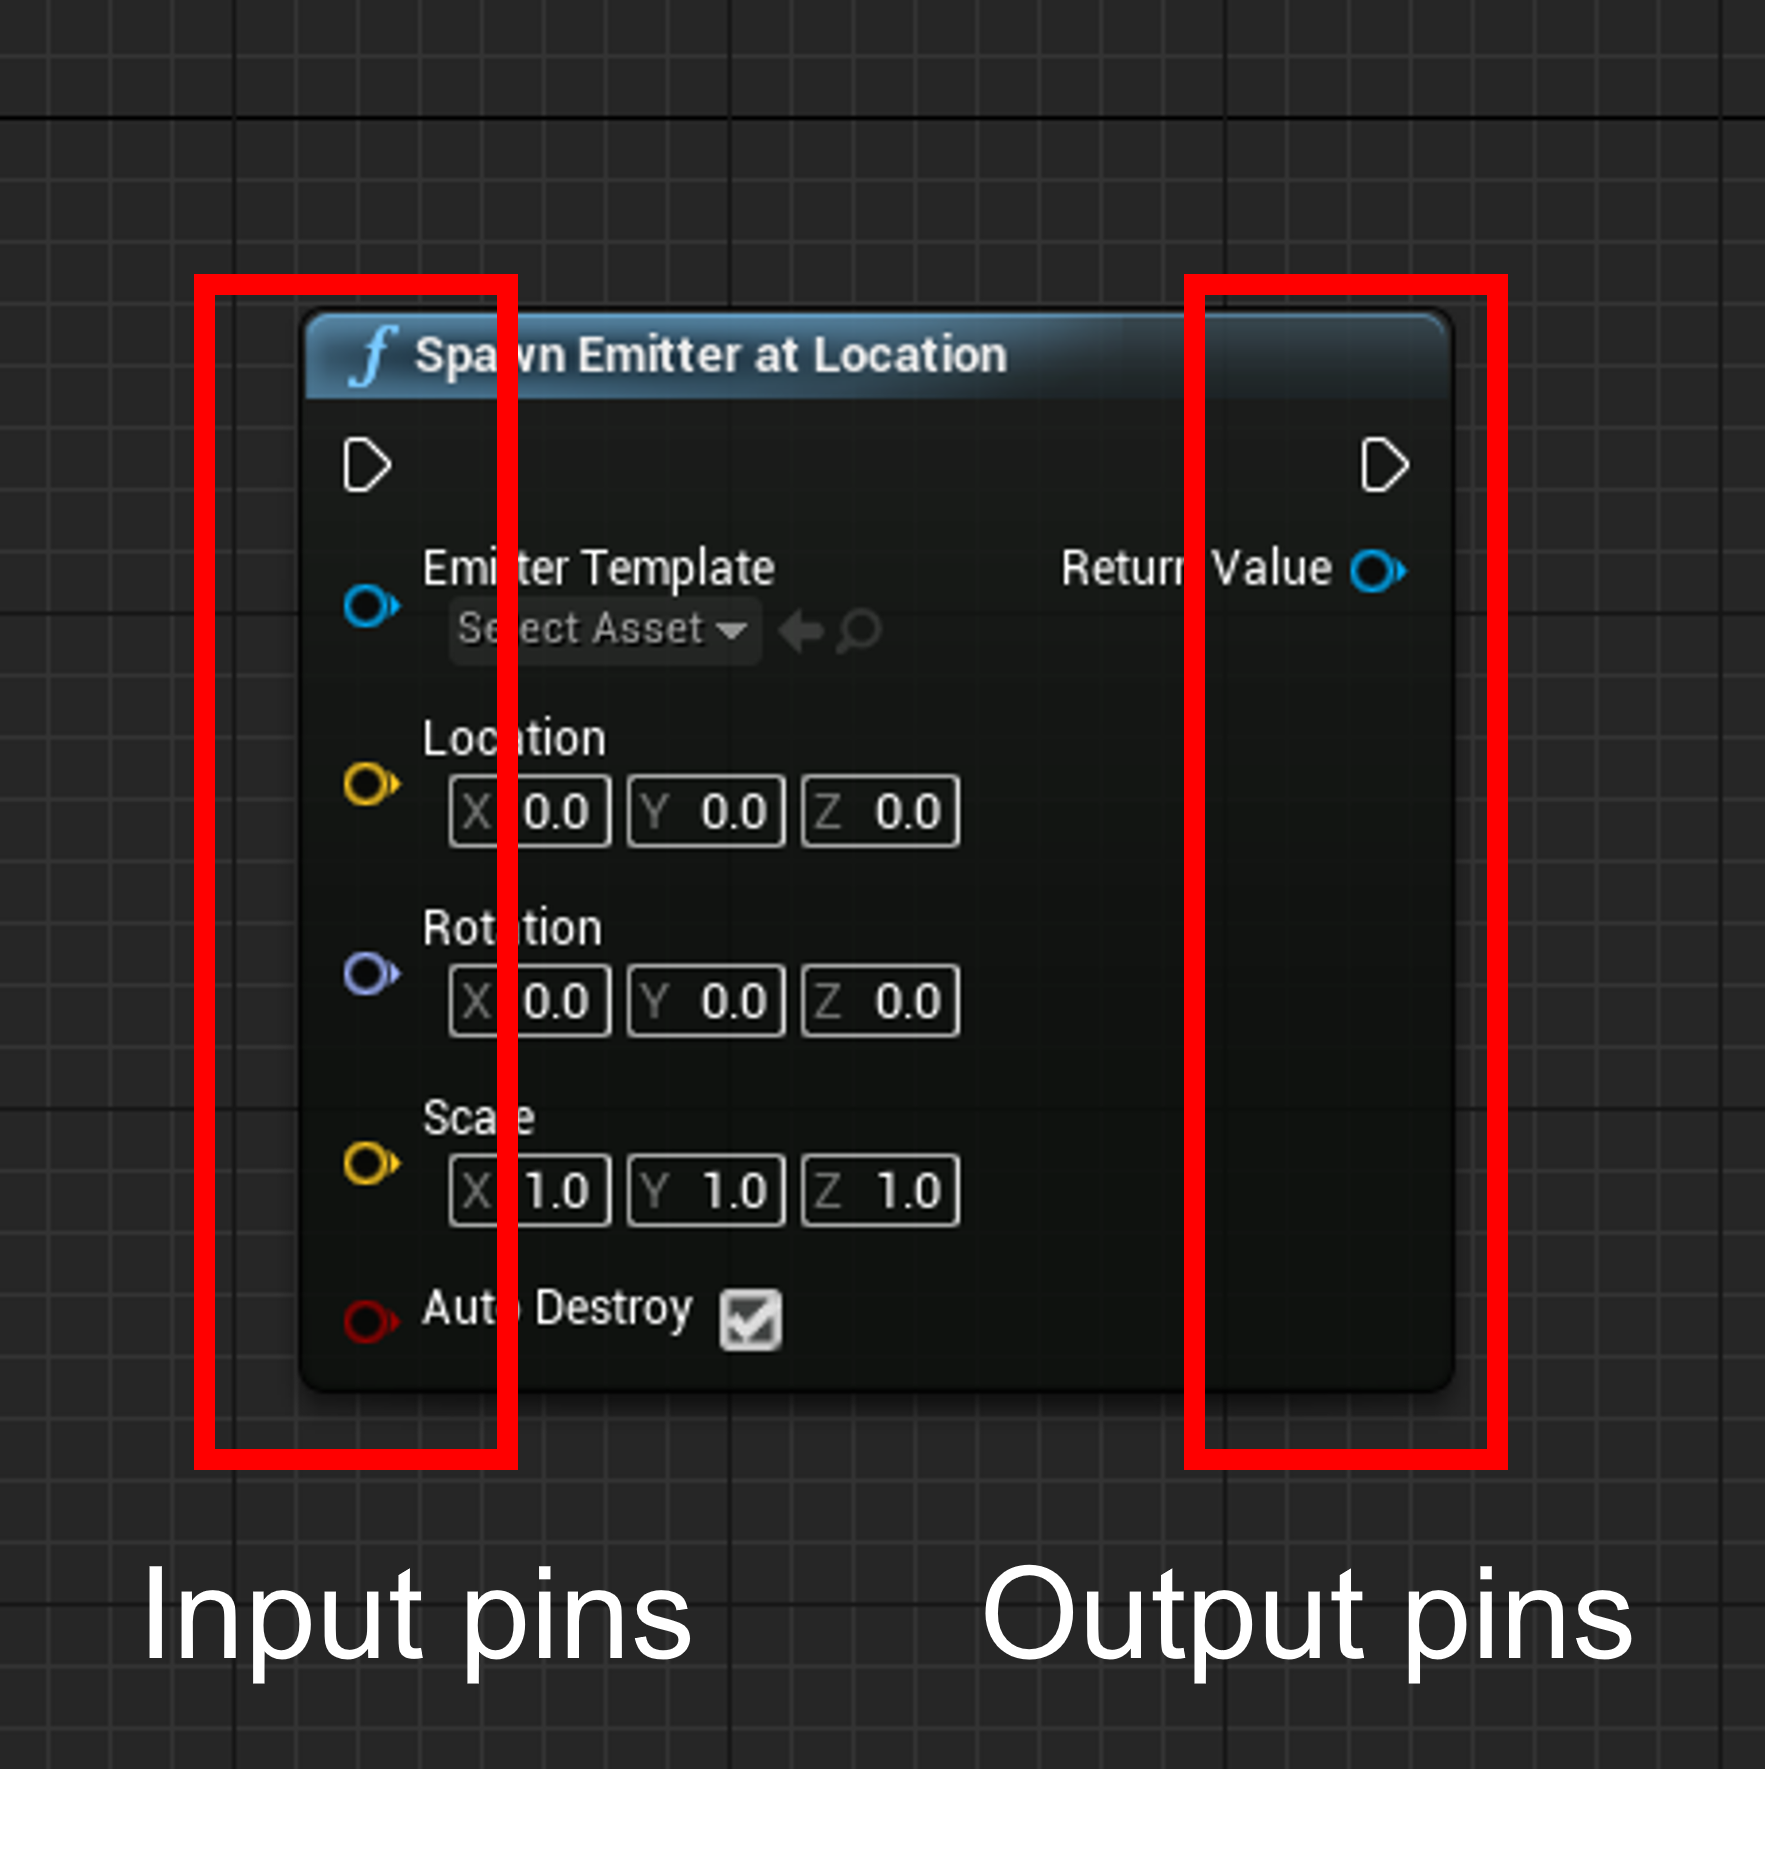
Nodes can have pins on either side. The pins on the left are input pins, and those on the right are output pins.
There are two main types of pins:
- execution pins
- data pins
In its simplest form, an event is something that happens during gameplay. It can be two objects colliding, the player Pawn entering a specified location, a Level restarting, or the mouse cursor hovering over an Actor. There are many different events that can happen during gameplay.
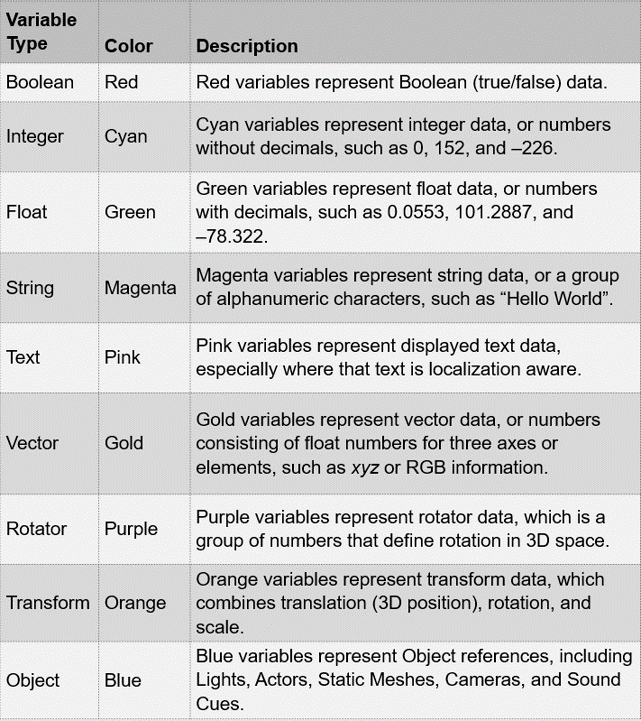
Variables store different types of data. When a variable is created, the computer sets aside a certain amount of memory, depending on the data type. That memory is then used to store or retrieve the information at that memory location. Different variable types use different amounts of memory.
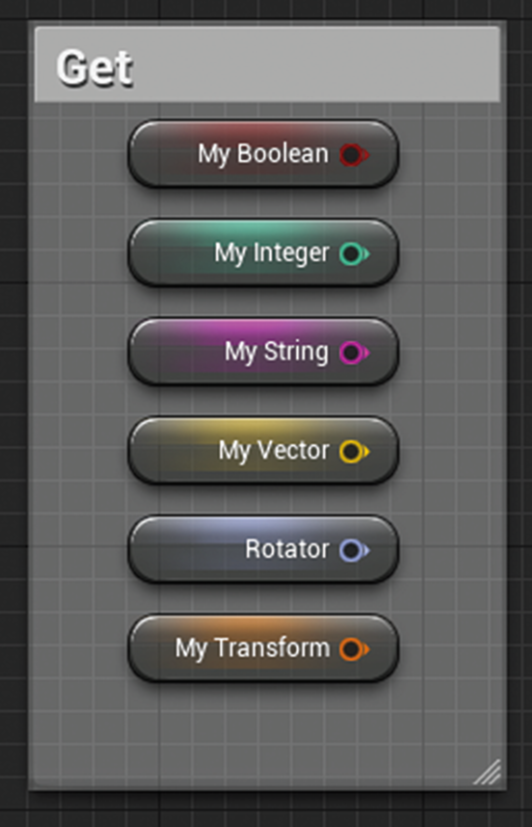
Variable Types
In the Blueprint Editor, variables are colour-coded so that you can quickly identify what variable type you are working with.
Variables are only good if you can change their states and compare them. Operators are nothing more than mathematical operations such as addition, subtraction, division, and multiplication. Operators are found under the Math heading in the context menu and are separated by variable type.
Conditionals such as >, <, and = allow you to compare variables. Depending on the result of the comparison, you can perform different function calls. Conditionals are also found under the Math heading in the context menu and separated by variable type.

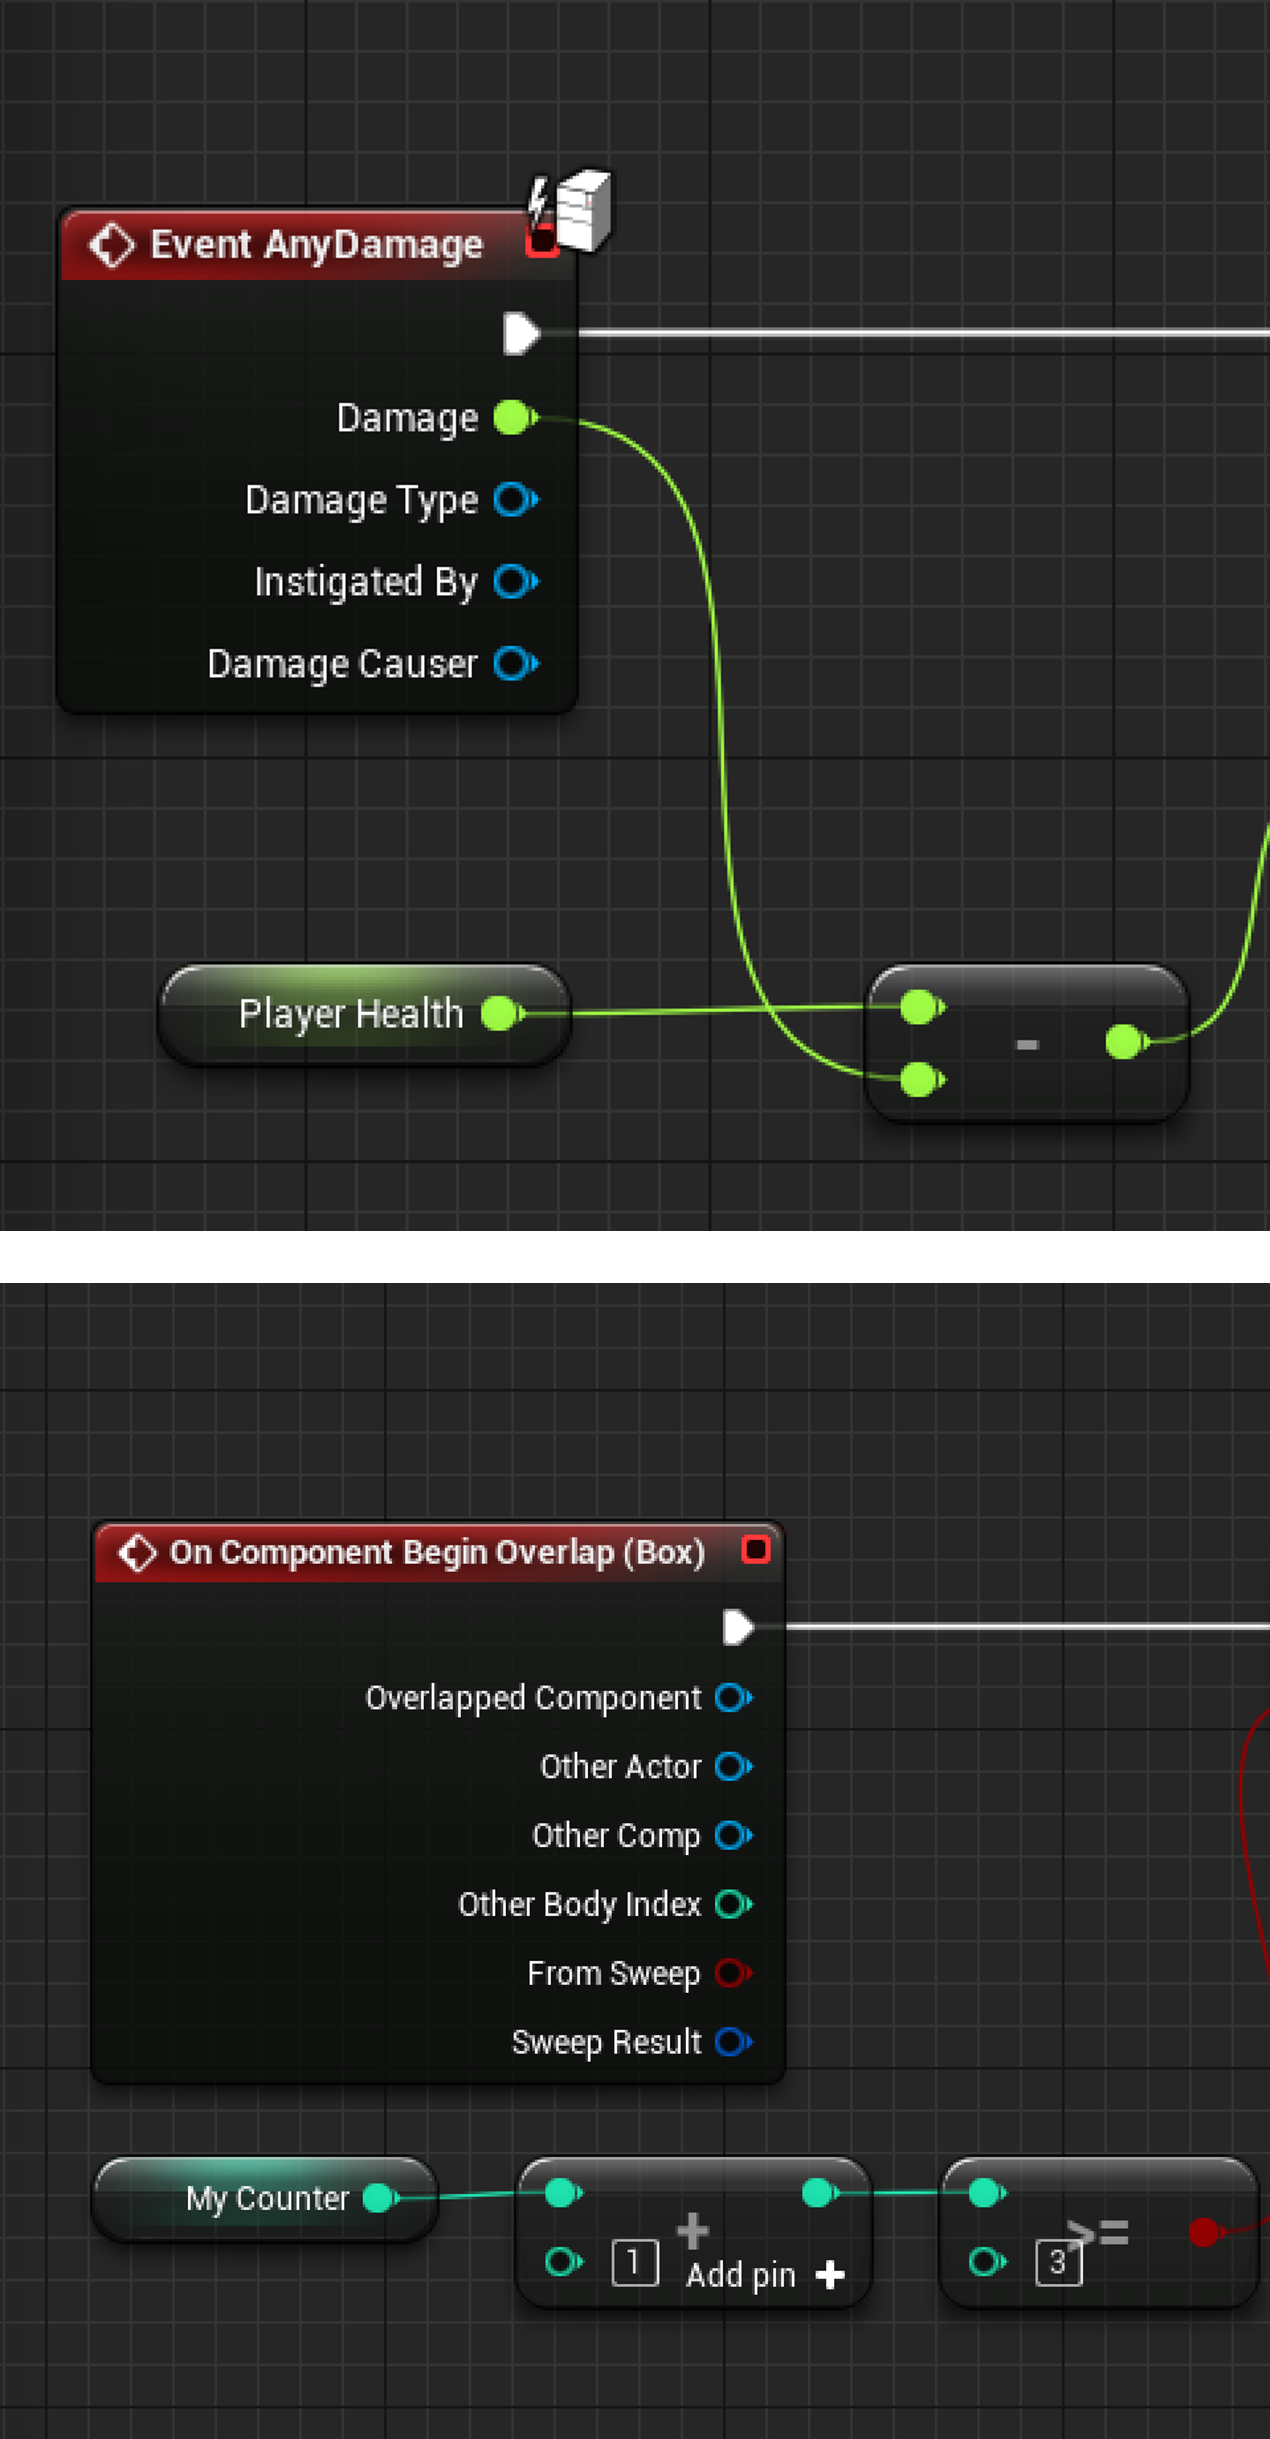
Flow control operations allow the flow of execution to be controlled explicitly in Blueprints. This control can be in the form of choosing one branch of the graph to execute based on whether some condition is true, executing a specific branch multiple times, executing multiple branches in a specific order, and so on.
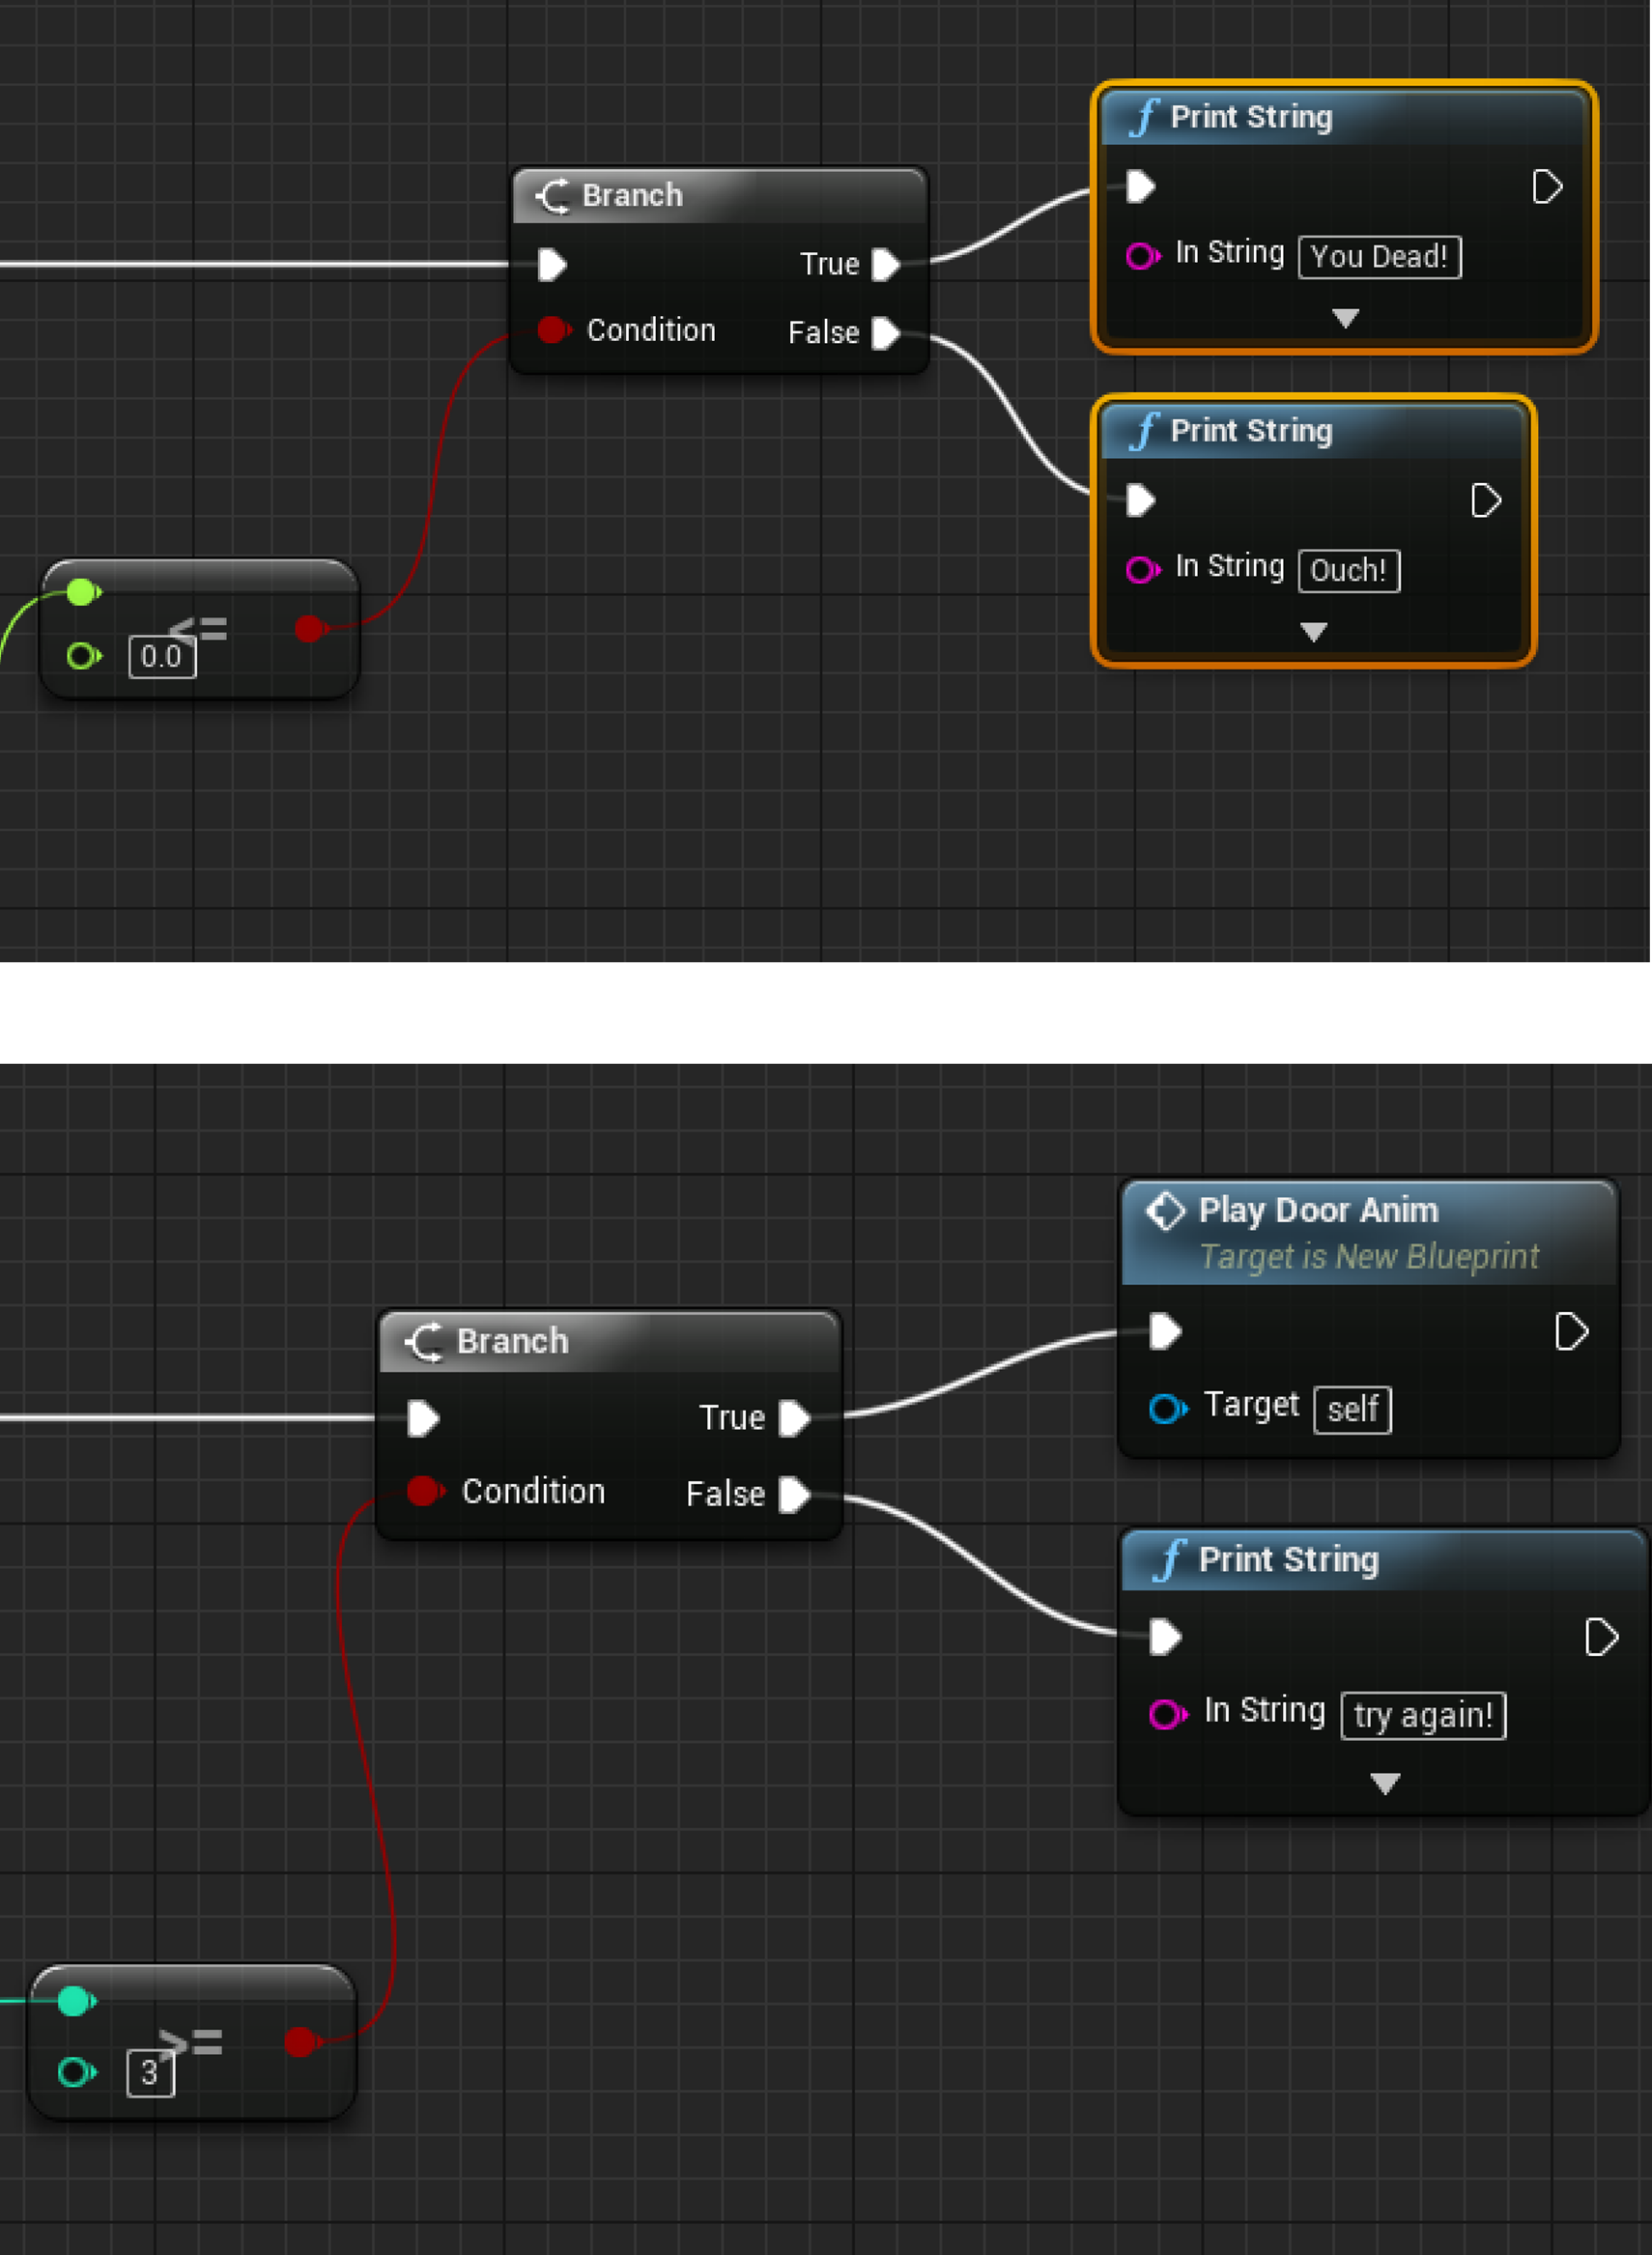
Flow control operations allow the flow of execution to be controlled explicitly in Blueprints. This control can be in the form of choosing one branch of the graph to execute based on whether some condition is true, executing a specific branch multiple times, executing multiple branches in a specific order, and so on.
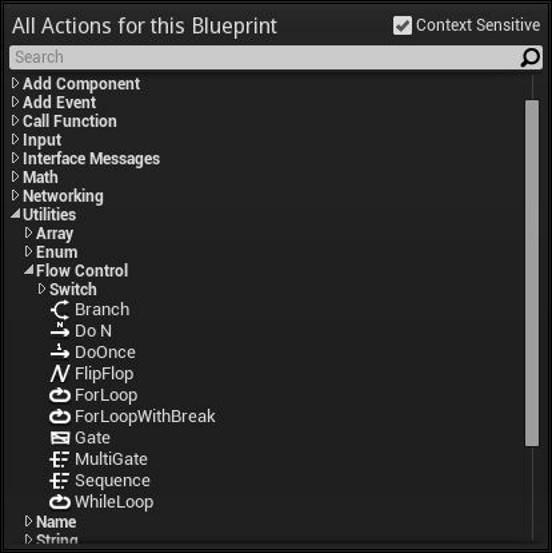
Loops will execute a set of commands or instructions in a loop until the conditions specified in the loop are met. /p>
Classes
Blueprint Classes serve as visual representations of classes, providing a node-based interface to define properties, functions, and interactions. Blueprint Classes make game development more accessible to non-programmers and promote rapid prototyping and iteration.
Actor Blueprint Classes
Actor Blueprint Classes in Unreal Engine are a specific type of Blueprint Class that represents game objects or entities within the game world. They serve as visual representations of Actors, which can include characters, objects, enemies, interactive elements, and more. Actor Blueprint Classes are created in the Blueprint Editor, where developers can define the properties, behaviour, and interactions of the Actors. Through the node-based interface, developers can add and connect nodes to implement logic, set variables, handle events, and customize the appearance and functionality of the Actors.
By leveraging Actor Blueprint Classes, developers can:
- Design and customize the appearance and properties of game objects, including their visuals, audio, and physical characteristics.
- Implement and define the behaviour and interactions of Actors, such as movement, animation, collision detection, and AI.
- Handle input and respond to player actions, allowing for interactive gameplay experiences.
- Create and manage game systems and subsystems, including game rules, scoring mechanisms, and game state transitions.
- Define interactions with other Actors and the game environment, enabling dynamic and immersive gameplay scenarios.
- Access and modify variables, properties, and functions of the Actors, both within the Blueprint and through interaction with other Blueprint Classes or C++ code.
Actor Blueprints can be placed in a Level, it is important to note however that Actor Blueprints contain almost nothing but a blank scene component and a 3D transform.
Creating Blueprint Classes
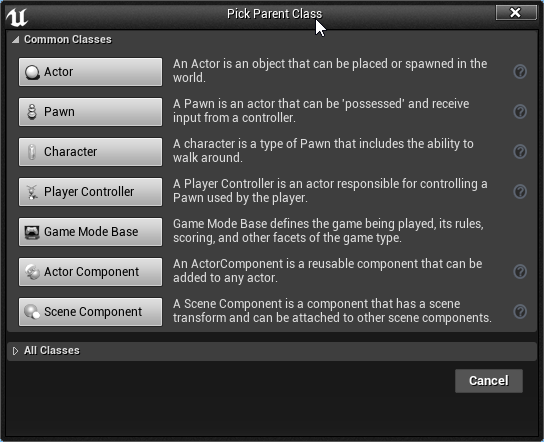
To create a Blueprint class, use either the Add New button or the context menu that appears when you right-click in the Content Browser. Select Blueprint Class from the list.
You will be presented with the Pick Parent Class dialogue. Here you can select the class that your Blueprint will inherit from.
Now we have learned the basics of the blueprint editor, it is now time to try it yourself.
Learning Activity
Build a Battery Collector Game
Your game must follow the conditions below:
Game Objective:
- Collect batteries to stay alive as long as you can
Features:
- Collect batteries that are scattered throughout the level
- The player's speed will slow down as he runs
- If the player's speed drops below 5 then they die
- When the player collects a battery their speed increases by a certain value
Now you have created your first game in Unreal Engine, let's level up and look at how we can create a First Person Shooter Game from in Unreal Engine. To do this you'll need to familiarize yourself with several key aspects and tools of the engine:
- Character Classes
- Inputs
- Projectiles
Let's start by looking at Character Classes.
Character Classes
Character classes play a crucial role in creating the player's character (first-person view) and managing its movement, animations, and interactions with the game world. Character classes serve as the foundation for the player's experience in the FPS game, enabling smooth movement, shooting mechanics, and interaction with the environment.
| Character Class | Description |
|---|---|
| First-Person Character | In an FPS game, the player's character is usually represented by the first-person camera view, where the player sees through the eyes of the character. The Character class acts as the base for the first-person character, handling its movement, input, and other functionalities. |
| Skeletal Mesh and Animation | Character classes typically include a Skeletal Mesh component representing the character's arms and weapon. The arms and weapons are visible in the first-person view, providing visual feedback to the player. Animation Blueprints control how the Skeletal Mesh responds to different movement states, such as walking, running, aiming, and shooting. |
| Character Movement Component | Unreal Engine's Character Movement Component provides essential settings for handling first-person character movement, such as walking, running, jumping, and crouching. It allows for smooth and responsive movement, and developers can customize movement settings to suit the game's requirements. |
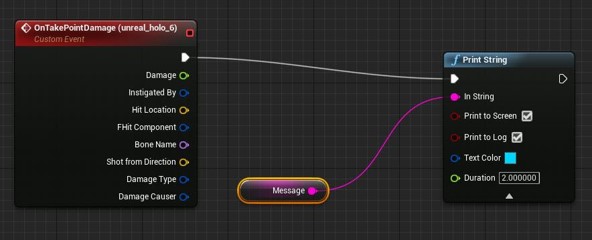
| Shooting Mechanics | FPS games require shooting mechanics to allow the player to fire weapons. The Character class should be equipped with shooting functionality. Implement a shooting system using ray tracing or hit scan methods to detect hits and apply damage to enemies or objects. (we will look at this in more detail in a further section) |
| Input Handling | The Character class handles input from the player, such as mouse movement for camera rotation and keyboard inputs for movement and actions. Implement input controls to allow the player to look around, move, jump, crouch, and shoot. (we will look at this in more detail in the next section) |
| Health and Damage | Include a health system for the first-person character to manage its health points and handle damage. Implement health depletion and character death handling to provide player feedback on their character's status. |
| Interaction with the Environment | Characters in FPS games need to interact with the game environment, such as picking up items or opening doors. Implement interaction mechanics to allow the first-person character to interact with interactable objects in the game world. |
| Animations and Feedback | Ensure that animations and audio cues provide clear feedback to the player during various actions, such as shooting, reloading, and taking damage. |
By managing movement, shooting mechanics, animations, and interactions, the Character class facilitates the core gameplay elements necessary for an enjoyable FPS game.
Inputs
Inputs are essential for enabling player interaction and controlling the character's movements and actions. Unreal Engine provides various methods for handling inputs, allowing players to move, look around, shoot, and perform other actions within the game world.
| Inputs | Description |
|---|---|
| Player Input Component | Unreal Engine utilizes the Player Input Component to handle player input in a flexible and organized manner. The Player Input Component allows you to bind functions in your Character Blueprint to specific input actions, such as moving, jumping, shooting, and interacting. |
| Action Mapping and Axis Mapping | Unreal Engine distinguishes between Action Mapping and Axis Mapping for handling different types of inputs. Action Mapping is used for discrete inputs, such as firing a weapon or jumping. When the player presses the input key, the associated action is executed. Axis Mapping is used for continuous inputs, like mouse movement for camera rotation or gamepad thumbstick movement. The input value is continuously updated based on the player's actions. |
| Input Events and Functions | You can define custom input events and functions in your Character Blueprint to respond to specific input actions. For example, you can create functions for shooting, reloading, crouching, and other player actions triggered by input events. |
| Look (Mouse) Input | Handling look input (mouse movement) is crucial for the first-person camera rotation. By using the "Add Controller Pitch Input" and "Add Controller Yaw Input" functions in the Character Blueprint, you can rotate the camera based on mouse movement. |
| Movement Input | Implementing movement input is essential for controlling the character's motion in the game world. Use functions like "Add Movement Input" to move the character based on the player's input for forward, backwards, left, and right movement. |
| Shooting Input | Create functions to handle shooting input, which spawns projectiles or applies damage to enemies. By binding the shooting function to a specific key or mouse click, you enable players to shoot their weapons. |
| Jumping and Crouching | Allow the player to jump and crouch by creating functions that modify the character's movement accordingly. Bind these functions to the corresponding input keys to enable smooth player interaction. |
| Interactions | Implement input events for interacting with objects in the game world, such as picking up items or opening doors. Create functions to perform interactions based on the player's input. |
| Key Bindings and Input Configurations | Unreal Engine provides options for customizing key bindings and input configurations, allowing players to remap keys to their preference. |
| Multiplayer Input | For multiplayer games, ensure that input handling is properly replicated across the network to maintain consistent gameplay for all players. |
Implementing and handling inputs effectively in your first-person shooter game is crucial for providing players with a responsive and immersive gaming experience. By using Unreal Engine's input system and customizing the input handling in your Character Blueprint, you can create a smooth and enjoyable FPS gameplay that players can control easily and intuitively.
Projectiles
In the context of developing a first-person shooter (FPS) game in Unreal Engine, projectiles are virtual objects that represent ammunition or bullets fired from weapons. Projectiles allow you to simulate realistic weapon mechanics, such as shooting and hitting targets at a distance. Implementing projectiles involves handling their spawning, movement, collision, and impact effects to create an engaging shooting experience in your FPS game.
| Projectile Blueprint | Description |
|---|---|
| Projectile Blueprint | In Unreal Engine, you create projectiles using a Projectile Blueprint. This Blueprint defines the behaviour, appearance, and impact effects of the projectile. The Projectile Blueprint typically contains a Static Mesh representing the visual appearance of the bullet, along with logic for movement and collision. |
| Spawning the Projectile | When the player shoots a weapon, the game spawns a projectile from the weapon's muzzle (the end of the barrel). Upon firing, you create an instance of the Projectile Blueprint and set its initial position and direction to match the weapon's muzzle. |
| Projectile Movement Component | Unreal Engine provides a Projectile Movement Component that handles the physical movement of the projectile. You can set the projectile's speed, trajectory, and other movement properties using this component. |
| Collision Detection | The Projectile Blueprint needs to have collision enabled to detect hits with other actors in the game world. When a projectile collides with an object, it triggers an event, allowing you to handle the impact and apply damage or other effects. |
| Hit Detection and Damage | When a projectile collides with an enemy, you can detect the hit using collision events. Calculate the damage to apply to the enemy based on factors like the weapon's damage output, distance from the impact point, and the enemy's health. |
| Particle Effects and Sound | To enhance the shooting experience, consider adding particle effects and sound cues to the projectile's impact point. Use particle systems to create explosion effects or bullet impacts, and play sound effects to simulate the sound of bullets hitting objects. |
| Projectile Lifespan | You can define a lifespan for projectiles to limit their travel distance and prevent them from moving indefinitely. After a certain time or distance, the projectile is destroyed to free up resources. |
| Ray Tracing or Hit Scan | Depending on your game's requirements, you can use ray tracing or hit scan techniques for projectile detection. Ray tracing calculates the projectile's trajectory and detects collisions along the path, while hit scan instantly checks for collisions in a straight line from the weapon to the target. |
| Network Replication | In multiplayer games, ensure that the projectile's spawning, movement, and collision detection are properly replicated across the network to maintain consistency for all players. |
Implementing projectiles is a fundamental aspect of FPS game development in Unreal Engine, as they directly contribute to the shooting mechanics and overall gameplay experience. By creating realistic and responsive projectiles, you can deliver a satisfying shooting experience that engages players and makes your FPS game more enjoyable.
So now we have the background on each of these. Let's take a look at how it all comes together, through this tutorial:
Learning Activity
Build a First Person Shooter Game
Develop a First Person Shooter game, for this task, you can use your imagination to develop whatever you want as long as it is a first-person shooter game.
Third-person games have gained widespread popularity due to their unique advantages and appeal to a diverse audience. In this perspective, the player views the character from behind and can see the character's movements, actions, and surroundings.
One of the key reasons for their success is the immersive experience they offer. With the third-person perspective, players can see their in-game character from behind, which fosters a stronger connection with the avatar and enhances the sense of presence in the game world. The third-person perspective also aligns well with character-driven storytelling, allowing players to witness their character's emotions and reactions to the game's events. This emotional connection enhances the narrative experience and fosters a deeper engagement with the game's story. In terms of accessibility, the third-person perspective is considered more natural by some players, making it easier to understand and control the character, especially for those new to video games or experiencing motion sickness in first-person games.
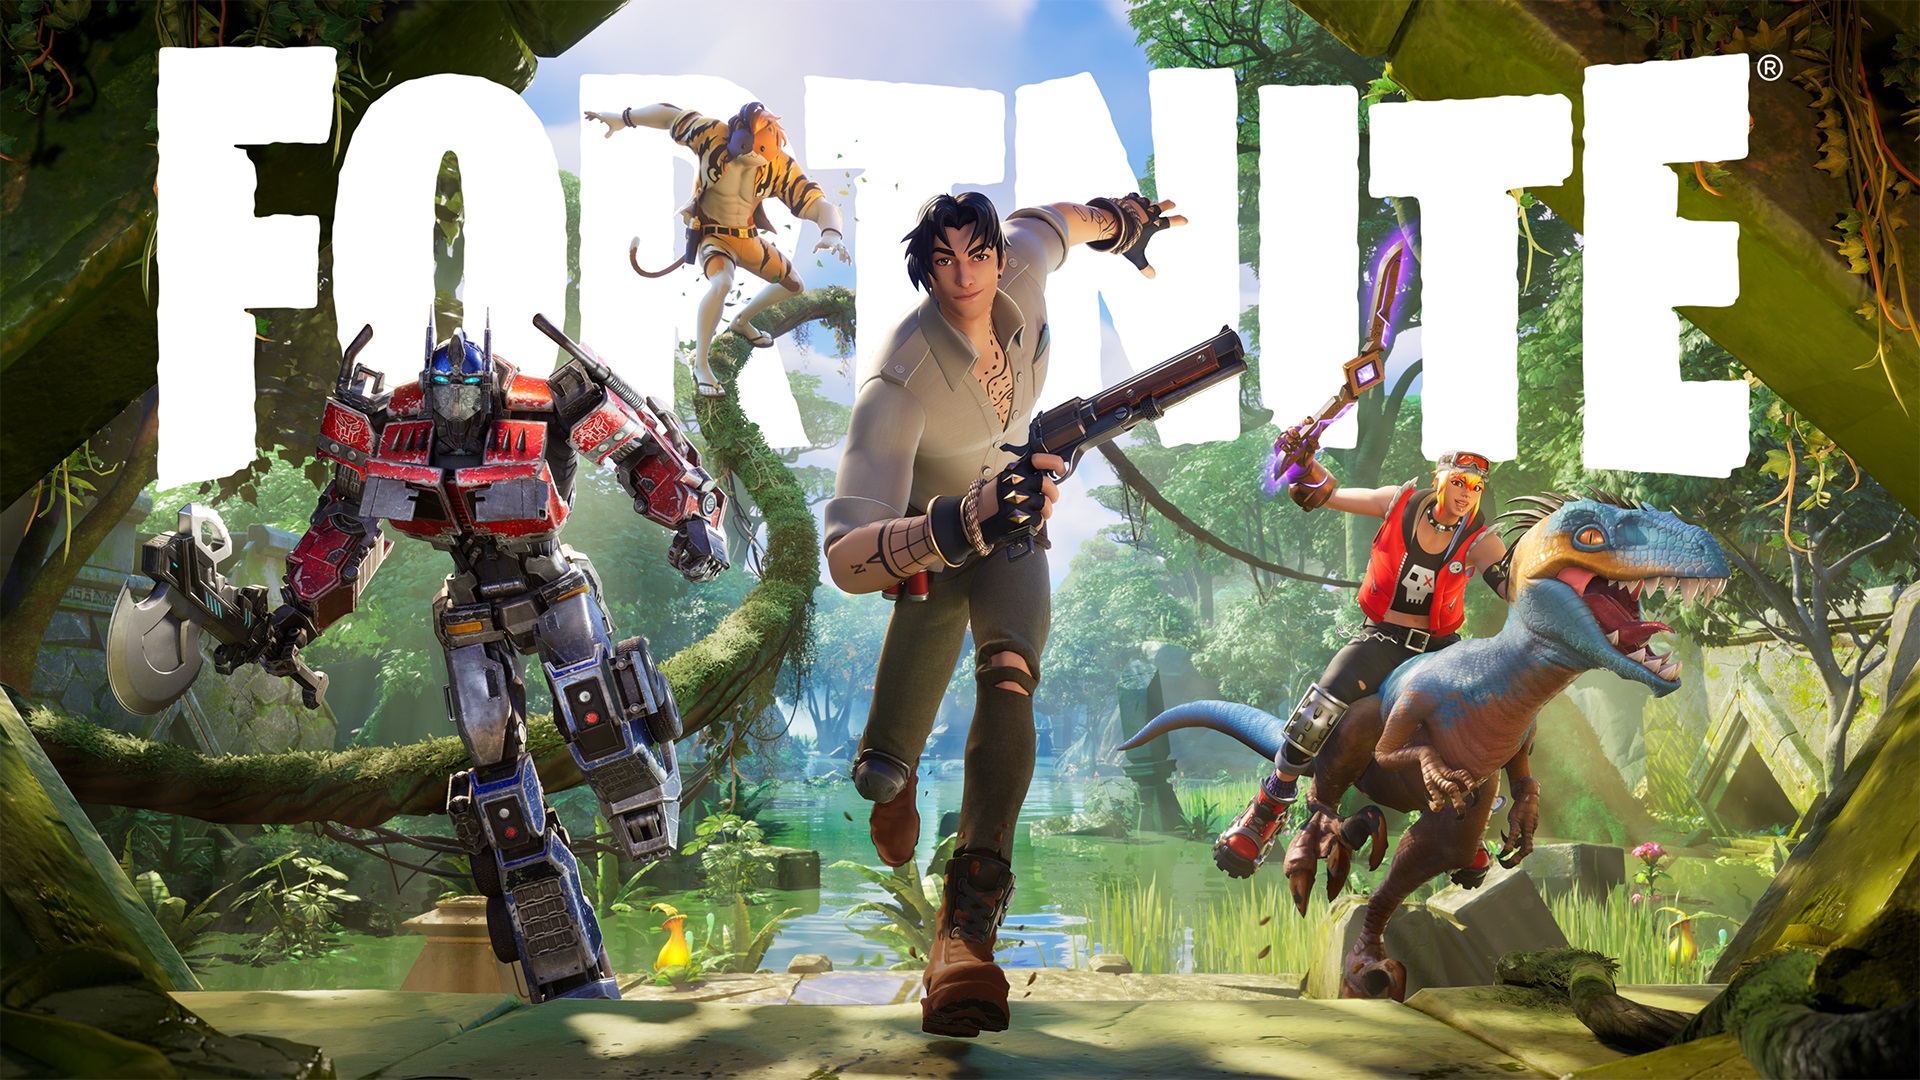
One of the most famous Unreal Engine games 'Fortnite', uses this third-person style of mechanics. Let's take a look at the recent update to Fortnite in Unreal Engine 5.
As seen in the UE5 release for Fortnite, third-person games often showcase impressive character designs, animations, and visually appealing environments. Players can fully appreciate the artistic aspects of the game as they explore the world from a cinematic perspective. It is for this reason that creating the right Character Class and utilising the right Animation Blueprints are essential for success.
Let's look at character class in this context.
Character Class
The Character class serves as the backbone of the character's movement, input handling, and interaction with the game world. It allows developers to define how the character responds to player input, handles navigation, and interacts with objects and enemies. Additionally, the Character class facilitates the implementation of combat mechanics and character customization.
Step 1: Define your character - Create a Character Blueprint that will serve as the foundation for your player character. This Blueprint will handle the character's movement, animations (we will explore this in more detail below), and interactions with the environment.
Step 2: Track your character - Once you have your character blueprint it is then important to consider the camera in a third-person game. The third-person camera follows the character from behind and above. The camera should allow the player to view the character and the surrounding environment. You can use the Spring Arm Component in Unreal Engine to attach the camera to the character and provide smooth and dynamic camera movement. Consider implementing camera adjustments based on the character's movement or actions. For example, the camera can zoom in during combat or dynamically adjust its position during specific events.
Step 3: Move your character - Unreal Engine provides a Character Movement Component that handles the character's movement. This component allows you to control the character's walking, running, jumping, and crouching behaviour. Customize the Character Movement Component's properties to fit your game's desired movement mechanics, such as adjusting the character's speed or jump height.
Step 4: Control your character - Implement input controls to enable the player to move the character and perform actions. You can handle input through the Player Controller or directly in the Character Blueprint. Map the player's input (keyboard, mouse, gamepad) to appropriate actions, such as moving the character, jumping, and interacting with objects in the game world.
Step 5: Define how your character interacts with the world - Add interaction mechanics to allow the character to interact with the environment. For example, the character should be able to pick up items, open doors, or trigger events. Create animations for these interactions to provide visual feedback to the player and make the character's actions more immersive. If your game involves combat, implement combat mechanics such as attacking and defending. You can add animations for combat actions and handle damage and health using the Health and Damage system.
Step 6: What happens to your character when... - Set up collision detection for the character and other objects in the game world to ensure the character interacts realistically with the environment. Use physics simulations for certain objects, such as physics-based puzzles or destructible objects, to add depth to the gameplay.
Remember that developing third-person mechanics is a dynamic process that may require iteration and fine-tuning to achieve a polished and engaging gameplay experience. Unreal Engine provides powerful tools and features to assist you in creating a satisfying third-person game.
As outlined previously, creating compelling characters is just part of the reason for the popularity of third-person games. It is the animation that can often be the difference between an average game and an amazing game. So let's now take a look at the animation blueprints for a third-person game.
Animation Blueprints
Animation Blueprints play a pivotal role in controlling the character's animations, ensuring smooth and realistic movements in response to player actions. Animation Blueprints manage character movement, combat actions, and environmental interactions, enhancing the player's immersion in the game world. By combining the functionalities of Character class and Animation Blueprints, developers can create lifelike and responsive third-person characters, making the gameplay more engaging and enjoyable for players.
Think about the steps above in Character Class then consider what animation is required for each of those components.
Animation Blueprints are important for developing the character class. Animation Blueprints control the character's movement animations, such as walking, running, jumping, crouching, and other locomotion actions. By using Animation Blueprints, you can create seamless and fluid transitions between different movement states, making the character's actions feel natural and responsive. In third-person games, characters often engage in combat and perform various actions. Animation Blueprints allow you to define combat animations for attacks, blocking, dodging, and other actions. These animations add depth and visual feedback to the player's interactions with the game world.
But Animation Blueprints are much more than just the character, these can use Blend Spaces or Blendspaces, which enable smooth blending between different animations based on the player's input or character state. For example, a Blend Space can be used to blend between different directions and speeds when the character is moving, resulting in realistic movement animations. Animation Blueprints can also incorporate Aim Offset nodes, which allow the character to aim and look in different directions independently from their movement. Aim Offset is especially important for third-person shooting games, as it ensures that the character's upper body aligns with the player's aiming direction. Additionally, Animation Blueprints use state machines to manage the character's animations based on their current state and input. State machines provide a structured and organized way to handle animation transitions, making it easier to manage complex character animations.
Ok, so now we understand the components of the Animation Blueprints in Unreal Engine in the context of third-person games, let's look at ways to achieve them by importing them.
Mixamo
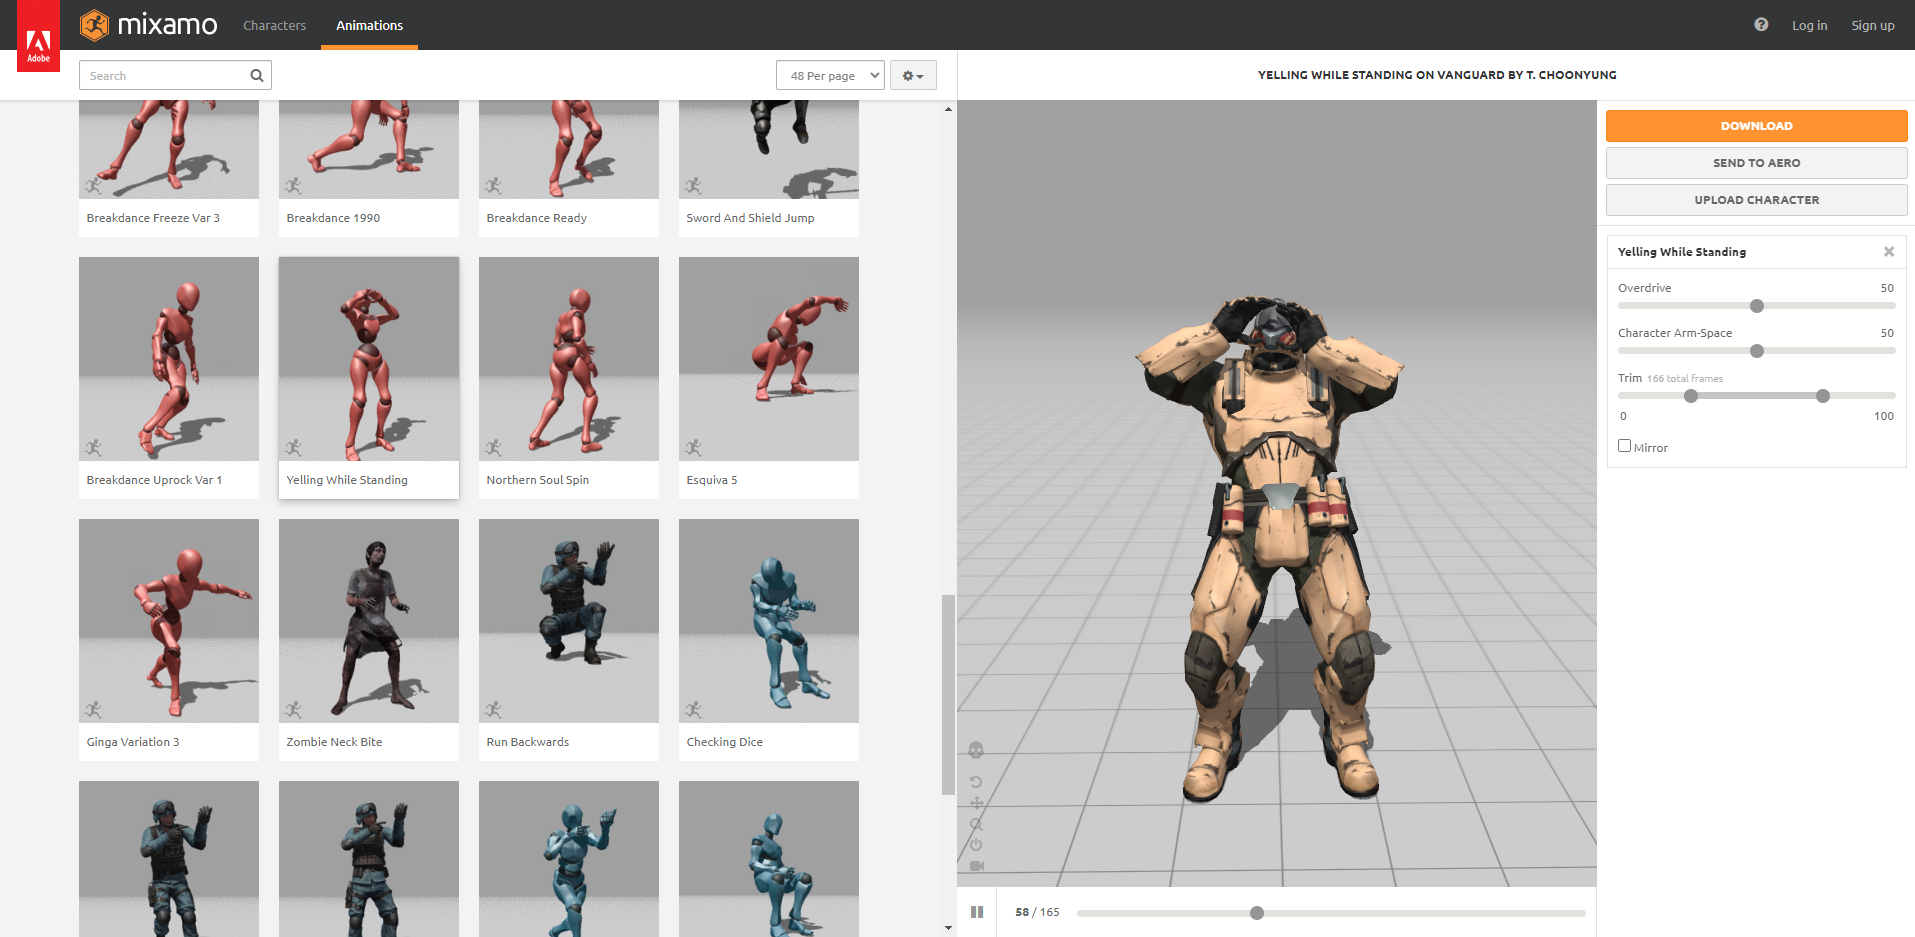
Mixamo is a web-based service and platform provided by Adobe that offers a vast library of high-quality 3D character animations and ready-to-use character rigs. It allows game developers, animators, and designers to easily access and use pre-made animations for their projects, saving time and effort in the animation creation process.
Mixamo provides an extensive library of motion-captured and hand-crafted 3D character animations, covering a wide range of actions and movements such as walking, running, jumping, combat animations, and more. Mixamo also offers a collection of pre-built character rigs with a standardized skeleton and controls. These rigs are designed to work seamlessly with the animations available in the Mixamo library. The standardized rigs ensure that the animations can be applied to different characters, and they simplify the process of integrating animations into a project. These can be downloaded directly from the Mixamo website.
When using Mixamo animations, you can download them in various formats, including FBX, which is a commonly used file format for 3D models and animations. Once downloaded, you can import the FBX files into your 3D modelling or game development software, such as Unreal Engine or Unity. While Mixamo animations are designed to work with specific character rigs provided by Mixamo, if you have a custom character rig, you can use retargeting tools within your 3D software to adapt Mixamo animations to your rig. Retargeting allows you to map the animation data from the Mixamo rig to your custom rig, ensuring that the animations can be applied to your specific character model.
Mixamo's animations are created by professional animators, and the library offers a wide variety of motions suitable for different character types and game genres. This ensures that you can find high-quality animations that match the style and requirements of your project.
Now let's take a look at an example of utilising Mixamo to create a third-person game in UE.
In Unreal Engine, UI (User Interface) and Widgets are essential components that allow developers to create interactive and visually appealing interfaces for their games or applications. UI elements, such as buttons, text, images, and panels, enable players to interact with the game, access menus, and receive important information during gameplay. Widgets are the building blocks of the UI, and they are created using Unreal Engine's UMG (Unreal Motion Graphics) system.
Let's take a moment to think through the experience a player will have with a game, the first thing to consider is the menu.
Creating Menu Classes
Creating menus in the context of UI and Widgets in Unreal Engine involves designing and implementing user interfaces to provide players with interactive menus and options for navigating through the game. Menus are essential for providing a polished and user-friendly experience, allowing players to access game settings, start or continue gameplay, and manage in-game features. Unreal Engine makes this process very easy through the Unreal Motion Graphics (UMG) editor. Like any good layout though it's important to consider the design.
Plan - Start by planning the layout of your menu on paper or using design software. Decide on the menu structure, including the main menu, options menu, pause menu, and any other specific menus relevant to your game. Once you have your design in mind its time to start creating
Create - In Unreal Engine, use Widget Blueprints to create the individual components of your menu, such as buttons, text fields, images, sliders, and panels. Each component will represent an element of the menu's layout. Open the UMG (Unreal Motion Graphics) editor in Unreal Engine. Drag and drop the Widget Blueprints you created into the UMG editor canvas and arrange them according to your menu layout design and then set anchors and alignment properties for the widgets. This ensures that the menu scales and adjusts correctly to different screen resolutions and aspect ratios.
Link - Now you have created your design, it's time to add interactivity and functionality. Utilising the Widget Blueprints, you can add button-click events to start the game, access the options menu, or exit the game. Set up input handling to allow players to navigate the menu using keyboard, mouse, or gamepad inputs. Create logic to move between menu options and highlight selected elements. Implement the functionality for each menu option, such as adjusting game settings (graphics, audio, controls), accessing a help or tutorial section, or saving/loading game progress.
Display - Depending on your game design, you may also create in-game menus or HUD elements to display information during gameplay, such as health bars, ammo counts, or quest progress (we will explore this in detail later in this subtopic).
Ok, so having thought about getting into the game, it's important to now consider the overall flow and logic of the game. As we touched on earlier, the key to the flow and logic is GameMode.
GameMode
The GameMode class can influence widget visibility based on the game's state. For instance, when the game is in a paused state or in a menu, the GameMode can control which widgets are displayed and which are hidden to provide the appropriate user interface for each game state.
By following these steps and leveraging the power of UI and Widgets in Unreal Engine, you can create visually appealing and intuitive menus that enhance the overall user experience in your game. Menus play a critical role in guiding players through the game and providing them with control over their in-game experience, making them an essential aspect of game development. Widgets can communicate with the GameMode class through Blueprint or C++ events and functions. This allows widgets to trigger specific game events or gameplay actions based on player interactions. In multiplayer games, the GameMode class also plays a role in managing widget interactions for all players. It ensures that widget actions and information are properly replicated across the network to maintain consistent gameplay for all players.
One of the key aspects of the GameMode class related to widgets is the ability to control the display of the HUD. HUD elements are a type of widget that shows important in-game information, such as health bars, scores, or objectives, directly on the screen during gameplay. The GameMode class allows you to specify the HUD class to be used during the game. This HUD class can be a Widget Blueprint that you create in the UMG editor, allowing you to customize the appearance and content of the HUD.
So let's take a look at using Widgets to create HUDs.
HUDs
Creating HUDs (Heads-Up Displays) through widgets in Unreal Engine is a crucial aspect of designing user interfaces that provide essential information to players during gameplay. HUDs serve as an overlay on the screen, displaying relevant in-game data and feedback to enhance the player's understanding of their character's status, game progress, and overall interaction with the game world. By using widgets to create HUD elements, developers can customize and update the display dynamically, resulting in a more immersive and informative user experience.
| Hud Element | Description |
|---|---|
| Using Widget Blueprints | Create Widget Blueprints representing HUD elements, such as health bars, ammo counters, objective indicators, and more. |
| HUD Layout and Composition | Design the layout of your HUD by arranging the created widgets in the UMG editor. Organize and anchor the elements appropriately to ensure they display consistently on different screen resolutions and aspect ratios. |
| Binding Data to HUD Widgets | Bind HUD widgets to relevant game data, such as the player's health, ammo count, or score. By binding the widgets to these data sources, the HUD will automatically update and reflect the current game state. |
| Dynamic Updating | Utilize Blueprint logic to update the HUD widgets dynamically during gameplay. For example, when the player's health decreases, the health bar widget should reflect the change accordingly. |
| Visibility and States | Control the visibility of HUD widgets based on the game's state and player interactions. For instance, certain HUD elements may only be visible during combat or when interacting with specific objects. |
| Adding Animations and Effects | Enhance the visual appeal of your HUD by adding animations and effects to the widgets. Animations can be used to draw attention to critical information or create dynamic transitions between different states of the HUD. |
| Interaction with Game Events | HUD widgets can also respond to game events and player actions. For example, displaying an on-screen notification when the player completes a quest or achieves an important milestone. |
| Multiplayer Considerations | In multiplayer games, ensure that HUD elements are properly replicated across all connected players. This ensures that each player receives relevant and consistent information on their HUD. |
Let's watch a HUD being created through the following two tutorial videos:
Part 1
Part 2
Learning Activity
Update Your Battery Collector Game
In a previous Learning Activity, you created the Battery Collector Game. Go back to that game and using what you have learned in this sub-topic, create a HUD that shows the following:
- Duration
- Speed

Regardless of if you are creating a First Person Shooter, a Battery Collector or a Third Person Adventure game, what all successful games have in common is stunning visuals. One of the ways to achieve this is through the creation of Landscapes. Let's start by looking at how we sculpt the 3D lanscape.
Sculpting Landscapes
Sculpting landscapes refers to the process of shaping and moulding the terrain in a 3D virtual environment. It allows developers and level designers to modify the landscape's topography, creating hills, mountains, valleys, rivers, and other natural features to form a realistic and visually appealing terrain. The sculpting process involves using specialized tools within the game engine to manipulate the landscape's geometry. These tools simulate real-world sculpting techniques, such as adding or subtracting material to raise or lower the terrain, smoothing rough areas, and shaping the landscape to match the desired design.
By crafting unique and intricate terrains, game developers can create immersive and expansive environments that enhance gameplay, storytelling, and player engagement. Whether it's designing a vast open world, an intricate dungeon, or a beautiful outdoor scene, landscape sculpting provides a creative and powerful means to bring virtual worlds to life.
Unreal Engine is a powerful tool that enables you to shape the terrain, add details, and create natural landscapes with ease. Here's a step-by-step guide on how to sculpt landscapes in Unreal Engine:
- Creating a Landscape: Start by creating a new Landscape at your level. To do this, go to the Modes panel, select the Landscape tab, and click "Create." You can set the landscape size, resolution, and other parameters to fit your project's needs.
- Selecting Sculpting Tools: Once you have your Landscape, select the Landscape Editing mode by clicking on the Landscape button in the toolbar. This mode allows you to access various sculpting tools.
- Choosing a Sculpting Tool: In the Landscape Editing mode, you'll find several sculpting tools in the Details panel. These tools include brushes for raising, lowering, smoothing, flattening, and more. Choose the sculpting tool that best suits your current task.
- Adjusting Brush Settings: After selecting a sculpting tool, adjust its settings in the Details panel. You can modify the brush size, strength, falloff, and other parameters to control the intensity and reach of the sculpting effect.
- Sculpting the Landscape: Start sculpting the landscape by painting directly on the terrain. You can raise mountains, create valleys, carve rivers, and shape the landscape to match your desired terrain features.
- Switching Sculpting Modes: You can switch between different sculpting modes like Raise, Lower, Flatten, Smooth, and more. Each mode offers unique sculpting capabilities for creating varied landscapes.
- Using Masks and Layers: Unreal Engine also supports layer-based sculpting. You can use landscape layers and masks to control the distribution of textures, foliage, and materials on the terrain, giving you greater control over the landscape's appearance.
- Refining Details with Sculpting Brushes: Use smaller brush sizes and lower strength values to add finer details to the terrain. Sculpting brushes like Erosion, Noise, and Scatter can be helpful for adding realistic textures and imperfections.
- Undo and Redo: Unreal Engine allows you to undo and redo sculpting actions, so you can experiment with different landscape designs without fear of making irreversible changes.
- Landscape Material and Texture Painting: Once you're satisfied with the landscape's shape, you can apply materials and textures to the terrain. Unreal Engine's landscape material system allows you to blend textures and add details to create realistic landscapes.
- Landscape Tessellation and LODs: For more detailed and smoother terrains, you can enable landscape tessellation and set up different levels of detail (LODs) to optimize performance at various distances.
- Testing and Iteration: Regularly playtest and iterate on your landscape design to ensure it fits your game's environment and aesthetics. Fine-tune the sculpting, materials, and textures as needed.
Like the creation of an object in the real world, once you have created and sculpted it is time to paint. Let's now look at how you take your sculptured landscapes to the next level through the process of painting materials.
Painting Materials
Painting materials on a landscape in Unreal Engine allows you to add textures, colours, and other material properties to different areas of the terrain, giving it a realistic and visually appealing appearance. With landscape material painting, you can create various biomes, blend different textures seamlessly, and add fine details to enhance the overall look of your environment. Let's take a look at how this is done by watching the following video.
- Create a Landscape: Before painting materials, you need to have a landscape in your level. If you don't have one yet, create a new landscape or import a heightmap to generate one.
- Apply Material to the Landscape: Open the Material Editor in Unreal Engine and create a landscape material. This material will define the visual properties and textures you want to apply to the terrain.
- Add Texture Samples to the Material: Within the Material Editor, add texture samples (also known as texture nodes) to the landscape material. Texture samples are images that represent the different textures you want to paint on the landscape, such as grass, dirt, sand, or rock.
- Connect Texture Samples to Material Outputs: Connect the texture samples to the appropriate material outputs, such as Base Color, Normal, Roughness, and more. This will determine how each texture affects the landscape's appearance.
- Enable Landscape Material Painting: Go to the Landscape Editing mode by clicking on the Landscape button in the toolbar. In this mode, you can access landscape painting tools.
- Choose Landscape Layer Info: In the Details panel, locate the "Layer Info" section. Here, you can define landscape layers, which represent the different textures you want to paint on the landscape.
- Create Landscape Layers: Add new layers by clicking the "+" button in the Layer Info section. Each layer corresponds to one of the texture samples you added to the landscape material.
- Assign Textures to Landscape Layers: For each landscape layer, assign the corresponding texture sample from the material to the layer's Weightmap Texture. This links the material's textures to the landscape painting system.
- Painting on the Landscape: Select the landscape layer you want to paint with and choose a painting tool, such as the "Weight-Map" tool or the "Visibility" tool. Start painting the landscape to apply the material textures to specific areas.
- Adjust Brush Settings: Fine-tune the brush settings, such as brush size, strength, and falloff, to control the intensity and blending of the material textures on the terrain.
- Blending and Smoothness: Use multiple landscape layers to create smooth transitions between different textures. For example, blend grass into dirt or sand to make the landscape look more natural.
- Testing and Iteration: Regularly playtest your painted landscape to see how the materials and textures fit together. Make adjustments as needed to achieve the desired visual result.
Now you have a sculpted and painted landscape it's time to add other natural elements, like foliage.
Foliage
Foliage is an indispensable element in the creation of landscapes due to its ability to infuse environments with realism, immersion, and visual richness. It represents the vegetation found in natural landscapes, such as trees, plants, grass, and flowers. Including foliage in landscape design yields numerous benefits. First and foremost, it enhances the realism of the environment, making it feel more authentic and believable. The presence of trees, shrubs, and grass breathes life into the landscape, transporting players or viewers into a captivating and immersive world. Additionally, foliage can play a significant role in environmental storytelling. Different plants and trees may indicate specific climates, terrain types, or environmental conditions, adding depth to the storytelling within the game or virtual experience. Foliage can be designed to change with the seasons, offering dynamic visual variations to the landscape. Trees with colourful autumn leaves or snow-covered landscapes in winter can create an ever-changing and immersive world. The sound and movement of foliage in the wind also contribute to the overall ambience and atmosphere of the landscape, providing a more immersive and engaging experience.
Foliage, however, is not merely decorative; it can also affect gameplay mechanics. In many games, foliage serves functional purposes, such as providing cover for players, concealing enemies, or acting as obstacles or collectables. Despite its rich visual impact, game engines often optimize foliage rendering to ensure smooth performance. Techniques like culling, level of detail (LOD) systems, and instancing allow developers to maintain good performance while including lush vegetation. In addition to its visual and atmospheric aspects, foliage aids in navigation and wayfinding. It can guide players through the landscape by marking paths or indicating areas of interest. Foliage plays a crucial role in the overall navigation of the world, facilitating exploration and enhancing the player's sense of orientation.
Let's take a look at how we add foliage to your landscape.
Collisions in the context of game development refer to the interactions and responses that occur when two or more objects in a virtual environment come into contact with each other.
Collisions are crucial for creating realistic and engaging gameplay experiences. Understanding how collisions work and implementing them effectively is essential for ensuring that objects interact believably and that the game world behaves as expected. This can be as big as what happens when a projectile hits a player, to as small as how water behaves when a player interacts with it or how the character's hair responds to wind/movement. To make this easy, Unreal Engine offers preset collisions, let's take a look at them.
Presets
First, it is important to determine what the type of object is in the context of collisions (what can the character do with it) Unreal Engine provides several collision presets that define how objects react when they come into contact with other objects or the environment. These presets are categorized based on common collision scenarios, and each preset comes with specific collision settings to handle collisions accordingly. Here are some common collision presets in Unreal Engine:
| Preset | Description |
|---|---|
| NoCollision | Objects with the "NoCollision" preset do not participate in any collision interactions. They will not collide with other objects or the environment. This preset is useful for objects like visual effects, particle systems, or other elements that should not have physical interactions. |
| BlockAll | The "BlockAll" preset prevents any form of collision penetration. Objects with this preset act as solid barriers, completely blocking the movement of other objects and characters. It is often used for walls, floors, or any object that should act as a physical barrier. |
| OverlapAll | The "OverlapAll" preset is used when an object should detect overlaps with other objects but not physically block them. Overlap events are triggered when objects pass through each other without any physical resistance. This is useful for triggering events or interactions without affecting movement. |
| PhysicsOnly | The "PhysicsOnly" preset is designed for objects that should interact with physics simulation but not with other non-physics objects. Objects with this preset will respond to physics forces and gravity but will not collide or interact with non-physics objects. |
| Custom | The "Custom" preset allows developers to define their own collision settings using collision channels. Collision channels are a flexible system that lets you specify which objects should collide with each other based on custom rules. You can set up specific behaviours and interactions for different combinations of objects. |
Let's take a look into the two most basic functions of these presets, BlockAll and OverlapAll.
Block and Overlap Functions
"Overlap" and "Block" functions refer to how objects with different collision settings interact with each other.
Overlap Function
When two objects with "Overlap" collision settings come into contact, they will detect the overlap event without blocking each other's movement. In other words, overlapping objects do not physically obstruct each other. Overlap events can be used to trigger specific actions or interactions without affecting the objects' positions or movements. This is particularly useful for implementing gameplay mechanics such as item pickups, triggering events, or detecting proximity between objects.
Example - Third-Person Adventure
Let's consider a game scenario where the player-controlled character enters a room containing collectable items scattered on the floor. The collectable items have "Overlap" collision settings. When the player's character moves close enough to one of the collectables, an overlap event is triggered, allowing the player to pick up the item without any physical obstruction. The collectable item can then disappear, add points to the player's score, or trigger other game events.
Block Function
When two objects with "Block" collision settings come into contact, they will physically block each other's movement. This means that the objects cannot pass through each other, and they will collide and respond to each other's presence. Objects with "Block" collision settings act as solid barriers that prevent other objects from passing through them.
Example - First-Person Shooter
Consider a first-person shooter game where the player shoots projectiles at wooden crates that have "Block" collision settings. When the projectile collides with the crate, the crate physically blocks the projectile's movement, and both objects may respond to the collision. The projectile may bounce off the crate or trigger a particle effect to simulate an impact.
Choosing the appropriate collision settings, whether "Overlap" or "Block," is crucial for achieving the desired gameplay and interactions within your game. The choice will depend on the specific requirements of your game mechanics and the behaviour you want to achieve between different objects in the game world. So now we have determined what the object is, an overlap, block or another function lets now determine what is going to happen when a collision occurs, through Collision Response.
Collision Response
Collision response in the context of game development refers to how objects react or respond when they come into contact with each other during collisions. It is a crucial aspect of creating realistic and engaging gameplay experiences. Collision response is responsible for determining how objects should behave upon collision, including factors like bouncing, sliding, triggering events, causing damage, or any other desired reaction. Unreal Engines offers a number of options available for this, lets take a look at some of them:
| Aspect | Description |
|---|---|
| Physics Simulation | Many games use physics simulation engines to handle collision responses. Physics simulation calculates how objects respond to forces, gravity, and collisions, resulting in realistic interactions within the game world. For example, when two objects collide, the physics engine calculates their resulting velocities and directions to determine the collision response. |
| Collision Materials | Unreal Engine, for instance, uses collision materials to define specific responses during collisions. Each object in the game can have a collision material assigned, which contains settings for friction, restitution (bounciness), and other collision properties. These settings influence how the objects react when they collide. |
| Friction and Restitution | Friction determines how much an object slows down or resists movement when in contact with another surface. Restitution, also known as bounciness or elasticity, controls how much energy is retained or lost during a collision. Adjusting these parameters can impact how objects slide, bounce, or stop upon collision. |
| Collision Events | Collision events are triggered when objects collide, allowing developers to respond to collisions through custom code. These events can be used to play sounds, spawn particle effects, apply damage, or trigger other in-game actions. |
| Custom Collision Response | In some cases, you may need to define custom collision response logic based on the type of objects colliding or the gameplay mechanics. This can involve using collision channels to control interactions between specific objects or creating custom physics behaviours for certain situations. |
| Character Movement Response | For character controllers, collision response is crucial for handling movement interactions with the environment. Characters need to respond appropriately to collisions with walls, floors, and other objects to provide a smooth and realistic movement experience for players. |
| Optimization and Performance | Balancing collision response complexity is important for performance. Too many complex collision interactions can impact the game's frame rate, so developers often use collision simplification techniques, like culling or using lower-detail collision meshes, to optimize performance. |
Now let's watch the following tutorial on creating basic collisions:
AI (Artificial Intelligence) or NPCs (Non-Player Characters) are entities that are controlled by the game's artificial intelligence systems rather than being directly controlled by a human player. These characters play various roles in the game, such as enemies, allies, bystanders, or other entities that interact with the player or the game world. Implementing AI and NPCs adds life, challenges, and depth to the game's environment and creates dynamic interactions with players.
Let's take a look at how we set the parameters for how these AI or NPC characters interact in your game by first exploring the concept of the behaviour tree.
Behaviour Tree
The Behavior Tree is a powerful tool in Unreal Engine used for implementing AI behaviour and decision-making in games. It is a visual scripting system that allows developers to define the logic and flow of an AI-controlled character's actions and decisions. The Behavior Tree is particularly useful for creating complex and dynamic AI behaviours, enabling NPCs to react to various stimuli and changing conditions in the game world.
A Behavior Tree is represented as a Behavior Tree Asset (.BT file) in Unreal Engine. It is a reusable blueprint-like asset that contains the nodes and logic for the AI behaviour. Behaviour Tree nodes are the building blocks of the Behavior Tree. Each node represents a specific behaviour or decision that the AI can perform. There are several types of nodes, including Composite Nodes (e.g., Selector, Sequence), Decorator Nodes (e.g., Decorator, Condition), and Task Nodes (e.g., Move To, Attack).
| Node Type | Description |
|---|---|
| Composite Nodes | Composite Nodes define the flow of the Behavior Tree. They group child nodes and determine how they are executed. For example, a Selector Node executes child nodes in sequence until one succeeds, and a Sequence Node executes child nodes in sequence until one fails. |
| Decorator Nodes | Decorator Nodes modify the behaviour of child nodes based on specific conditions. They can be used to add conditional checks before executing a task or to control when certain branches of the tree should be explored. |
| Task Nodes | Task Nodes represent specific actions or behaviours that the AI should perform, such as moving to a location, attacking an enemy, or performing an animation. These nodes are the leaves of the Behavior Tree, where the actual actions are defined. |
| Composite Task Nodes | Composite Task Nodes are special task nodes that contain sub-tasks. They are used to organize and combine multiple tasks into a single node, improving the readability and structure of the Behavior Tree. |
| Parallel Nodes | Parallel Nodes allow the AI to perform multiple tasks simultaneously. For example, an AI character can walk towards a destination while also scanning for nearby enemies. |
Task" and "Sequence" are two types of composite nodes that play crucial roles in defining the behaviour and decision-making process of AI characters.
Task Node: A Task Node is a type of Behavior Tree node that represents a specific action or behaviour that the AI should perform. These nodes are considered the leaf nodes of the tree, as they do not have any child nodes. Instead, they directly execute the action they represent. Task Nodes are responsible for handling actions such as moving to a location, attacking an enemy, performing an animation, or any other task that the AI character should perform during gameplay.
For example, a "Move To" Task Node instructs the AI character to move to a specified location in the game world. The node's implementation handles the movement logic, including pathfinding and obstacle avoidance, to ensure the character reaches the destination successfully.
Sequence Node: A Sequence Node is a type of composite node that groups multiple child nodes together in sequential order. The Sequence Node executes its child nodes one by one, from left to right, until one of the child nodes fails. If any of the child nodes fails, the Sequence Node immediately stops executing and returns a failure status to its parent node. If all child nodes succeed, the Sequence Node returns a success status to its parent.
Sequences are useful for creating step-by-step behaviours for the AI. For example, a combat sequence might consist of child nodes representing actions like "Attack Enemy," "Reload Weapon," and "Take Cover." The Sequence Node ensures that the AI character performs each action in order, and if any of the actions fail (e.g., the character cannot attack an enemy because there is none in range), the entire sequence is aborted.
The combination of Task Nodes and Sequence Nodes allows developers to create complex and dynamic AI behaviours in the Behavior Tree. By arranging Task Nodes within Sequence Nodes and organizing them hierarchically, developers can define the AI's decision-making process and how the character should respond to different game situations.
In order to share data structures between the Behavior Tree and the AI Controller, Unreal Engine has created the Blackboard.
Blackboard
Blackboard is a data structure used to store and share information between AI behaviour and decision-making systems. It acts as a communication channel between the Behavior Tree and the AI Controller, allowing the AI to access and modify data during runtime. The Blackboard is a crucial component in implementing AI logic, as it enables AI characters to make informed decisions based on the current state of the game world. The Blackboard consists of key-value pairs, where each key represents a specific data entry (or "Blackboard Key") and each value corresponds to the data associated with that key. These entries can represent various information relevant to the AI, such as the location of the player, the presence of enemies, or the status of a quest.
The Blackboard is shared between the Behavior Tree and the AI Controller, ensuring that both systems have access to the same data. When the Behavior Tree makes decisions or updates data, it can store or retrieve information from the Blackboard, and the AI Controller can use that data to control the AI character's behaviour. Blackboard is managed using the Blackboard Component, which is attached to the AI Controller. The Blackboard Component allows you to add and manage Blackboard Keys, set their initial values, and get or set data during runtime.
The Behavior Tree nodes in Unreal Engine can access the Blackboard to read or modify Blackboard Keys. For example, a Behavior Tree node can check if an enemy is in the AI character's line of sight by reading the relevant Blackboard Key that stores the enemy's location. The Blackboard allows for dynamic updates during gameplay. AI characters can continuously update the Blackboard with new information as the game progresses. For example, an AI character that is searching for an item can update its Blackboard with the item's location when it finds it.
The Blackboard can be used to handle events triggered during gameplay. For instance, when an AI character receives damage, it can update the Blackboard with its current health, allowing other parts of the AI system to react accordingly.
Now let's take a look at how these are implemented by watching the following tutorial playlist:
In this topic, we have focused on utilising Blueprints for game development in Unreal Engine. Blueprint scripting is important for its ease of use, visual scripting capabilities, and rapid iteration during game development however it is not the only option. Unreal Engine is also available to develop games utilising C++. Utilising C++ provides direct access to engine features and memory management capabilities.
Both C++ and Blueprints have their strengths, and the choice between them depends on the specific needs of the project and the skill set of the development team. Many projects utilize a combination of both C++ and Blueprints to leverage the strengths of each and create successful and efficient game experiences.
Let's take a moment to review the basics of utilising C++ in Unreal Engine: