Welcome to the CS204B Cloud Application Development Extension topic! In this topic, we will be extending the work you are doing in your elective course.
By the end of this topic, you will have familiarised yourself with the following:
- Web tier architecture
- AWS storage services
- Writing RESTful APIs
- Test-driven development
- The application of containers and dockers
- Web application deployment
- Reliability and load balancing
- AWS best practices
By now you will be familiar with AWS and the products and services it offers. One of the main benefits of AWS is that it allows businesses and individuals to achieve scalability, flexibility, and cost-effectiveness. Let's take a look at the different pricing models of AWS.
AWS Pricing Models
As you learn cloud application development, understanding AWS pricing models becomes crucial. Familiarizing yourself with AWS pricing models will help you accurately estimate the costs associated with your cloud-based applications, enabling effective cost management and budgeting. Knowing the various pricing options, such as On-Demand, Reserved Instances, and Savings Plans, empowers you to optimize your resource usage and select the most suitable services for your application's requirements. This knowledge also allows you to provide transparent cost estimates to clients when working on cloud-based projects professionally. By grasping AWS pricing models, you gain valuable insights into cloud cost optimization best practices, ensuring you can build cost-effective and efficient cloud solutions without compromising performance. Moreover, this expertise enhances your career prospects, as cloud skills, including AWS proficiency, are highly sought after in the job market.
- Free Tier: AWS offers a free tier with limited resources for new customers to try out their services without incurring costs for a limited time. This is an excellent way to experiment and learn about AWS services without financial commitment.
- Pay-as-you-go (On-Demand): This is the most common and straightforward pricing model. With the pay-as-you-go model, you pay for the compute resources (such as virtual machines, databases, or storage) that you consume, on an hourly or per-second basis. There are no upfront costs or long-term commitments, and you can easily scale resources up or down as needed. This model is suitable for applications with variable workloads or for those who want to avoid upfront capital expenses.
- Reserved Instances (RIs): RIs are a way to save costs when you know you'll need certain resources for an extended period, typically a year or three years. By committing to a one-time upfront payment or a monthly fee, you can significantly reduce the hourly cost of the resources compared to on-demand pricing. RIs are recommended for applications with predictable and steady workloads.
- Savings Plans: Savings Plans offer greater flexibility than RIs. They provide savings on the hourly rate in exchange for a commitment to a certain amount of compute usage (measured in dollars per hour) over a one- or three-year term. The savings plans apply across different instance families, sizes, and regions, giving you more flexibility in resource usage.
- Spot Instances: Spot Instances allow you to bid on unused AWS compute capacity. If your bid price is higher than the current spot price, you get access to that capacity at your bid price. However, the prices for spot instances fluctuate based on supply and demand, and AWS can terminate these instances with little notice if the spot price exceeds your bid. Spot Instances are ideal for applications that have flexible start and end times and can tolerate interruptions.
- Dedicated Hosts: With Dedicated Hosts, you can have an entire physical server dedicated to your use. This model is suitable for companies that have regulatory or compliance requirements that necessitate dedicated hardware.
It's essential to understand your application's requirements and usage patterns to choose the appropriate pricing model. AWS provides a cost calculator and various tools to help you estimate your costs based on your specific use case before making a decision. Let's take a look at why understanding pricing models is important.
Case Study: Cloud Cost Overrun at XYZ Tech Solutions
XYZ Tech Solutions, a software development company, was tasked with building a web application for a client using Amazon Web Services (AWS) cloud services. The project aimed to create a user-friendly platform for online shopping, providing customers with a seamless shopping experience. However, the development team faced unexpected challenges when it came to managing AWS costs due to a lack of understanding of the AWS pricing models.
Client Requirements: The client's requirements included a highly available web application with a database to store product information, user data, and order details. They also wanted the application to scale effectively during peak traffic periods to ensure a smooth shopping experience for customers.
Deployment Approach: Without a clear grasp of AWS pricing models, XYZ Tech Solutions decided to use On-Demand instances for all components of the application, including the web servers and database. The team believed that On-Demand instances would provide the needed flexibility and scalability without considering other cost optimization options.
Challenges:
- Unexpected Cost Overrun: As the web application gained traction and user traffic increased, the AWS bill skyrocketed due to the hourly charges of On-Demand instances. The lack of cost optimization measures resulted in the project exceeding the allocated budget, leading to financial strain for XYZ Tech Solutions.
- Resource Limitations: Relying solely on On-Demand instances made it challenging to scale the application efficiently during peak periods. The team faced performance issues and potential downtime, impacting the overall user experience.
- Missed Cost Optimization Opportunities: XYZ Tech Solutions missed the opportunity to explore Reserved Instances or Savings Plans, which could have significantly reduced the application's long-term costs. Additionally, they did not leverage Spot Instances for non-critical tasks, missing out on potential cost savings during periods of low demand.
Resolution:
Upon realizing the cost overrun and scalability issues, XYZ Tech Solutions conducted a thorough review of the AWS pricing models and optimized their deployment strategy:
- Cost Optimization Strategy: The team adopted a mix of Reserved Instances and On-Demand instances. Reserved Instances were utilized for stable and predictable components, while On-Demand instances were kept for parts of the application with varying workloads.
- Resource Scaling: To address resource limitations, the team employed auto-scaling with a combination of On-Demand and Spot Instances. This allowed the application to automatically adjust resources based on demand, ensuring a better user experience during peak traffic.
- Usage of AWS Free Tier: For certain non-production environments and low-traffic services, XYZ Tech Solutions utilized the AWS Free Tier, taking advantage of the limited free usage to reduce costs.
Results:
By optimizing their AWS deployment and adopting cost-effective pricing models, XYZ Tech Solutions successfully managed to control their AWS costs while providing a reliable and scalable web application for their client. The application's performance improved during peak periods, leading to increased customer satisfaction and higher retention rates.
This case study highlights the importance of understanding AWS pricing models for cloud application development. By learning from their initial mistakes, XYZ Tech Solutions was able to navigate cloud cost management effectively, ensuring a successful project delivery within budgetary constraints and maintaining a satisfied client. It serves as a valuable lesson for companies to invest in AWS cost optimization expertise and implement best practices when building and managing cloud-based applications.
Keep in mind that AWS pricing can be complex, and the prices may change over time, so it's crucial to regularly review your usage and adjust your resources accordingly to optimize costs. Additionally, be aware of data transfer costs and other ancillary fees associated with certain services.
Web-tiered architecture, also known as multi-tiered architecture or n-tier architecture, is a software design pattern commonly used in web application development. It divides the application into multiple layers, each responsible for specific functions. The primary goal of web-tiered architecture is to promote modularity, scalability, maintainability, and reusability of code components. The architecture typically consists of three main layers: the presentation layer (also known as the user interface or front-end), the application layer (also called the business logic or middle tier), and the data layer (also known as the back-end or data storage).
Presentation Layer (Front-end)
The presentation layer is the user interface of the application, where users interact with the system. It is responsible for rendering the data and providing a user-friendly interface through web browsers or mobile devices. In this layer, HTML, CSS, and JavaScript are commonly used to create the visual layout and handle user interactions. Modern web frameworks and libraries, such as React, Angular, or Vue.js, are often employed to build dynamic and responsive front-end applications.
Application Layer (Middle-tier or Business Logic)
The application layer serves as the bridge between the presentation layer and the data layer. It contains business logic, processing user requests, and handling application-specific functionalities. Here, application servers or web servers run the application code to execute complex calculations, validate user inputs, and interact with external services or databases. The middle tier ensures that the data sent to and received from the front end is in the correct format and aligns with business rules.
Data Layer (Back-end or Data Storage)
The data layer is responsible for managing and storing data used by the application. It includes databases or storage systems where information is persistently stored and retrieved. Databases can be relational (e.g., MySQL, PostgreSQL) or NoSQL (e.g., MongoDB, Cassandra) based on the application's data requirements. The back end interacts with the data layer to read, write, update, and delete data based on user actions or application processes.
Communication Between Layers
In a web-tiered architecture, communication between the layers is typically established using well-defined APIs (Application Programming Interfaces). The front end communicates with the middle tier by sending HTTP requests, and the middle tier responds with appropriate data or actions. The middle tier, in turn, interacts with the data layer to retrieve or update data as needed. This separation of concerns ensures that changes in one layer do not impact the other layers, promoting maintainability and flexibility.
Benefits of Web-Tiered Architecture
- Scalability: The modular nature of the architecture allows individual layers to scale independently, accommodating increasing user demands and traffic.
- Modularity and Reusability: Each layer operates independently, promoting code reusability and easy maintenance of specific components.
- Security: Separating the presentation layer from the business logic and data layer enhances security, as sensitive data and business logic are not directly exposed to the end users.
- Maintainability: The clear separation of concerns enables developers to focus on specific functionalities, making code maintenance and updates more manageable.
- Flexibility: Changing or updating one layer does not affect the others, making it easier to adapt to evolving requirements or technologies.
Learning Activity
Undertake the research required against each of the points below and post your findings to the forum.
- Advantages and Disadvantages - Identify and list the advantages and disadvantages of each architectural style. Consider factors like scalability, maintainability, flexibility, development speed, team collaboration, and resource utilization.
- Use Cases and Real-World Examples - Research and present real-world use cases where microservices and monolithic architectures have been successfully applied. Discuss why each approach was chosen for the particular scenario, and analyze the outcomes and benefits.
- Scalability and Performance - Examine how each architecture handles scalability and performance requirements. Compare the ease of scaling and the impact on overall application performance under high traffic or load conditions.
- Development and Deployment - Investigate the development and deployment process for both microservices and monolithic architectures. Analyze the development workflow, integration challenges, testing strategies, and deployment complexities.
- Team Organization and Collaboration - Explore how the organizational structure and team collaboration differ between microservices and monolithic development. Discuss the impact on team dynamics, communication, and overall project management.
- Monitoring and Debugging - Evaluate the monitoring and debugging capabilities of each architecture. Consider how easy it is to identify and troubleshoot issues in both development and production environments.
- Security and Data Management - Discuss the security considerations and data management practices for microservices and monolithic architectures. Compare data isolation, access controls, and potential vulnerabilities.
- Cost Analysis Conduct a cost analysis of both architectural styles. Compare the initial development costs, operational expenses, and infrastructure requirements for each approach.
AWS Academy Task
Go through the AWS Academy Portal’s videos and the challenge questions of Module 13 (Cloud Architecting).
| Cloud Foundations Module 13 – AWS Cloud Foundations |
|---|
|
This module includes the following sections:
|
| https://awsacademy.instructure.com/courses/42151/modules |
Cloud Databases

Cloud databases play a crucial role in modern application development, offering scalable, managed, and highly available data storage solutions in the cloud. Two popular cloud database services are Amazon RDS (Relational Database Service) and Amazon DynamoDB, each catering to different application architectures like monolithic and microservices.
Cloud Databases in Monolithic Architecture:
In a monolithic architecture, the entire application is built as a single, tightly integrated unit. The application typically consists of a front-end user interface, a back-end business logic layer, and a centralized database. Cloud databases, such as Amazon RDS, are well-suited for monolithic applications that require traditional relational databases like MySQL, PostgreSQL, Oracle, or Microsoft SQL Server.
Amazon RDS:
Amazon RDS is a managed relational database service that simplifies database setup, operation, and scaling. It automates routine database tasks such as hardware provisioning, database setup, patching, backups, and more. RDS provides high availability and fault tolerance by automatically replicating data across multiple Availability Zones (data centres) within a region. It supports read replicas for read scalability and multi-AZ deployments for automatic failover in case of primary database failures.
In monolithic architecture, Amazon RDS serves as the centralized data store for the entire application. The application's back-end communicates directly with the RDS instance to perform data operations, including CRUD (Create, Read, Update, Delete) operations. RDS ensures data integrity, consistency, and durability for the entire application, maintaining a single source of truth for all data.
Cloud Databases in Microservices Architecture:
Microservices architecture is an approach where an application is broken down into a set of loosely coupled and independent services, each focused on specific business capabilities. Each microservice typically has its own database, which can be a NoSQL database like Amazon DynamoDB.
Amazon DynamoDB:
Amazon DynamoDB is a fully managed NoSQL database service designed to provide fast and predictable performance with seamless scalability. It offers automatic scaling based on the read and write capacity needs of the application. DynamoDB is a key-value and document database that allows developers to store and retrieve data in a flexible schemaless format.
In a microservices architecture, each microservice may have its own data store, and Amazon DynamoDB is an excellent choice for these use cases. Each microservice can independently scale its own database based on its specific requirements, allowing for better isolation and resource management. DynamoDB's flexible schema allows microservices to evolve independently without affecting other services in the application.
Advantages of Using Cloud Databases in Both Architectures:
- Scalability: Cloud databases like Amazon RDS and DynamoDB offer seamless scalability, allowing applications to grow as per demand without manual intervention.
- High Availability: Both RDS and DynamoDB provide high availability options, ensuring minimal downtime and data loss.
- Managed Services: These cloud databases are fully managed by AWS, handling routine maintenance tasks, backups, and updates, reducing the operational burden on developers.
- Security: AWS provides various security features and encryption options to protect data at rest and in transit.
- Global Reach: Cloud databases enable data replication across multiple regions, supporting global applications with low-latency access to data.
Watch the following video on Amazon RDS and Amazon DynamoDB for more information on these solutions as well as an introduction to Redshift:
Guidelines for Selecting Web-tier Architecture
Guidelines for selecting the web tier architecture for cloud-based software involve carefully considering various factors to ensure the chosen architecture aligns with the application's requirements, performance goals, scalability, and cost-effectiveness. Here are some essential guidelines to help you make an informed decision:
- Analyze Application Requirements: Start by understanding the specific requirements of your cloud-based software. Consider factors such as expected user traffic, data storage needs, performance expectations, security requirements, and the complexity of business logic. These requirements will play a significant role in determining the most suitable web-tier architecture.
- Scalability and Performance: Evaluate the scalability and performance demands of your application. If you anticipate rapid growth or varying workloads, consider architectures that can easily scale horizontally to handle increased user traffic. Cloud environments are well-suited for auto-scaling, so choosing an architecture that supports this feature can help optimize performance and cost efficiency.
- Modularity and Reusability: Opt for an architecture that promotes modularity and reusability of code components. Cloud-based software often undergoes continuous updates and enhancements, so having a modular architecture simplifies maintenance, debugging, and code management.
- Microservices vs. Monolithic: Decide between microservices or monolithic architecture. Microservices offer advantages in terms of scalability, independent deployments, and team collaboration, but they may introduce additional complexity. Monolithic architectures are simpler to start with, but they might limit scalability in the long run. Choose the one that best fits your application's complexity and future growth plans.
- Cloud-Native Considerations: Consider cloud-native architectures and services that are specifically designed for cloud environments. Leveraging cloud-native technologies, such as serverless computing, containers, and managed services, can simplify development, reduce operational overhead, and optimize cost.
- Data Storage and Management: Determine the data storage requirements of your application. Cloud providers offer various database options, such as relational databases (e.g., Amazon RDS) and NoSQL databases (e.g., Amazon DynamoDB). Choose the database service that aligns with your data model, query patterns, and scalability needs.
- Latency and Geographic Distribution: If your application serves users in different geographic locations, consider an architecture that can distribute content closer to the end users. Content Delivery Networks (CDNs) and edge computing can help reduce latency and improve the user experience.
- Security and Compliance: Ensure that the selected architecture aligns with your security and compliance requirements. Use encryption, access controls, and other security best practices to protect data and prevent unauthorized access.
- Cost Optimization: Estimate the cost implications of the chosen architecture. Consider the pricing models of various cloud services and optimize your resources to minimize costs while maintaining performance.
- Monitoring and Troubleshooting: Choose an architecture that facilitates monitoring and troubleshooting. Use cloud-native monitoring tools and logging services to gain insights into application performance, detect issues, and ensure high availability.
- Developer Expertise: Evaluate the expertise of your development team. Choose an architecture that aligns with their skills and experience to ensure efficient development and maintenance.
- Future-Proofing: Lastly, think about the future evolution of your application. Select an architecture that allows room for growth, flexibility, and adaptability to emerging technologies and business requirements.
By carefully considering these guidelines and conducting a thorough evaluation of your application's needs, you can make an informed decision when selecting the web-tier architecture for your cloud-based software.

Amazon Web Services (AWS) offers a wide range of storage services designed to cater to various data storage and management needs. These storage services are built to be scalable, durable, highly available, and secure, making them suitable for a variety of applications and workloads. Here's an overview of some of the key AWS storage services:
Amazon Simple Storage Service (Amazon S3)
Amazon S3 is one of the most popular and widely used storage services provided by AWS. It offers scalable object storage for storing and retrieving any amount of data over the internet. S3 provides a simple interface to upload and download files, making it ideal for storing static assets, media files, backups, and other unstructured data. S3 supports multiple storage classes, enabling users to optimize costs based on data access patterns.
Example Use Case: Storing and serving static website assets (HTML, CSS, JavaScript), hosting media files (images, videos), and data backup and archiving.
| Pros | Cons |
|---|---|
| Highly durable and scalable, designed to handle large amounts of data and traffic. | Data consistency is eventually consistent, which may lead to temporary inconsistencies between updates. |
| Supports multiple storage classes, allowing users to optimize costs based on access patterns. | Pricing can become complex, especially when dealing with data transfer and request costs. |
| Integrates well with other AWS services, enabling seamless data transfer and workflows. |
Amazon Elastic Block Store (Amazon EBS)
Amazon EBS provides block-level storage volumes that can be attached to Amazon EC2 instances. It offers persistent storage that allows data to survive the termination of an EC2 instance. EBS volumes can be used as the primary boot device or for additional data storage. There are different types of EBS volumes available, such as General Purpose SSD, Provisioned IOPS SSD, Cold HDD, and Throughput Optimized HDD, each with different performance characteristics.
Example Use Case: Storing database files, operating system volumes, and block-level data for EC2 instances.
| Pros | Cons |
|---|---|
| Provides persistent and reliable storage for EC2 instances, ensuring data survival during instance restarts. | Bound to a specific AWS region, making it less suitable for cross-region disaster recovery. |
| Offers different volume types for varying performance needs, allowing users to choose based on application requirements. | EBS volumes can be detached accidentally, leading to data loss if not properly managed. |
| Supports snapshots for data backup and replication across AWS regions. |
Amazon Elastic File System (Amazon EFS)
Amazon EFS offers fully managed, scalable, and elastic file storage for use with Amazon EC2 instances. It supports the Network File System (NFS) protocol and allows multiple instances to share the same file system concurrently. EFS is suitable for applications that require shared file storage and is well-suited for content management, web serving, and data-sharing scenarios.
Example Use Case: Shared file storage for web application servers, content management systems, and data analytics clusters.
| Pros | Cons |
|---|---|
| Fully managed and scalable, allowing dynamic adjustment of storage capacity to match demands. | Higher cost compared to Amazon S3 for storing large amounts of data. |
| Supports NFSv4 protocol, enabling seamless file access and sharing among multiple EC2 instances. | Slightly higher latency compared to local storage options like Amazon EBS. |
| Data is automatically replicated across multiple Availability Zones, ensuring high availability. |
Watch the following video to see a comparison between S3, EBS and EFS.
Other AWS Storage Services
Amazon FSx provides fully managed file systems optimized for specific use cases. Amazon FSx for Windows File Server offers Windows-compatible file storage with native support for the SMB protocol. Amazon FSx for Lustre provides high-performance file storage for compute-intensive workloads that require low-latency access to data.
Example Use Case: Running Windows applications that require file storage, such as Microsoft SharePoint or SQL Server.
| Pros | Cons |
|---|---|
| Fully managed and integrated with Windows Active Directory, simplifying user and group access control. | Windows-only support limits its usability for non-Windows applications. |
| High performance for both read and write operations, suitable for I/O-intensive workloads. | Higher cost compared to other file storage options like Amazon EFS. |
| Data is replicated and backed up, ensuring durability and availability. |
Amazon Glacier is a secure and durable storage service designed for long-term data archiving and backup. It offers low-cost storage options with retrieval times ranging from minutes to hours, making it suitable for data that is rarely accessed but needs to be retained for compliance or regulatory purposes.
Example Use Case: Long-term data archival and compliance data retention.
| Pros | Cons |
|---|---|
| Very cost-effective for storing large amounts of infrequently accessed data. | Retrieval times can be lengthy, ranging from minutes to hours, making it unsuitable for frequently accessed data. |
| Designed for long-term retention, providing a low-cost solution for data archiving. | Data retrieval incurs additional costs, which can be significant for large amounts of data. |
| Integrates with AWS Data Lifecycle Manager for automated data retention and deletion policies. |
Amazon S3 Glacier is an archival storage service that integrates with Amazon S3. It provides three archive retrieval options: Expedited, Standard, and Bulk, with varying retrieval times and costs. S3 Glacier is ideal for archiving large volumes of infrequently accessed data at a lower cost compared to regular Amazon S3 storage.
Example Use Case: Long-term archival of large volumes of infrequently accessed data with varying retrieval time requirements.
| Pros | Cons |
|---|---|
| Provides different retrieval options, allowing users to choose based on their data access needs. | Retrieval times can still be relatively slow compared to real-time access. |
| Cost-effective for long-term storage of data that is rarely accessed but needs to be retained. | Not suitable for applications that require frequent and immediate data retrieval. |
| Integrates with Amazon S3 for easy data transfers and lifecycle policies. |
Amazon Storage Gateway is a hybrid cloud storage service that enables on-premises applications to seamlessly use AWS cloud storage. It provides three types of gateways: File Gateway for file-based access, Volume Gateway for block storage, and Tape Gateway for virtual tape-based backup and archival.
Example Use Case: Hybrid cloud storage, seamlessly extending on-premises storage to AWS cloud.
| Pros | Cons |
|---|---|
| Enables smooth integration between on-premises infrastructure and AWS cloud services. | Additional complexity compared to using native AWS storage services alone. |
| Provides options for file, block, and tape-based storage solutions, catering to various use cases. | Network latency and bandwidth limitations can affect performance in hybrid setups. |
| Data is encrypted in transit and at rest, ensuring security during transfer and storage. |
These are some of the key AWS storage services, and each serves specific storage use cases and scenarios. By leveraging these services, users can take advantage of scalable, reliable, and cost-effective storage solutions to meet their application's data storage and management requirements.

RESTful APIs (Representational State Transfer) are a widely used architectural style for designing web services that adhere to certain principles and conventions. RESTful APIs are designed to be simple, scalable, and easily maintainable, making them popular for building web applications and services that can be consumed by various client applications.
In RESTful APIs, everything is considered a resource. A resource can be any entity or object that the API provides access to. Each resource is identified by a unique URL (Uniform Resource Locator), known as the endpoint. RESTful APIs use standard HTTP methods to perform different operations on resources. The most commonly used HTTP methods are:
- GET: Used to retrieve data from the server.
- POST: Used to create new resources on the server.
- PUT: Used to update existing resources on the server.
- DELETE: Used to remove resources from the server.
- PATCH: Update individual fields of a record.
RESTful APIs use different data formats to represent resources. The most common formats are JSON (JavaScript Object Notation) and XML (eXtensible Markup Language). JSON is more widely used due to its simplicity and ease of parsing. RESTful APIs are stateless, meaning each request from the client to the server must contain all the information needed to understand and process that request. The server does not store any client state between requests.
Live Session Tutorial: Writing REST APIs
Your tutor will facilitate an online class to demonstrate this process in a live setting. Please check 'Live Sessions' in your navigation bar to register and attend this session.
Watch the following video playlist from sudoCODE to explore the basics:
Before deploying an API to production, thorough testing is necessary to ensure it works as expected. Additionally, using version control systems like Git to manage API code helps track changes and maintain codebase integrity. When designing and writing RESTful APIs, it is important to adhere to these principles and best practices to create well-structured, efficient, and user-friendly web services that can be easily consumed by various client applications.
Live Session Tutorial: making two micro-services communicate
Your tutor will facilitate an online class to demonstrate this process in a live setting. Please check 'Live Sessions' in your navigation bar to register and attend this session.

Test-driven development (TDD) is a software development approach where developers write automated tests before writing the actual code. The TDD process follows a specific cycle known as the "Red-Green-Refactor" cycle, which involves the following steps:
Red: Write a Test - In this step, developers first write a test for the functionality they want to implement. This test is expected to fail initially since the corresponding code has not been implemented yet. The test should be focused on a small, specific unit of functionality, ensuring that it's easy to validate.
Green: Implement the Code - In this step, developers write the minimal code necessary to make the previously written test pass. The goal is not to create a perfect implementation but to make the test pass successfully. At this stage, the code might not be optimized or complete; it just needs to pass the test.
Refactor: Improve the Code - After making the test pass, developers improve the code's quality without changing its behaviour. Refactoring may include cleaning up the code, removing redundancies, and ensuring it adheres to coding standards. The test ensures that any changes do not break the expected functionality.
By following this cycle repeatedly, developers incrementally build and refine the application, ensuring that all functionality is backed by automated tests. Here are the key principles and benefits of Test-driven development:
Principles:
- Test First, Code Later: Writing tests before implementing the code helps to clarify the expected behaviour and functionality of the code.
- Incremental Development: TDD encourages developers to build the application incrementally, one small piece at a time, ensuring that each piece is tested and working correctly.
- Regression Testing: Since automated tests are written first, they act as a safety net to catch any regressions or unintended side effects when new code is added or changes are made.
TDD enforces a discipline of writing testable code and encourages refactoring, resulting in cleaner, more maintainable, and better-designed code. By writing automated tests first, developers receive immediate feedback when errors or bugs are detected early in the development process. This early detection makes debugging more efficient and reduces the likelihood of issues in the final product. While TDD offers significant advantages, it is essential to acknowledge that it comes with challenges. Writing tests upfront can be time-consuming and may require developers to invest effort in learning and adapting to the process. However, as developers become more proficient in TDD, its benefits far outweigh the initial investment of time and effort.
White and Block Box Testing
White Box Testing and Black Box Testing are two different approaches to software testing, and they focus on different aspects of the testing process.
White Box Testing
White Box Testing, also known as Clear Box Testing or Structural Testing, is a testing technique where the internal structure, code, and logic of the software application are examined. The tester has access to the source code and is aware of the internal implementation details. The primary goal of White Box Testing is to ensure that all paths and conditions within the code are tested thoroughly.
Key Characteristics of White Box Testing:
- Requires knowledge of the application's internal design and code.
- Focuses on statement coverage, branch coverage, and path coverage to achieve thorough testing.
- Typically conducted by developers or testing teams with programming expertise.
- Aims to validate the correctness of the code's logic and verify the execution of all possible code paths.
Advantages of White Box Testing:
- Identifies errors in code, such as logic errors, boundary issues, and flow control problems.
- Allows for in-depth testing of critical areas within the code.
- Provides developers with insights into code quality and potential improvements.
Black Box Testing
Black Box Testing is a testing approach where the internal structure and code of the software application are not known to the tester. The tester treats the software as a "black box" and tests the functionality and behaviour based on specified inputs and expected outputs. Black Box Testing focuses on validating the software's functionality and features from an end-user perspective without being concerned about the internal implementation.
Key Characteristics of Black Box Testing:
- Does not require knowledge of the application's internal design or code.
- Concentrates on testing the application's external behaviour and user interactions.
- Typically performed by QA testers who do not have access to the source code.
- Aims to identify issues related to incorrect functionality, usability, and compliance with requirements.
Advantages of Black Box Testing:
- Simulates real end-user scenarios, ensuring that the application behaves as expected from a user's perspective.
- Facilitates testing by non-technical testers, making it more accessible to a wider range of team members.
- Helps in uncovering issues that may not be apparent from code inspection.
White vs Black Box Testing
Both White Box Testing and Black Box (Functional) Testing are essential components of a comprehensive testing strategy. White Box Testing validates the internal logic and structure of the code, while Black Box Testing focuses on the software's functionality from an end-user perspective. Both approaches complement each other to ensure the software is robust, reliable and meets the specified requirements.
|
Testing Type |
Pros |
Cons |
|---|---|---|
|
White Box Testing |
Provides in-depth testing of critical code areas. |
Requires knowledge of the application's internal design and code. |
|
Identifies logic errors and flow control issues. |
May not cover all possible real-world scenarios from an end-user perspective. |
|
|
Helps in improving code quality and performance. |
Time-consuming, especially for large codebases. |
|
|
Black Box (Functional) Testing |
Simulates real end-user scenarios. |
Does not provide insights into the application's internal logic. |
|
Accessible to non-technical testers. |
May not uncover certain code-related issues. |
|
|
Focuses on validating functionality and usability. |
Relies on external requirements documentation, which may not be complete or accurate. |
The Testing Process
Testing is an essential phase in the software development life cycle (SDLC) that ensures the quality, functionality, and reliability of a software application. The testing process involves several stages, each serving a specific purpose and contributing to the overall software quality.
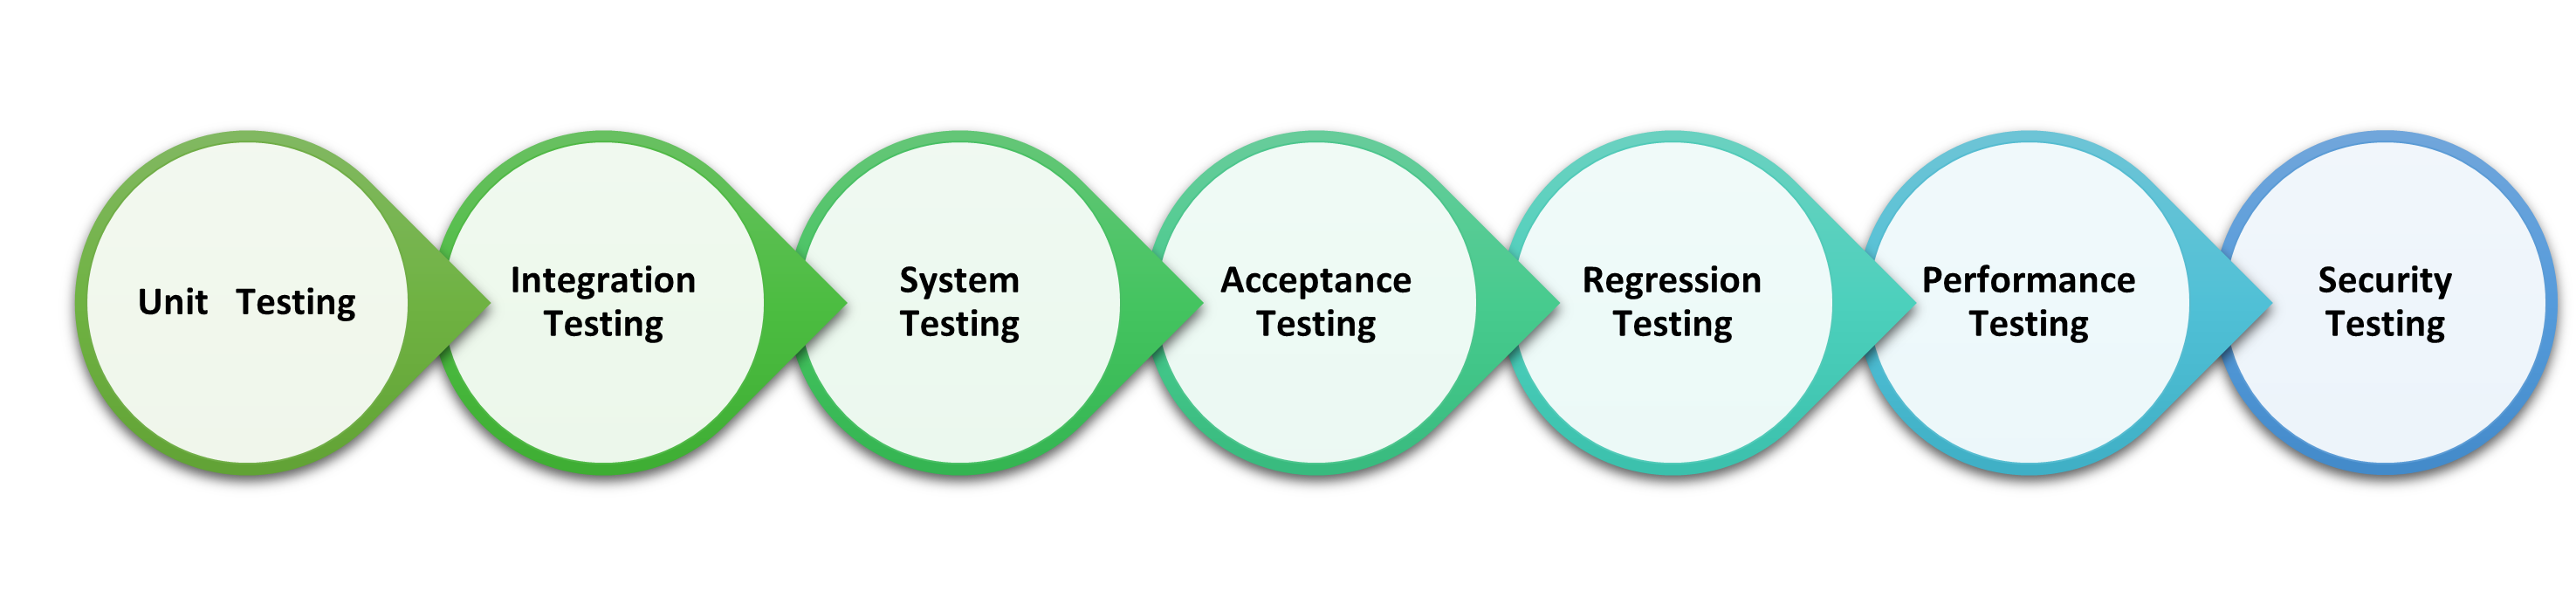
- Unit Testing: Unit testing is the first stage of testing and focuses on verifying the smallest testable parts of the software, known as units. Units are typically individual functions, methods, or classes. Testers write and execute test cases for each unit to validate its correctness and functionality in isolation from the rest of the application. Unit testing helps detect bugs and issues early in the development process.
- Integration Testing: Integration testing comes after unit testing and focuses on testing interactions between different units or modules of the application. The goal is to ensure that the integrated components work together as expected. Testers verify that data and control flow between units are seamless and that the integrated system functions correctly.
- System Testing: System testing involves testing the entire software system as a whole. It verifies that all integrated components work together in compliance with the specified requirements. Testers perform various tests, including functional testing, performance testing, security testing, and usability testing, to ensure the system meets its intended purpose.
- Acceptance Testing: Acceptance testing is the final stage of testing before the software is deployed to production or handed over to the end users. It involves testing the system against the user's acceptance criteria to ensure it meets their needs and expectations.There are two main types of acceptance testing:
- User Acceptance Testing (UAT): Conducted by end-users to validate that the system meets their business requirements and functions as intended.
- Alpha and Beta Testing: Real-world testing performed by a selected group of users (alpha) or a broader audience (beta) to collect feedback and uncover any remaining issues.
- Regression Testing: Regression testing is not a separate stage but rather a recurring process throughout the testing life cycle. It involves retesting the modified or newly added parts of the software to ensure that the changes do not introduce new bugs or negatively impact existing functionalities. Regression testing helps maintain software stability and quality after updates or enhancements.
- Performance Testing: Performance testing evaluates the application's responsiveness, speed, scalability, and stability under various load conditions. It ensures that the software performs optimally, even with multiple users and large datasets. Different types of performance testing include load testing, stress testing, and scalability testing.
- Security Testing: Security testing focuses on identifying vulnerabilities and weaknesses in the software's security mechanisms. Testers simulate potential security breaches to evaluate the system's resilience against malicious attacks. Security testing aims to protect sensitive data and ensure the software meets industry security standards.
Each stage of testing plays a critical role in identifying defects, improving software quality, and ensuring a robust and reliable product. The combination of these testing stages helps deliver high-quality software that meets user requirements and delivers a positive user experience.
In CS204B Cloud Application Development we learned about Containers, let's take a moment to recap. Containers are a form of virtualization technology that enables developers to package applications and their dependencies, including libraries and runtime, in a self-contained unit. This unit called a container, is isolated from the host system and other containers, ensuring that the application runs consistently across various environments. Containers and containerization are integral components of modern cloud application development and deployment. They provide a lightweight and efficient way to package, distribute, and run applications, making it easier to deploy and manage software across different environments.
Containerization has revolutionized cloud application development and deployment by enabling developers to build, ship, and run applications efficiently across diverse environments. The adoption of containers and container orchestration platforms has become a standard practice in modern cloud-native application development due to their numerous advantages in terms of agility, scalability, and maintainability.
Learning Activity
Undertake the research required against each of the points below and post your findings to the forum.
- Understanding Docker: - Explain the Docker platform and its components (Docker Engine, Docker CLI, Docker Hub, etc.). Explore the concept of container images and Dockerfile. Describe how Docker containers are different from virtual machines.
- Benefits of Docker Containers: - RInvestigate the advantages of using Docker containers in software development and deployment. Discuss how containers improve portability, scalability, and resource efficiency. Analyze how Docker containers contribute to the DevOps culture and continuous delivery.
- Docker Use Cases: - Identify various use cases of Docker containers in different industries and domains. Research how companies are leveraging Docker to streamline their application deployment and management processes. Discuss real-world examples of Docker implementation and its impact on development workflows.
- Docker in Cloud-Native Applications: - Research how Docker containers are an integral part of cloud-native application development. Discuss how microservices architecture and Docker complement each other in modern applications. Explore the role of Docker in enabling seamless deployment across multi-cloud environments.
Research Methodology:
- Utilize academic and technical literature, research papers, whitepapers, and official Docker documentation.
- Perform hands-on experiments and demonstrations with Docker to gain practical insights.
AWS Academy Task
Go through the AWS Academy Portal’s videos and the challenge questions of Module 6 (Cloud Foundations) and Module 8 (Cloud Developing).
| Cloud Foundations Module 6 – AWS Cloud Foundations |
|---|
|
This module includes the following sections:
|
| https://awsacademy.instructure.com/courses/50473/modules |
| Cloud Foundations Module 8 – AWS Cloud Developing |
|---|
|
This module includes the following sections:
|
| https://awsacademy.instructure.com/courses/42150/modules |

Web application deployment on the cloud with a database and Amazon S3 involves the process of hosting and running your web application on the cloud platform Amazon Web Services (AWS). This allows your application to be accessible over the internet and provides scalability, reliability, and various managed services to support your application's backend, including a database and storage on Amazon S3. Let's look at the key steps to deploy a web application on the cloud with AWS services:
- Prepare your Web Application:
- Ensure your web application is fully developed and tested locally before deploying it to the cloud.
- Make sure it is optimized and ready for production use.
- Set Up AWS Account:
- Create an AWS account if you don't have one.
- Sign in to the AWS Management Console.
- Choose a Web Application Deployment Option:
- Choose from options like Elastic Beanstalk, EC2, or serverless options like AWS Lambda and API Gateway.
- Choose the option that best suits your application's requirements.
- Deploy the Web Application:
- Deployment steps will vary depending on the chosen option:
- Elastic Beanstalk Deployment:
- Create an Elastic Beanstalk environment and upload your application code.
- Choose the programming language, runtime, and platform for your application.
- Configure environment settings, such as the database connection and environment variables.
- Deploy the application to the Elastic Beanstalk environment.
- EC2 Deployment:
- Launch an EC2 instance with your preferred operating system and configuration.
- Install and configure the required web server (e.g., Apache, Nginx) and runtime environment (e.g., Node.js, Python).
- Upload your web application code to the EC2 instance.
- Set up the database and install necessary database software (e.g., MySQL, PostgreSQL).
- Serverless Deployment with AWS Lambda and API Gateway:
- Package your web application code into AWS Lambda functions.
- Create API endpoints using AWS API Gateway to expose your Lambda functions.
- Configure API Gateway to handle incoming requests and trigger the appropriate Lambda functions.
- Set up the database using Amazon RDS (Relational Database Service) or other managed database services.
- Database Setup:
- Create a database instance on AWS. Use Amazon RDS for relational databases or Amazon DynamoDB for NoSQL databases, depending on your application's needs.
- Configure the database settings, including access credentials and security.
- Store Static Assets on Amazon S3:
- For storing static assets like images, CSS, and JavaScript files, create an Amazon S3 bucket.
- Upload your static assets to the S3 bucket, making them publicly accessible.
- Domain Setup and DNS Configuration:
- If you have a custom domain, set up DNS configuration to point to your web application's cloud resources (e.g., Elastic Beanstalk URL, EC2 instance IP, API Gateway URL).
- Security and Access Control:
- Implement security best practices for your web application, such as using HTTPS, managing IAM (Identity and Access Management) roles, and configuring security groups.
- Testing and Monitoring:
- Perform thorough testing of your web application on the cloud environment to ensure everything works as expected.
- Implement monitoring and logging solutions to keep track of your application's performance and health.
- Scaling and Auto-Scaling:
- Configure auto-scaling for your application to automatically adjust resources based on demand.
- Use AWS services like Elastic Load Balancing to distribute traffic evenly among multiple instances or containers.
Caching S3 Objects
Caching S3 objects on CloudFront is an efficient way to enhance the performance and reliability of your web application
Caching S3 objects on the cloud using Amazon CloudFront CDN (Content Delivery Network) service is an effective way to improve performance and reduce the latency of your web application. CloudFront is a globally distributed network of edge locations that cache and serve content from various AWS services, including Amazon S3. By caching S3 objects on CloudFront, you can deliver content to users from the edge locations nearest to them, reducing the load on the origin (S3 bucket) and providing a faster and more reliable user experience. Caching S3 Objects on CloudFront reduced latency, provides global scalability, lowers the load on S3 and is more cost-effective making it an affordable choice. Let's take a look at the steps to cache S3 objects using CloudFront.
- Create an Amazon S3 bucket - If you don't have an S3 bucket already, create one to store your static objects (e.g., images, CSS files, JavaScript files) that you want to cache with CloudFront.
- Enable Static Website Hosting (Optional) - If you want to use CloudFront to serve your entire static website from the edge locations, you can enable static website hosting on your S3 bucket. This allows CloudFront to act as a content delivery service for your entire website.
- Create a CloudFront Distribution
- Sign in to the AWS Management Console and navigate to the CloudFront service
- Click on "Create Distribution" and choose "Web" as the distribution type.
- In the "Origin Settings" section, select your S3 bucket as the origin and configure the cache behaviours as needed.
- Optionally, you can set up custom SSL certificates, choose the locations for your edge locations (if desired), and configure other settings based on your requirements.
- Click on "Create Distribution" to create the CloudFront distribution.
- Configure Caching Behavior
- In the "Cache Behavior Settings" of your CloudFront distribution, you can set the caching behaviour for different types of content (e.g., images, CSS, JavaScript)./li>
- You can choose whether CloudFront caches the content for a specific duration (TTL - Time To Live) or follows cache-control headers set in your S3 objects' metadata./li>
- Update Your Website's URLs - Update the URLs of your static objects in your web application to use the CloudFront domain name instead of the S3 bucket URL. CloudFront will automatically fetch the content from the S3 bucket and cache it in the edge locations on the first request.
- Invalidate or Update Cached Objects (Optional) - If you update or change your S3 objects frequently, you can use CloudFront's cache invalidation feature to clear cached objects from the edge locations. This ensures that users always get the latest version of the content.
Caching S3 objects on CloudFront is an efficient way to enhance the performance and reliability of your web application, especially for static content. It's a powerful tool to ensure a seamless and fast user experience across different regions and devices.
AWS Academy Task
Go through the AWS Academy Portal’s videos and the challenge questions of Module 9 (Cloud Developing).
| Cloud Foundations Module 9 – AWS Cloud Developing |
|---|
|
This module includes the following sections:
|
| https://awsacademy.instructure.com/courses/42150/modules |

Reliability is a critical aspect of cloud computing, ensuring that cloud services and resources are consistently available and perform as expected. Cloud providers strive to deliver high levels of reliability to meet the demands of modern applications and businesses.
Benefits of Reliability on the Cloud:
- Improved Availability: Services and applications are accessible and operational most of the time, ensuring a positive user experience.
- Increased Business Continuity: Cloud reliability ensures that critical applications and services remain operational, even during hardware failures or disasters.
- Scalability and Flexibility: Cloud services can easily scale up or down to meet changing demands, allowing businesses to adapt quickly to fluctuations in workload.
- Reduced Downtime: Cloud providers' redundancy and failover mechanisms significantly reduce downtime and service interruptions.
So let's take a look at what contributes to the reliability of cloud providers like AWS.
- High Availability: Cloud providers design their infrastructure to offer high availability, meaning services and resources are accessible and functional most of the time. They use redundant components and data centres to minimize downtime and mitigate the impact of hardware failures or maintenance activities.
- Redundancy and Failover: Cloud providers implement redundancy by replicating data and services across multiple data centres or availability zones. If one data centre experiences an issue, the workload is automatically shifted to another location with minimal disruption, a process known as failover.
- Load Balancing: Load balancing distributes incoming traffic across multiple instances or servers, ensuring that no single resource becomes overloaded. This helps maintain steady performance and prevents any one component from becoming a single point of failure. (Review the additional reading below for more information on load balancing)
- Scalability: Cloud services can easily scale up or down based on demand. This ensures that applications can handle increased traffic or resource requirements without sacrificing performance. Auto-scaling mechanisms automatically adjust resources as needed.
- Monitoring and Alerts: Cloud providers offer monitoring and alerting tools that continuously monitor the health and performance of services and resources. DevOps teams can set up alerts to be notified of any anomalies or potential issues, allowing them to take immediate action. (Review the additional reading below for more information on Monitoring using CloudWatch and CloudTrail)
- SLAs (Service Level Agreements): SLAs define the expected level of reliability and uptime that a cloud provider guarantees for its services. These agreements commit the provider to certain performance levels and may include compensation in case of failure to meet the agreed-upon levels.
- Data Backups and Disaster Recovery: Cloud providers often offer data backup and disaster recovery services. They create regular backups of data, ensuring data integrity and recoverability in case of data loss. Disaster recovery plans are in place to address catastrophic failures or events.
- Security Measures: Robust security measures are crucial for reliability. Cloud providers implement various security controls, including encryption, access controls, and network security, to protect data and resources from unauthorized access or attacks.
- Geographical Distribution: Cloud providers have data centres located in various regions around the world. Geographical distribution ensures data and services are close to end-users, reducing latency and improving performance.
- Constant Updates and Maintenance: Cloud providers perform regular updates and maintenance on their infrastructure to ensure security and performance. They often schedule these activities during low-traffic periods to minimize disruption.
By prioritizing reliability, cloud providers deliver a stable and resilient environment, making cloud computing an ideal choice for hosting mission-critical applications and services. Businesses can focus on innovation and growth without worrying about the underlying infrastructure's reliability.
High Availability vs Fault Tolerance
High Availability and Fault Tolerance ensure that applications and services remain accessible and operational even in the face of hardware failures, software issues, or other unforeseen disruptions. Both concepts aim to minimize downtime and provide a seamless user experience. Let's take a look at both concepts side by side.
| High Availability | Fault Tolerance | |
|---|---|---|
| Description |
High availability refers to the ability of a system or application to remain accessible and functional for extended periods, usually measured as a percentage of uptime. The goal of high availability is to minimize downtime and ensure continuous service availability to users. In the cloud, achieving high availability involves designing and deploying redundant resources and services across multiple data centres or availability zones. This ensures that if one component fails, another can take over without disruption, providing seamless service continuity. Cloud providers offer features such as load balancing, auto-scaling, and automatic failover to enhance high availability. These mechanisms distribute traffic evenly and scale resources based on demand to maintain optimal performance even during peak usage. |
Fault tolerance is the ability of a system to continue operating, albeit with reduced performance, in the event of a failure or fault. Unlike high availability, which aims to maintain uninterrupted service, fault tolerance focuses on gracefully handling failures and maintaining basic functionality. In the cloud, achieving fault tolerance involves implementing measures to detect and recover from failures automatically. This may include redundant components, data replication, and automated failover procedures. Cloud providers use techniques like data replication across multiple regions, backup and restore mechanisms, and continuous monitoring to enhance fault tolerance. If a failure occurs, the system can quickly recover without causing significant disruptions. |
| Objective | High availability aims to provide continuous service without interruption, ensuring users can access applications and resources at any time. | Fault tolerance focuses on maintaining basic functionality in the presence of failures, even if it means reduced performance. |
| Response to Failures | In high availability, failures trigger an immediate failover to redundant components, often with minimal or no downtime. | Fault tolerance acknowledges that failures can happen and takes steps to gracefully handle them without sacrificing overall service availability. |
| Impact on Performance | High availability prioritizes performance and may lead to higher costs due to the need for immediate redundancy. | Fault tolerance accepts some performance degradation in favour of maintaining core functionality. |
Live Session Tutorial: Backing up your cloud data and instances
Your tutor will facilitate an online class to demonstrate this process in a live setting. Please check 'Live Sessions' in your navigation bar to register and attend this session.
AWS Academy Task
Go through the AWS Academy Portal’s videos and the challenge questions of Module 6 (Cloud Foundations RECAP) and Module 9 (Cloud Architecting).
| Cloud Foundations Module 6 – AWS Cloud Foundations |
|---|
|
This module includes the following sections:
|
| https://awsacademy.instructure.com/courses/50473/modules |
| Cloud Foundations Module 9 – AWS Cloud Architecting |
|---|
|
This module includes the following sections:
|
| https://awsacademy.instructure.com/courses/42151/modules |

Amazon Web Services (AWS) offers a variety of services and features that allow organizations to design scalable, secure, and cost-effective solutions. To help users make the most of AWS, the platform follows six architectural best practices, often referred to as the "Six Pillars of AWS Well-Architected Framework." These pillars provide guidance for building reliable, efficient, and high-performing applications in the cloud:
1. Operational Excellence:
- Focus on running and monitoring systems to deliver business value continually.
- Automate manual tasks to reduce human error and improve efficiency.
- Establish operational performance metrics to identify areas for improvement.
- Use CloudFormation or AWS CDK for infrastructure-as-code to manage and version-control your infrastructure.
2. Security:
- Implement multiple layers of security to protect data and resources.
- Use AWS Identity and Access Management (IAM) to manage access control and permissions.
- Encrypt data at rest and in transit using AWS Key Management Service (KMS) and SSL/TLS.
- Regularly audit security configurations to ensure compliance with best practices.
3. Reliability:
- Design systems to recover automatically from failures.
- Use multiple availability zones to distribute application components for higher fault tolerance.
- Monitor applications and resources to quickly identify and address issues.
- Implement automated backup and restore processes to ensure data resilience.
4. Performance Efficiency:
- Choose the right AWS resources to meet application requirements and optimize costs.
- Scale resources horizontally to handle varying workloads.
- Leverage AWS services like AWS Auto Scaling and AWS Lambda to automatically adjust resources based on demand.
- Monitor performance and use AWS tools like Amazon CloudWatch to optimize resource utilization.
5. Cost Optimization:
- Use AWS Cost Explorer and AWS Budgets to manage and forecast costs effectively.
- Right-size resources to avoid overprovisioning and unnecessary expenses.
- Use AWS Spot Instances for cost-effective, fault-tolerant workloads.
- Take advantage of AWS Cost Allocation Tags to identify cost centres and optimize spending.
6. Well-Architected Review:
- Regularly conduct reviews of your architecture to ensure alignment with best practices.
- Use AWS Well-Architected Tool or partner solutions to evaluate your architecture against the AWS Well-Architected Framework.
- Continuously improve and iterate on your architecture based on feedback and lessons learned.
By following these best practices and principles, organizations can build robust, scalable, and secure applications on AWS. The Six Pillars provide a framework for designing and operating systems that align with the characteristics of the cloud, making the most of AWS services while minimizing risks and costs.
Sustainability in Cloud Application Development
Following sustainable practices in cloud development is essential for reducing the environmental impact of your applications and infrastructure. By adopting environmentally friendly strategies, you can minimize resource waste, energy consumption, and carbon footprint. Here are some guidelines to help you integrate sustainability into your cloud development process:
- Optimize Resource Usage:
- Utilize cloud services efficiently, provisioning only the resources needed to meet your application's requirements.
- Regularly review your resource utilization to identify areas for optimization.
- Implement autoscaling to dynamically adjust resource allocation based on demand.
- Choose Energy-Efficient Regions:
- Opt for cloud regions that use renewable energy sources and have a lower carbon footprint.
- Consider using cloud providers' "Carbon Footprint" reports to make informed decisions about region selection.
- Leverage Serverless and Containerization:
- Utilize serverless computing (e.g., AWS Lambda) to reduce resource usage and energy consumption.
- Use containerization platforms like Docker to optimize application deployment and resource allocation.
- Implement Green Data Practices:
- Make use of data compression and deduplication to reduce storage needs and data transfer.
- Clean up and delete unnecessary data regularly to avoid storage waste.
- Opt for Renewable Energy Credits (RECs):
- Consider participating in cloud providers' Renewable Energy Credits (RECs) or carbon offset programs.
- Support renewable energy projects and offset your carbon emissions.
- Use Serverless Database Options:
- Utilize managed database services (e.g., Amazon RDS, DynamoDB) for better energy efficiency and automation.
- Implement Power Management:
- Enable power management features on your virtual machines and instances to reduce energy consumption during idle periods.
- Monitor and Optimize:
- Use cloud monitoring tools like Amazon CloudWatch to track resource utilization and identify areas for optimization.
- Continuously analyze performance and cost data to make informed decisions about resource allocation.
- Educate Team Members:
- Educate your development team about the importance of sustainability in cloud development.
- Encourage them to adopt best practices and participate in eco-friendly initiatives.
- Commit to Green Initiatives:
- Advocate for green initiatives within your organization and partner with cloud providers that prioritize sustainability and environmental responsibility.
By incorporating these sustainable practices into your cloud development process, you can create applications and infrastructure that are not only efficient and cost-effective but also environmentally friendly. It's important to be mindful of your cloud resource usage and continually seek ways to minimize your environmental impact while delivering high-quality solutions.
AWS Academy Task
Go through the AWS Academy Portal’s videos and the challenge questions of Module 9 (Cloud Foundations).
| Cloud Foundations Module 9 – AWS Cloud Foundations |
|---|
|
This module includes the following sections:
|
| https://awsacademy.instructure.com/courses/50473/modules |