In this topic, we concentrate on the upper body. This is a big topic so remember to take notes and to add any unfamiliar terms and exercises to your terminology and vocabulary reference guide! You will learn how to perform and teach clients 18 specific exercises listed in the following table:
| Bench press | Pec deck | Lat pulldown |
| Machine bench press | Overhead/shoulder press | Seated row |
| Chest press | Front raise | One-arm row |
| Push-ups | Lateral raise | Bent over row |
| Pec flys | Shrugs | Upright row |
| Cable crossover flies | Pullups/chin-ups | Rear deltoid raises |
Terminology and vocabulary reference guide
As an allied health professional, you need to be familiar with terms associated with basic exercise principles and use the terms accurately (and confidently) with clients, your colleagues, and other allied health professionals. You will be introduced to many terms and definitions. Add any unfamiliar terms to your own vocabulary reference guide.
Activities
There are several practical activities in the topic and an end of topic automated quiz. These are not part of your assessment but will provide practical experience to help you in your work and help you prepare for your formal assessment.
You will study images of each exercise and read the information on the major muscles, the equipment options, and the key coaching points and steps. You may wish to refer back to the following illustrations as you review each exercise. It is important you become comfortable with these aspects of the exercises, in a sense this information is the why, where, when, how of training. The more comfortable you become the more comfortable you will be able to make your clients when working with you.
As you describe these exercises time and time again (which you will) you will develop your own spin which works for you but first, become comfortable with the following information. Practice, practice!

Equipment
Equipment you will commonly use include:
Let's get started!
Before we look at each exercise and their specifics, let's first look at training posture. Having an awareness of our posture when we are training will lead to safe and effective exercising. This means, our bones, muscles, and joints should ideally be in their 'happy place' for optimal movement/stability/function and support.
Training posture can be described as having specific characteristics:
- Chin 'tucked in' being mindful of the cervical portion of the spine-retraction of the head. This will straighten the neck region.
- Eyes are looking straight ahead.
- Shoulders are 'back and down' (removing the rounded/shrugged shoulder posture and pulling out shoulder blades back into 'anatomical position'). This would be retraction and depression of the clavicles and scapula.
- Engage/activate the core. This is important for 'good/safe posture' when exercising as it stabilises the hips and supports the lower back along with giving the tummy muscles a 'wake up'.
- Neutral pelvis. This is important for good/safe posture' when exercising as it stabilises the hips and supports the lower back. See the image below which illustrates the neutral pelvis.
- Feet hip-width apart (typically ankles are in line with the ball and socket region of the hips). Note: This will be modified in some exercises where the shoulder-width distance of the feet is more appropriate for the exercise being performed.
- Knees in line with hips (ball and socket region) and approximately in line with middle toe.
- Feet pointing forward.
As a trainer, encourage your client to think about these points as they are performing the exercises. Some ways to activate the core include drawing in the belly button (sucking it in) as you would when on the beach and an attractive man/woman walks past (we all do it). This is also a handy way to describe this action to your client because using descriptors such as 'Activate your transverse abdominus' or 'Engage your core' will mean something to your colleagues but likely mean very little to your average client! Therefore, translating this into everyday words and something we can all relate to helps your client understands what you are asking of them (it will also ensure that when they train in their own time, they are doing it safely).
Neutral pelvis
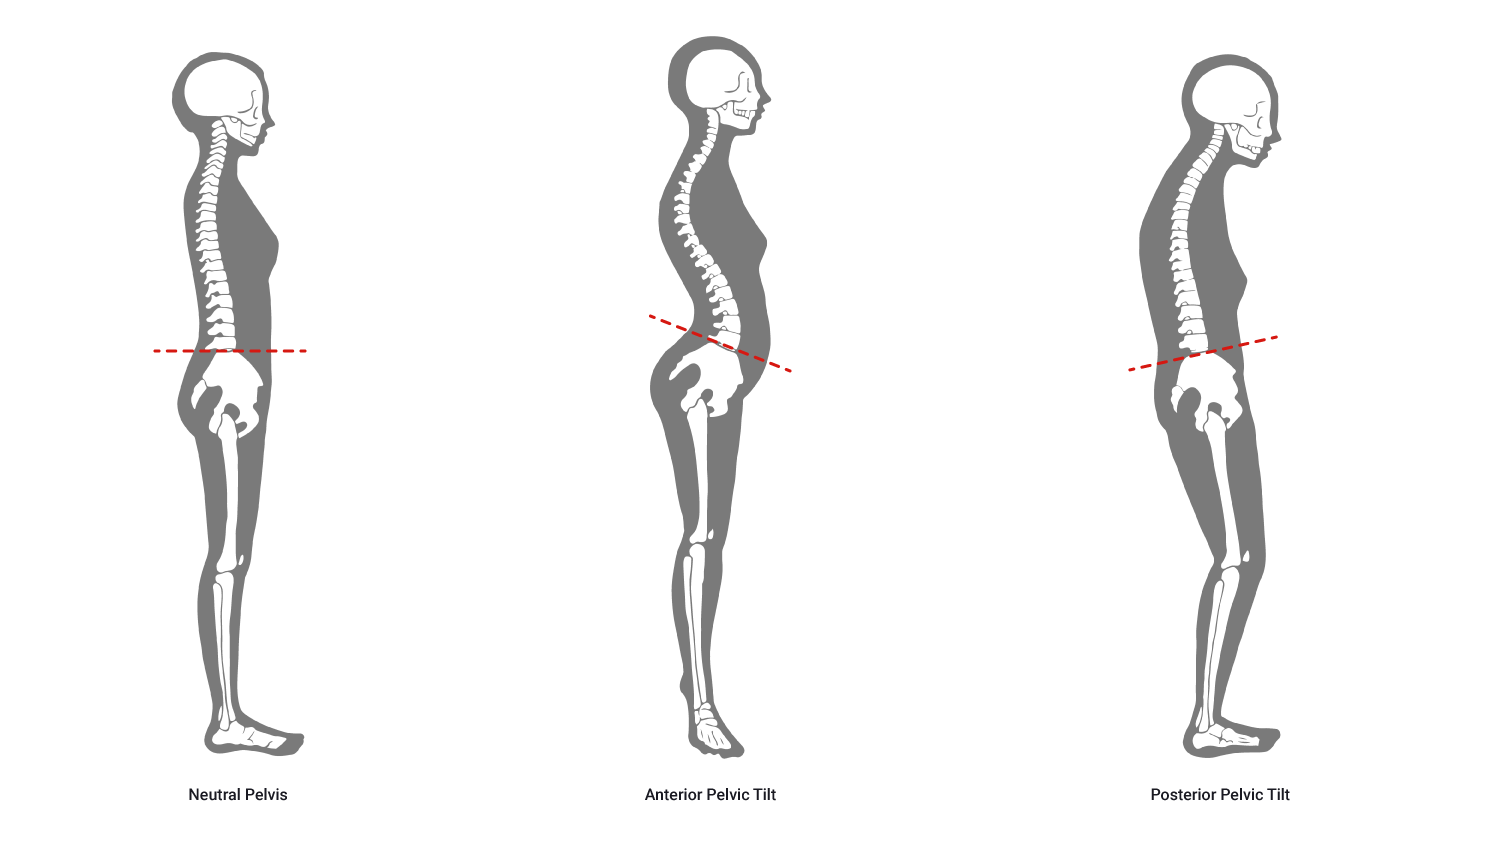
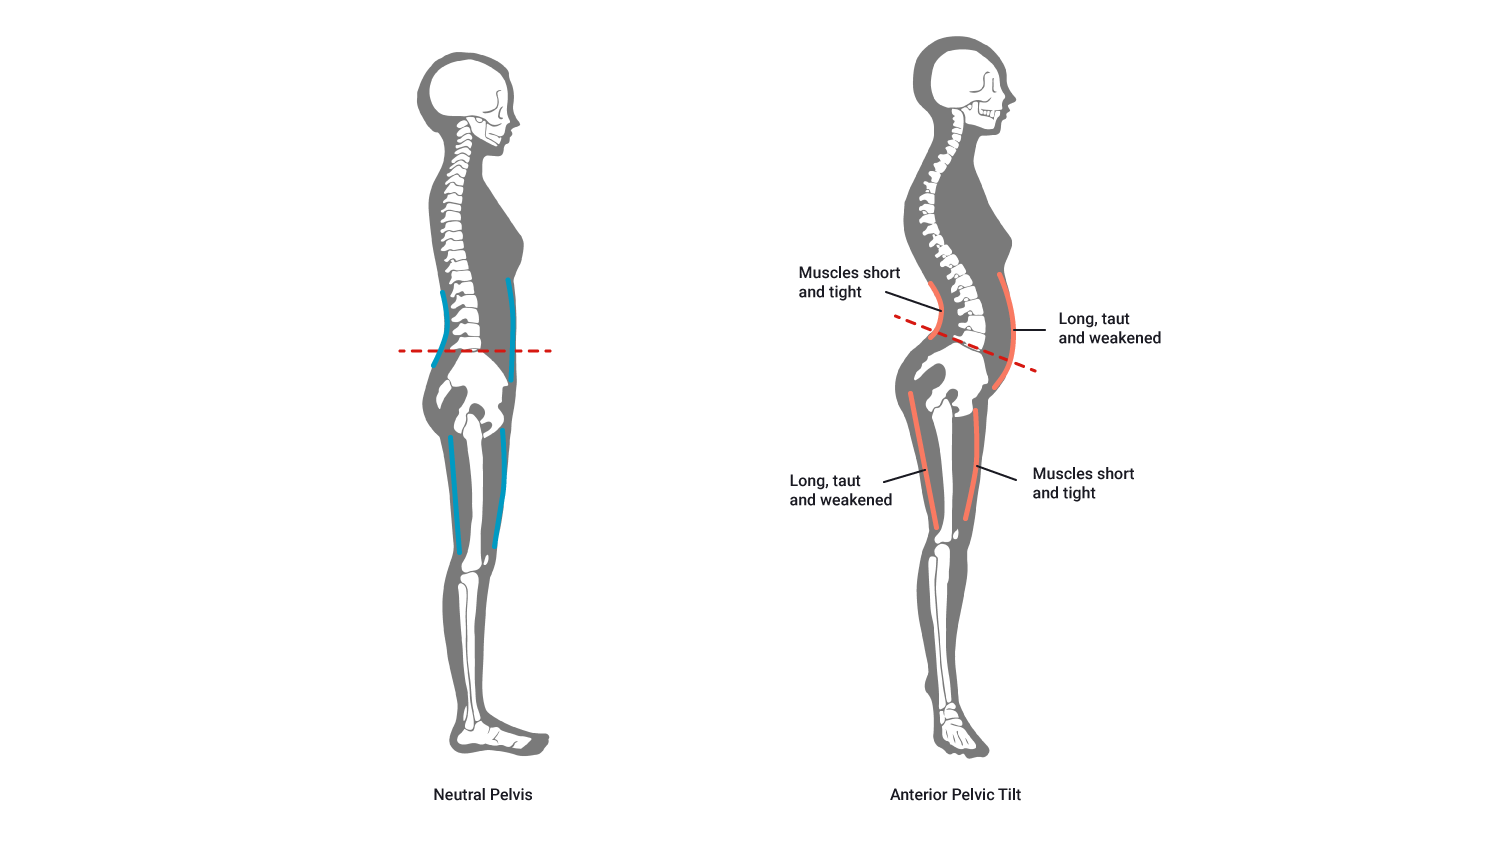
Neutral pelvis acts to ensure the posture of the lower region of the spine (lumbar and sacrum) and in their anatomical alignment, removing any 'poor posture' and ensuring the spine is efficient and safely aligned prior to and during exercise. When training, neutral pelvis can be tricky to maintain, particularly when getting tired. With this in mind, it is important to do a mental checklist of all the training posture points during an exercise and particularly between each repetition. This will soon become unconscious behaviour however in the early days, it is important to mentally run through the checklist and review each area of the body to assess if training posture is intact.
There are five (5) contact points for supine (person is lying face upwards) exercises:
- Feet: Have feet firm placed on the ground of another even surface such as a small step-up bench or platform. Have ankles in line with knees and knees in line with hips for a stable and secure lower body posture.
- Glutes: Keep the glutes in contact with the bench throughout the exercise to ensure the lower back muscles are only supporting the exercise and not actually performing the exercise.
- Shoulders: to keep the shoulder blades (scapula) safe and secure throughout the exercise, the best position to maintain is to fully retract and depress the scapula to begin and ensure this is maintained throughout the exercise. A handy way to describe this movement is to think of putting the shoulder blades "back in your pocket", squeeze them together and push them down.
- Head: The safest placement of the head, in order to take care of the cervical spine, is to ensure the head remains on the bench throughout the movement.
- Hands: Hands should be placed symmetrically along the bar with the middle of the head as an imaginary midline. Varying the grip will alter the contribution of different muscles and the gains achieved from the exercise, consider variations carefully in relation to your client's goals.

The following table provides information on the major muscles, variations, and equipment options.
| Major muscles | Variations/progressions | Equipment options |
|---|---|---|
|
Pectoralis major Anterior deltoid Triceps Serratus anterior |
Incline (activates upper fibers of pecs) Decline (activates lower fibers of pecs Flat (activates middle fibers of pecs) Vary grip width (closer grip isolates central part of pecs; while a wider grip isolates lateral part of pecs) |
Barbell Machine Swiss ball Bands Dumbbells |
Key coaching points and steps
- Lie faceup on a horizontal bench, with five points of contact.
- Adopt training posture (ensure safe lifting of the bar into starting position).
- Grasp the barbell with an overhand grip slightly wider than shoulder-width and maintain a flat back.
- Review training posture (ensure this is in place before repetitions begin).
- Inhale and lower the bar to the chest with a controlled movement.
- The barbell should follow a slightly arched movement, from chin line to nipple line and back.
- Exhaling, extend the arms moving the barbell from nipple to chin (opposite movement to above). Avoid locking elbows at the end of the eccentric phase, keep elbows 'soft'.
- Review training posture and adjust where required before the next repetition.
Note the safety precautions for this exercise.
Bench presses and pain
Elbow and wrist pain most often develop after bench pressing. This is something you as the personal trainer can help a client avoid by observing the following recommendations.
- This overuse injury is generally related to excessive training with long sets. In bench pressing, locking the elbows at extension can cause rubbing and microtrauma which will lead to inflammation and pain.
- At the first sign of elbow pain, avoid exercises that involve arm extension for several days and ice. If you (or the client) keep working out with this condition you may get intra-articular calcifications which may need surgery to fix!
- Some people will also get wrist pain with narrow grips depending on your (or the client’s) physical structure. Check posture to ensure wrists are straight during all stages of the movement, the using a wider grip can often ease the pain. Excessive benching can also form muscular imbalances between the front and back of the shoulder.
- Overdeveloped anterior shoulders will cause the humerus (upper arm bone) to pull back against its shoulder socket joint. You must balance pressing exercises out with overhead presses and rotator cuff work. Observe that elbows are not passing the rib cage when performing the end movement, this would cause excessive straining on the shoulders. Ensure movement ends where elbows stop slightly above the line of the shoulder socket.

There are five (5) contact points for supine (person is lying face upwards) exercises:
- Feet: Have feet firm placed on the ground of another even surface such as a small step-up bench or platform in order to have ankles in line with knees and knees in line with hips for a stable and secure lower body posture.
- Glutes: Keep the glutes in contact with the bench throughout the exercise to ensure the lower back muscles are only supporting the exercise and not actually performing the exercise.
- Shoulders: To keep the shoulder blades (scapula) safe and secure throughout the exercise, the best position to maintain is to fully retract and depress the scapula to begin and ensure this is maintained throughout the exercise. A handy way to describe this movement is to think of putting the shoulder blades "back in your pocket", squeeze them together and push them down.
- Head: The safest placement of the head, in order to take care of the cervical spine, is to ensure the head remains on the bench throughout the movement.
- Hands: Hands should be placed symmetrically along the bar with the middle of the head as an imaginary midline. Varying the grip will alter the contribution of different muscles and the gains achieved from the exercise, consider variations carefully in relation to your client's goals.
The following table provides information on the major muscles, variations, and equipment options.
| Major muscles | Variations/progressions | Equipment options |
|---|---|---|
|
Pectoralis major Anterior deltoid Triceps Serratus anterior |
Incline (activates upper fibers of pecs) Decline (activates lower fibers of pecs Flat (activates middle fibers of pecs) Vary grip width (closer grip isolates central part of pecs; while a wider grip isolates lateral part of pecs) |
Barbell Machine Swiss ball Bands Dumbbells |
Key coaching points and steps
- Lie faceup on an incline bench, with five points of contact. ( typically incline benches are fixed however adjustable machines present options of angles, 45 degrees is generally a good rule of thumb although an adjustable machine can range from 30 to 75 degrees and will depend on factors such as height, muscle focus, and body type)
- Adopt training posture (ensure safe lifting of the bar into starting position).
- Grasp the barbell with an overhand grip slightly wider than shoulder-width and maintain a flat back.
- Review training posture (ensure this is in place before repetitions begin).
- Inhale and lower the bar to the chest with a controlled movement.
- The barbell should follow a slightly arched movement, from chin line to nipple line and back.
- Exhaling, extend the arms moving the barbell from nipple to chin (opposite movement to above). Avoid locking elbows at the end of the eccentric phase, keep elbows 'soft'.
- Review training posture and adjust where required before the next repetition.
Note: If doing incline bench use angle of 45-60°, and with a decline use angle of 20-40° approx. Note the safety precautions for this exercise.
Bench presses and pain
Elbow and wrist pain most often develop after bench pressing. This is something you as the personal trainer can help a client avoid by observing the following recommendations.
- This overuse injury is generally related to excessive training with long sets. In bench pressing, locking the elbows at extension can cause rubbing and microtrauma which will lead to inflammation and pain.
- At the first sign of elbow pain, avoid exercises that involve arm extension for several days and ice. If you (or the client) keep working out with this condition you may get intra-articular calcifications which may need surgery to fix!
- Some people will also get wrist pain with narrow grips depending on your (or the client’s) physical structure. Check posture to ensure wrists are straight during all stages of the movement, the using a wider grip can often ease the pain. Excessive benching can also form muscular imbalances between the front and back of the shoulder.
- Overdeveloped anterior shoulders will cause the humerus (upper arm bone) to pull back against its shoulder socket joint. You must balance pressing exercises out with overhead presses and rotator cuff work. Observe that elbows are not passing the rib cage when performing the end movement, this would cause excessive straining on the shoulders. Ensure movement ends where elbows stop slightly above the line of the shoulder socket.

There are five (5) contact points for supine (person is lying face upwards) exercises:
- Feet: Have feet firm placed on the ground of another even surface such as a small step-up bench or platform in order to have ankles in line with knees and knees in line with hips for a stable and secure lower body posture.
- Glutes: Keep the glutes in contact with the seat (and backrest) throughout the exercise to ensure the lower back muscles are only supporting the exercise and not actually performing the exercise.
- Shoulders: To keep the shoulder blades (scapula) safe and secure throughout the exercise, the best position to maintain is to fully retract and depress the scapula to begin and ensure this is maintained throughout the exercise. A handy way to describe this movement is to think of putting the shoulder blades "back in your pocket", squeeze them together and push them down.
- Head: The safest placement of the head, in order to take care of the cervical spine, is to ensure the head remains on the headrest of the machine throughout the movement.
- Hands: Hands in an overhand grip on the handles offered by the machine.
The following table provides information on the major muscles, variations, and equipment options.
| Major muscles | Variations/progressions | Equipment options |
|---|---|---|
|
Pectoralis major Anterior deltoid Triceps Serratus anterior |
Incline (activates upper fibers of pecs) Decline (activates lower fibers of pecs Flat (activates middle fibers of pecs) Vary grip width (closer grip isolates central part of pecs; while a wider grip isolates lateral part of pecs) |
Barbell Machine Swiss ball Bands Dumbbells |
Key coaching points and steps
- Sit within the frame of the machine, with five points of contact.
- Adopt training posture (ensure safe lifting of the bar into starting position).
- Grasp the handles offered by the machine in an overhand grip style. Ensure the starting position of the machine enables the line of the hands to be in line with the nipples, this may mean adjusting the seat of the machine to achieve this before you begin. this creates the same movement pattern as on a bench whilst performing the exercise on the machine, as is, the movement pattern required to achieve maximal pec major input
- Review training posture (ensure this is in place before repetitions begin).
- Inhale and push the handles away from the chest in a controlled movement.
- The handles should follow a slightly arched movement, from chin line to nipple line and back.
- Exhaling, extend the arms moving the barbell from nipple to chin (opposite movement to above). Avoid locking elbows at the end of the eccentric phase, keep elbows 'soft'.
- Review training posture and adjust where required before the next repetition.
Bench presses and pain
Elbow and wrist pain most often develop after bench pressing. This is something you as the personal trainer can help a client avoid by observing the following recommendations.
- This overuse injury is generally related to excessive training with long sets. In bench pressing, locking the elbows at extension can cause rubbing and microtrauma which will lead to inflammation and pain.
- At the first sign of elbow pain, avoid exercises that involve arm extension for several days and ice. If you (or the client) keep working out with this condition you may get intra-articular calcifications which may need surgery to fix!
- Some people will also get wrist pain with narrow grips depending on your (or the client’s) physical structure. Check posture to ensure wrists are straight during all stages of the movement, the using a wider grip can often ease the pain. Excessive benching can also form muscular imbalances between the front and back of the shoulder.
- Overdeveloped anterior shoulders will cause the humerus (upper arm bone) to pull back against its shoulder socket joint. You must balance pressing exercises out with overhead presses and rotator cuff work. Observe that elbows are not passing the rib cage when performing the end movement, this would cause excessive straining on the shoulders. Ensure movement ends where elbows stop slightly above the line of the shoulder socket.

There are five (5) contact points for supine (person is lying face upwards) exercises:
- Feet: Have feet firm placed on the ground of another even surface such as a small step-up bench or platform in order to have ankles in line with knees and knees in line with hips for a stable and secure lower body posture.
- Glutes: Keep the glutes in contact with the bench throughout the exercise to ensure the lower back muscles are only supporting the exercise and not actually performing the exercise.
- Shoulders: to keep the shoulder blades (scapula) safe and secure throughout the exercise, the best position to maintain is to fully retract and depress the scapula to begin and ensure this is maintained throughout the exercise. A handy way to describe this movement is to think of putting the shoulder blades "back in your pocket", squeeze them together and push them down.
- Head: The safest placement of the head, in order to take care of the cervical spine, is to ensure the head remains on the bench throughout the movement.
- Hands: Hands should be placed symmetrically along the bar with the middle of the head as an imaginary midline. Varying the angle will alter the contribution of different muscles and the gains achieved from the exercise and place different demands upon the ligaments and tendons around the joints (wrist, elbow, and shoulders) keep this in mind when selecting and supervising exercises for your clients, consider variations carefully in relation to your client's goals and abilities.
The following table provides information on the major muscles, variations and equipment options.
| Major muscles | Variations/progressions | Equipment options |
|---|---|---|
|
Pectoralis major Anterior deltoid Triceps Serratus anterior |
Incline (activates upper fibers of pecs) Decline (activates lower fibers of pecs Flat (activates middle fibers of pecs) Vary grip width (closer grip isolates central part of pecs; while a wider grip isolates lateral part of pecs) |
Dumbbell Machine Swiss ball Bands |
Key coaching points and steps
- Lie faceup on a horizontal, incline, or declined bench, with five points of contact.
- Adopt training posture (ensure safe lifting of the bar into starting position).
- Grasp the dumbbells with an overhand grip slightly wider than shoulder-width and maintain a flat back.
- Review training posture (ensure this is in place before repetitions begin).
- Inhale, with dumbbells inline with nipples, push dumbbells away from the body in an arch (from nipples to chin).
- Dumbbells should follow a slightly arched movement, from nipple line to chin line and back.
- Exhaling, extend the arms moving the dumbbell from chin line to nipple line (opposite movement to above). Avoid locking elbows at the end of the eccentric phase, keep elbows 'soft.
- Review training posture and adjust where required before the next repetition.
Bench presses and pain
Elbow and wrist pain most often develop after bench pressing. This is something you as the personal trainer can help a client avoid by observing the following recommendations.
- This overuse injury is generally related to excessive training with long sets. In bench pressing, locking the elbows at extension can cause rubbing and microtrauma which will lead to inflammation and pain.
- At the first sign of elbow pain, avoid exercises that involve arm extension for several days and ice. If you (or the client) keep working out with this condition you may get intra-articular calcifications which may need surgery to fix!
- Some people will also get wrist pain with narrow grips depending on your (or the client’s) physical structure. Check posture to ensure wrists are straight during all stages of the movement, the using a wider grip can often ease the pain. Excessive benching can also form muscular imbalances between the front and back of the shoulder.
- Overdeveloped anterior shoulders will cause the humerus (upper arm bone) to pull back against its shoulder socket joint. You must balance pressing exercises out with overhead presses and rotator cuff work. Observe that elbows are not passing the rib cage when performing the end movement, this would cause excessive straining on the shoulders. Ensure movement ends where elbows stop slightly above the line of the shoulder socket.
Note: Be mindful of the different demands upon the ligaments and tendons around the joints in relation to movement patterns and angles at the elbows and wrists and shoulders when selecting and supervising exercises for your clients, consider variations carefully in relation to your client's goals and abilities.

The following table provides information on the major muscles, variations and equipment options.
| Major muscles | Variations/progressions | Equipment options |
|---|---|---|
|
Pectoralis major Anterior deltoid Triceps |
Flat Incline (isolates inferior part of pecs) Decline (isolates clavicular head of pecs) Vary grip width (hands wider isolates lateral part of pecs; hands closer isolates the sternal head of pecs) |
Body weight BOSU or stability trainer External weights (i.e. weight vest) |
Key coaching points and steps
- Support yourself facedown on the ground, with arms extended, hands shoulder-width (or more) apart, and feet touching or slightly apart.
- Adopt training posture.
- Consider the body one solid piece (that is, everything moves as one unit).
- Inhale and bend the elbows to bring chest close to the ground without arching the lower back excessively.
- Push back up to complete arm extension (maintain 'soft' elbows, that avoids locking elbow joints)
- Exhale at end of movement.
- Review training posture and adjust where required before the next repetition.

The following table provides information on the major muscles, variations and equipment options.
| Major muscles | Variations/progressions | Equipment options |
|---|---|---|
|
Pectoralis major Anterior deltoid |
Incline/decline bench Rotating arm with ascent/decent |
Dumbbells Cables Bands |
Key coaching points and steps
- Lie on a narrow bench that won’t interfere with the shoulder movement and hold a dumbbell in each hand with arms extended and slightly bent to relieve stress on the joint.
- Adopt training posture.
- Inhale and open the arms to horizontal ensuring the elbows do not pass the line of the nipples/rib cage.
- Raise the arms to vertical while exhaling.
- Perform a small isometric contraction at the end of the movement to emphasize the work on the sternal head of pecs
- Review training posture and adjust where required before the next repetition.
Note:
- Never perform this lift with heavy weights.
- Be mindful of the different demands upon the ligaments and tendons around the joints (wrist, elbow, and shoulders).

The following table provides information on the major muscles, variations, and equipment options.
| Major muscles | Variations/progressions | Equipment options |
|---|---|---|
|
Pectoralis major Anterior deltoid |
Change angle of pull (adjust height of cable) Change torso angle |
Cable machine Bands |
Key coaching points and steps
- Stand with legs slightly apart and lean the torso forward a bit, with arms spread apart and elbows slightly bent.
- Engage training posture.
- Inhale and squeeze the arms together until the wrists touch, maintaining training posture throughout the movement.
- Exhale at the end of a contraction.
- Squeeze pecs at end of movement.
- Review training posture and adjust where required before the next repetition.
Note:
- You can work all the fibres of the pecs by varying the angle of the chest and the working angle of the arms.
- This exercise also works the pectoralis minor, which stabilises the scapular and pulls it forward.
- For more advanced clients, the power stance of one foot slightly in front of the other can be adopted, as long as core and stabilization can be maintained throughout the movement.

The following table provides information on the major muscles, variations and equipment options.
| Major muscles | Variations/progressions | Equipment options |
|---|---|---|
|
Pectoralis major Anterior deltoid |
Standing/seated Back against wall Vary grip (neutral/pronated) Lying facedown on an incline bench Cable machine |
Dumbbell Barbell Bands Cable machine |
Key coaching points and steps
This exercise works the pecs by stretching it.
- Sit on the machine, ensure the machine is set so hands begin in line with nipple line and feet are flat on the floor (aiming to have knee joint in line with ball and socket of hip i.e things at right angles to the floor).
- Adopt training posture.
- Sit on the machine with arms slightly behind the body, inhale and squeeze the arms together.
- Exhale at end of the movement.
- As the hands come together, focus the effort onto the sternal head of the pecs.
- Exhale at end of the movement.
- Review training posture and adjust where required before the next repetition.
Note:
- This exercise is good for beginners needing to develop enough strength to move onto more complex exercises.
- Ensure feet are flat on the floor and pointing forward. If a client has difficulty placing feet flat on the floor, adjust the seat. If further adjustment is required, consider using another flat surface like a step-up bench placed under their feet while seated.
The following table provides information on the major muscles, variations, and equipment options.
| Major muscles | Variations/progressions | Equipment options |
|---|---|---|
|
Trapezius (upper fibers) Triceps Medial deltoid |
Standing/seated Dumbbell/barbell Alternating Shoulder rotation Front press |
Dumbbell Barbell (military press) Seated on Swiss ball/bench Machine |
Key coaching points and steps
- Sit on a bench, keeping the back straight, and hold dumbbells at shoulder level with an overhand grip.
- Adopt training posture.
- Inhale and extend arms vertically, gently touching weights above the crown of the head.
- Ensure elbows remain 'soft' at the end of the movement (that is, not 'locked').
- Exhale at end of movement.
- In a controlled movement, return the elbows back to the shoulder level.
- Review training posture and adjust where required before the next repetition.
Note: It is important to maintain the core particularly during exercises, particularly free weight-based exercises to ensure the lower back is protected throughout (decreasing risk of injury).

The following table provides information on the major muscles, variations, and equipment options.
| Major muscles | Variations/progressions | Equipment options |
|---|---|---|
|
Anterior deltoid Pectoralis major (upper fibers) |
Standing/seated Back against wall Vary grip (neutral/pronated) Lying facedown on an incline bench Cable machine |
Dumbbell Barbell Bands Cable machine |
Key coaching points and steps
Cable frontal raise
- Stand with feet shoulder-width apart.
- Begin with hand(s) against the thighs or slightly to the side.
- Adopt training posture.
- Inhale and alternate raising the arms to the front to eye level.
- Exhale as the arm raises, in line with the shoulder (wrist, elbow, and shoulder in line with each other).
- In a controlled movement, bring the arm back to the resting position (in front of/slightly to the side of the thigh).
- Review training posture and adjust where required before the next repetition.
Note: Typically performed one arm at a time, alternating sides.
Dumbbell frontal raise
- Stand with feet slightly apart, holding the dumbbells with an overhand grip as they rest against the front of the thighs or slightly to the side.
- Adopt training posture.
- Inhale and alternate raising the arms in line with the shoulder (wrist, elbow, and shoulder in line with each other).
- In a controlled movement, bring the arm back to the resting position (in front of/slightly to the side of the thigh).
- Review training posture and adjust where required before the next repetition.
Note: All movements that raise the arms contract the muscles that anchor the scapula to the rib cage, such as serratus anterior and rhomboids. This creates a stable support for the humerus to move from.

The following table provides information on the major muscles, variations and equipment options.
| Major muscles | Variations/progressions | Equipment options |
|---|---|---|
|
Medial deltoid Trapezius (especially if arms are lifted above parallel) |
Neutral grip Pronated grip Sitting/standing Cables |
Dumbbell Barbell Sitting on Swiss ball Bands Machine |
Key coaching points and steps
- Stand with a straight back, with legs slightly apart, arms hanging next to the body, holding a dumbbell in each hand.
- Adopt training posture.
- Inhale, raising the arms to horizontal with the elbows slightly bent.
- Aim to keep the arms slightly below shoulder height.
- In a controlled movement, return the arms back towards the side of the body by the thighs, exhaling as the arms descend.
- Return to the initial position.
- Review training posture and adjust where required before the next repetition.
-
Barbell shrugs
-
dumbbell shrugs
The following table provides information on the major muscles, variations, and equipment options.
| Major muscles | Variations/progressions | Equipment options |
|---|---|---|
|
Trapezius (upper fibers) Deltoid |
Dumbbell Barbell Standing/seated Shoulder rotation |
Dumbbell Barbell Machine Bands |
Key coaching points and steps
- Stand with legs slightly apart (approximately shoulder width for stability), head upright and looking straight ahead, or slightly flexed forward griping dumbbell at sides or barbell at front.
- Adopt training posture.
- Shrug the shoulders with an anterior to posterior rotation; keep the arms relaxed, back straight, and abdominals contracted.
- Return to the initial position.
- Review training posture and adjust where required before the next repetition.
Note: Heavy weights are not needed for this type of exercise, shoulders are slimmer muscles than others in both therefore do not require the same heavy weight when targeting this muscle group.
Note the safety precautions for this exercise.
Shoulder pain when lifting
Most weightlifting injuries occur when training the deltoids and rarely result in muscle pulls or tears. They are usually caused by poor technique or overusing the tendons reinforcing the shoulder capsule.
When some people perform exercises where they raise the arms, such as extensions from behind the neck or lateral raises, the supraspinatus tendon is rubbed and compressed between the head of the humerus and the tendons originating from the collar bone (entrapment). Inflammation soon follows.
Some people have smaller distances between the humerus and these tendons, they will develop shoulder pain more regularly. These people should avoid behind the head extensions (including behind head lat pulldowns) and lateral raises that go to high.
Another cause of shoulder pain is an imbalance in muscle tension around shoulder ball and socket joint. Muscles hold the ball in the socket of this joint from in front, on top, and behind. If one or more gets tight or loose, the ball and socket joint will not line up correctly. This is a common cause of shoulder pain.
- Pull ups on bar
- Assisted chin up (machine)
The following table provides information on the major muscles, variations, and equipment options.
| Major muscles | Variations/progressions | Equipment options |
|---|---|---|
|
Latissimus dorsi Trapezius (Middle fibers) Biceps Teres Major Rhomboids |
Hands neutral Hands pronated Hands supinated Vary grip width |
Pull up bar Assisted machine |
Key coaching points and steps
- Hang from a fixed bar generally with a shoulder-width wide overhand grip.
- Adopt training posture, maintain core, shoulders, and ensure elbows are fully extended, however, never locked.
- Inhale and pull chest up to the level of the bar (avoid a swinging movement for momentum).
- Exhale at the end of the movement.
- Lower the body in a controlled movement towards the ground, returning to starting position (keep elbows soft).
- Review training posture and adjust where required before the next repetition.
Note: To avoid tendinitis of the distal tendon of the biceps, keep elbows slightly bent.
The following table provides information on the major muscles, variations and equipment options.
| Major muscles | Variations/progressions | Equipment options |
|---|---|---|
|
Latissimus dorsi Trapezius (middle fibers) Teres major Biceps Rhomboids |
Hands neutral Hands pronated/supinated Vary grip width To front/back of the head |
Machine |
Key coaching points and steps
- Sit facing the machine with the legs positioned under the pads, feet flat on the floor, pointing forward.
- Grip the bar with a wide overhand grip.
- Maintaining a straight back and engaged core, tilt back slightly from the hips with the upper body as one entire unit for complete lat engagement (and posture stabilisation)
- Inhale and pull the bar down to sternal notch while slightly puffing out the chest and pulling elbows back.
- Exhale at the end of the movement.
- Review training posture and adjust where required before the next repetition.
Note:
- Avoid 'swinging' when lifting heavy weights in a lat pull down, if this occurs, lower the weight to a safe weight. If intensity needs to be increased, consider other techniques such as slowing the movement.
- Keep shoulders in retracted position throughout lift to emphasize the lats.
- Ensure to adjust machine where required to ensure pads support positioning on the machine. If feet are unable to be placed evenly on the floor, adjust with a step-up bench or barbell plate or two.
- In both the lat pulldown and chin-ups, the long head of the triceps muscle is used to pull the upper arm towards the body’s centre line. Triceps injuries can occur during these lifts so ensure sufficient warm up and triceps stretching.
- Maintaining core stability and ensuring training posture is observed reduces the possibility for lumbar spine strain or injury.
The following table provides information on the major muscles, variations and equipment options.
| Major muscles | Variations/progressions | Equipment options |
|---|---|---|
|
Latissimus dorsi Trapezius Rhomboids Posterior deltoid Biceps Erector spinae (if using back flexion/extension) |
Hands neutral grip Hands supinated/pronated grip Vary grip width With back flexion/extension |
Machine |
Key coaching points and steps
- Sit facing the machine, feet resting on the footpad and the torso bent forward.
- Sit far back enough so that knees remain slightly bent/'soft'.
- Adopt training posture, chin, shoulders, core with eyes and head looking straight ahead.
- From the hip, till the entire upper body back in a straight line (as one solid unit) a few degrees.
- Inhale and bring the handle to the base of the sternum by straightening back and pulling elbows back as far as possible.
- Actively pull shoulder blades together with each pull.
- Never round back with heavy weights.
- Exhale and control the weight moving away from your body (avoid being pulled by the weight).
- Review training posture and adjust where required before the next repetition.
Note:
- A rounded back typically implies too heavy a weight, so reduce the weight, and regain correct and safe training posture. If greater intensity is needed, consider the FITT principles; one adaptation would be slowing the speed of the movement to increase the intensity of the exercise.
- Allowing the weight to pull you back at the end of the movement risks smaller muscles taking the strain of a large weight.

The following table provides information on the major muscles, variations and equipment options.
| Major muscles | Variations/progressions | Equipment options |
|---|---|---|
|
Latissimus dorsi Trapezius Posterior deltoid Bicep |
Vary pull angle |
Dumbbell |
Key coaching points and steps
- Using a gym bench, position on foot flat on the floor with ankle, knee, and hip joint in one line.
- Place the other leg, bent on the bench with the knee directly under the hip.
- Place hand on the bench with wrist, elbow, and shoulder in line.
- Grasp a dumbbell with the palm facing in (medially); using the opposite hand and knee on the bench to support the back and maintain posture.
- Adopt training posture, chin tuck (neck alignment), core, flat back.
- Inhale and lift the upper arm and elbow in a controlled movement as high as possible next to the body with the elbow bent. Keep back flat and abdominals contracted.
- Avoid swaying or twisting of the torso for a greater 'pull' and aim to keep posture fixed and steady.
- Exhale at end of movement.
- Review training posture and adjust where required before the next repetition.
Note: Rotating the torso at the end of the movement, can on some occasions, be performed but it is important to highlight that this is an advance movement and comes with safety risks so not advised for beginner exercisers or those with weaker core muscles. Proficiency in this movement pattern is required prior to introducing advanced techniques (as with all exercises).

The following table provides information on the major muscles, variations and equipment options.
| Major muscles | Variations/progressions | Equipment options |
|---|---|---|
|
Latissimus dorsi Trapezius Rhomboids Posterior deltoid Bicep |
Supinated or pronated grip Dumbbells for single arm isolation Vary grip width Angle of torso at different angles |
Dumbbells Barbells Bands T-bar |
Key coaching points and steps
- Stand with legs slightly bent, grasping the bar with an overhand grip and the hands wider than shoulder-width.
- Keep back straight, lean forward at 45° (so the bar is level with the top of the knee). Stick your bum back (sit into the movement similar to a partial squat) to get in the right position. However, ensure this does not knock out your core posture.
- Inhale and pull the barbell to stomach following the line of the thighs in a controlled, smooth movement.
- Exhale and return to the initial starting position, controlling the weight in line with gravity.
- Review training posture and adjust where required before the next repetition.
The following table provides information on the major muscles, variations and equipment options.
| Major muscles | Variations/progressions | Equipment options |
|---|---|---|
|
Trapezius (upper fibres) Deltoid Bicep |
Wide grip (uses deltoids more) Close grip (uses traps more) |
Dumbbells Barbells Plates Band Cable |
Key coaching points and steps
- Stand with legs slightly apart, keeping the back straight and grasping the bar or barbell with an overhand grip. For standard close grip have tips of thumbs from each hand touching.
- Adopt training posture.
- Inhale and pull the barbell up along the front of the body to chin (lower if needed) in a smooth and controlled movement, raising the elbows as high as possible.
- Always keep elbows higher than wrists and avoid excessive flexing of the wrists to prevent wrist pain.
- Do not rock your upper body excessively.
- Exhale and lower bar, controlling the weight in line with gravity.
- Review training posture and adjust where required before the next repetition.
The following table provides information on the major muscles, variations, and equipment options.
- Dumbbell rear deltoid raise/fly
- Cable rear deltoid raise/fly
- Machine rear deltoid raise/fly
| Major muscles | Variations/progressions | Equipment options |
|---|---|---|
|
Posterior (rear) deltoid Trapezius (lower fibres) Rhomboids Rotator Cuff muscles |
Seated Standing Machine Cables Bands |
Seated Standing Machine Cables Bands |
Key coaching points and steps
Adopt training posture and review prior to every repetition.
Seated
- Sit bent over at 45° with dumbbell under legs.
- Keep core activated, shoulders back and down, and a straight torso.
- Inhale and extend arms out to sides parallel with the ground. Ensure elbows are soft and do not come above shoulders.
- Exhale and lower the arms back towards the floor, returning to starting position.
Standing
- On two feet, move glutes back/sit into the position.
- Keep back straight or arched, bent over at the hips approximately 45°.
- Inhale and extend arms out to sides till parallel. Ensure elbows are soft and do not come above shoulders.
- Exhale and lower the arms back towards the floor, returning to starting position.
Machine
- Sit on seat, feet flat on the floor with arms parallel to ground out in front of you.
- Inhale and extend arms rearward through full range of motion. Maintain posture and soft elbows.
- Exhale and control the movement of the machine, leave a small gap between plates prior to the next repetition. That is, do not let the plates touch (or crash) until the set is over.
Cables
- Grab cable handles in each hand, cross hands (cables crossed) below, and in front of you.
- With an activated core and straight back, tilt the torso at a 45° angle (tilting from the hips).
- Inhale and straighten arms out to the side.
- Exhale and control the return of the weight with gravity.
You will encounter other exercises as your career progresses and as technologies change and information evolves.
Education is not the filling of a bucket but the lighting of a fire.William Butler Yeats
Exhausted? As you can see there are many different upper body exercises to improve your own wellbeing as well as that of your clients. What exercises you choose will depend on the characteristics and needs of the client and the equipment and resources you have access to at work. In this topic, you learnt how to perform and teach clients 18 specific exercises listed in the following table:
| Bench press | Pec deck | Lat pulldown |
| Machine bench press | Overhead/shoulder press | Seated row |
| Chest press | Front raise | One-arm row |
| Push-ups | Lateral raise | Bent over row |
| Pec flys | Shrugs | Upright row |
| Cable crossover flies | Pullups/chin-ups | Rear deltoid raises |